Showing posts with label BLOGGER TOOLS. Show all posts

How to Grow a Blog into a Profitable Company

Well growing a successful blog that will rank among the worlds best blogs can be a challenge more especially when you choose a very much competitive niche. I have come across a lot of challenges in my blogging in such that I was more even ready to quit but I really believed that Ajaxsurf will one day grow into being a giant.


There are many bloggers that get into blogging in the name of online revenue and most blogs that are started with that purpose are very less likely to survive competition as they lack a true motive. Blogging should be done as a hobby and as a business in order to be done successfully.

The question I have received from most of the Ajaxsurf fans is how did I get the confident to start a blog and what made me believe that my blog was going to stand out from the huge blogging crowd that contains millions of blogs around the world and my answer is simply hardwork and dedication because when I started things were not as easy as many have thought because my blog lacked content

Content
Content is the best thing that makes a site to be get famous, the content of the site matters the most of the readers will land to your site because of the content that they are looking for.
I know most of you are asking how will one get enough content for publishing, and believe me when I say it is very simple because as new blogger, I spent most of my free time writing articles instead of watching TV and by doing that the readership of Ajaxsurf has grown significantly to an amazing 30,000 daily visits and more 100,000 which is a big improvement that I can achieve as a professional blogger.So keep those articles coming and see the magic and the growth your site will get.


Must Read: Benefits of having a professional blog design

SEO(Search Engine Optimisation)
I believe most bloggers are familiar with Search Engine Optimisation(SEO) as it has been the best when it comes to the terms of improving a new site. Even though content might be the best part of a blog but SEO still remains as one of the most important parts of blogging because its creates a very much visible presence.

Without a proper optimisation, it is very less likely that your blog can be noticed in the internet because the internet very much depends on search engines and without any proper optimisation, your site will hardly make it through despite the content it has.

Dedication
Looking at well known bloggers like Pete Cashmore, you will notice the hard contribution they had put to bring the best quality blogs. Working hard to produce quality materials and posts has been a challenge for me recently until I started to set myself a publishing schedule to improve the quality of my posting. you cannot overcome your blog competition unless you dedicate yourself into blogging because there are so many blogs out there and competition is getting tougher everyday.

I will recommend bloggers to work smart in order to outrun the blog competition

Its Not Only About The Money
Thats is the biggest mistake that many bloggers make out there, they start blogging with the purpose of making some easy cash which will result in their blogs failing to survive as they may lack traffic or interest. I make a lot of money from blogging and trading the currency market but that has not stopped me from wanting to increase my networth or revenue and to speak the truth I am not driven by money but I just want to achieve a lot more in life. I have been blogging for money and instead I have lost a lot until I started blogging professionally without being driven by greed or anything related.

Blogging should be done with the purpose of increasing the readership and the value of the blog and trust me your blog will grow into being a giant. Its that easy, Just forget the crap you see all over the internet about blogging and start blogging the smart way and you will notice some great growth in your blog.

How to Add a Floating Christmas Widget on Blogger


Christmas is around the corner and it is best that we develop a widget that will enable you to give your blog readers a warm Christmas welcome which will show how much welcomed are they in your blog. We have created this simple awesome floating Christmas widget for blogspot users and which I believe will work also on other blogging platforms as I created this widget using HTML which is acceptable in most blogging platforms and websites.


Widget Blog Installation

Installing this widget is very simple but to respect those that are new into blogging I will will show the steps that should be followed to successfully install this widget on their blogs.


  • Step 1 - Log into Blogger Dashboard and  select the blog you want to install the Christmas widget
  • Step 2 - Go Layout and select Add Widget on your blog layout page.
  • Step 3 - A window will pop up on your screen and in that window you will have to select JavaScript/HTML.
     
  • Step 4 - Upon selecting the JavaScript/html tab a window will open and you will have to paste the code below and save your widget.


<style>
#floatingbyAjaxsurf {position:fixed;bottom:10px;right:10px;z-index:999;}
#floatingbyAjaxsurf img {background:white;border:1px solid #ddd;padding:4px;width:100px;}
</style>
<div id="floatingbyAjaxsurf">
<img src="http://38.media.tumblr.com/2433f2f591186ac5aae8c891f60ba4ac/tumblr_mu04mbVocO1r9vyoko1_500.gif"/>
</div>

Editing The Widget

You might want to edit your widget in a way that suites your blog design then probably thats very simple as all you will have to do is to to follow the guide that is given below.


  • Widget backgroud

    You can alter the background of the widget simply by adding any colour of your choice, you don't need to hastle about which colour html code you will have to use as you will only be required to use real colour names such as blue,red, green etc.  You will only have to change the colour name.

    background:white;border:1px solid #ddd;padding:4px
  • Widget Width

    The current width used on the image is 100px which you can also alter on a way that suites you but I will recommend that you don't change it.
     
  • Widget Image

    I have decided to use a Christmas image with this link http://38.media.tumblr.com/2433f2f591186ac5aae8c891f60ba4ac/tumblr_mu04mbVocO1r9vyoko1_500.gif  but you can use the image of your choice depending on your choice of image or season, maybe Easter, Halloween and other holidays because this does not make this widget strictly for Christmas but you can adjust it by having your own image. 
Conclusion
well that is it, wish you the best blogging experience ever and the best blogging experience. suppose you face any difficulties with installing the the widget please feel free to let me know by leaving your comments in the box below.

How to Add Your Blog Sitelinks to Search Engines


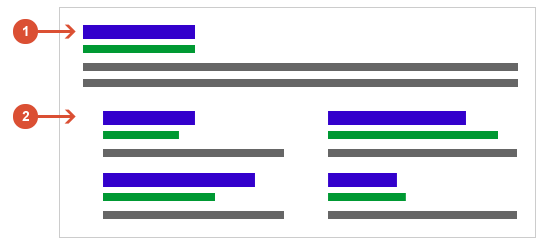
Having your the Sitelinks of your blogger blog or wordpress site listed on search engines can really increase the search traffic  of your blog by a high margin which will totally overcome your competition making your blog to appear the most in most keyword Related searches as your blog will appear like this on the Google home page with the links of your best blog posts appearing right under the meta-description of your site.
On the Image represented below is the appearance of how your blog will appear with the sitelinks showing on the search engine.


1 : The Normal Meta-description of your site in the normal way it appears on search engines.

2 : The Links which will be under the meta-description, these links will help push the other sites down the search engine.


Maybe you might have seen them in the sites you follow on search engines as they appear in a very beautiful way which definately attract the user into clicking on the links provided on your site as it makes your site unique compared to the sites appearing on the search engines.
Site links are probably internal links that are are chosen as the best to represent your site as they are the links that new visitors will click on to access your if it shows on the search results. The installation of these links will make it easier for the blog readers to quickly navigate to the sites most important posts on the blog.

Reduces the Bounce rate of the Blog
The bounce rate is greatly reduced by these links because sitelinks create a platform where readers get to trust yoursite simply because it is not every site that get links on the search results but only a few are given according to the amount of traffic they get.

Higher visibility of Links
There is a higher visibilty of important links which will make it easier for your blog readers to easily buy products right from the search engine page, these links can be customized on the Google webmasters page.

Definately make the competitors sites go down the results
Sitelinks are very well known for making Sites appear more on the front page compared to competition pages on the first page of the search engine.

Increases Alexa rank
For you to have sitelinks on your site, the very first thing that you need to add is an xml sitemap which can be added on your blog through this tutorial and in some blogs it might have been automatically created by blogger for you, to see if your blog sitemap is setted up please copy this code below and paste it in your browser 


Example.com/sitemap.xml


Replace Example.com with your blog url and press enter to open the sitemap.
If a sitemap with links is not showing then you will have to add it manually at .
Once you have added the sitemap please try again on the webmaster tools and if it happens that your blog is not showing then you will have to check your blog search visibilty but as much as I am concerned every blogger blog created should have a sitemap.

The Second most important thing that you must have is a Google Webmaster tools account  which you will use to create the sitelinks for your blog, setting up an account is easy as you will have to go to Google Webmaster tools  and submit your blog and an verify it from there but if you used the same email account as on blogger then automatically your site will be verified. Now click on the site and go to sitemaps and from there you will have to submit your sitemap which is like this ...
If you have done the things mentioned above you will have to go to the tutorial below.

How to Add blogger Sub-headings or Site links on Google Search Engine

As mentioned in the above paragraph to get the sitelinks on your Blog is very easy as you as the blogger does not need to create any links but instead the Google search engine will automatically create the sitelinks for your site without you having to show any efforts.

SiteLinks are not customized by humans but they are customized and Updated by Search Bots which means you will just have to add some inputs that will improve your blog Search Appearance. which will include things like:

• Get a professional domain
• Post Regularly
• Increase your site content
• Create Meta tags

Once you have applied all the mentioned thing then you will have to wait for a week or two because it doesn't happen automatically but it will eventually take some time.

How To Insure Successful Blog Monetization

Many Bloggers out there start blogs with a belief of making an income and they normally End up not making any income at all and we have made it Possible by compiling an ebook that will give you a very much better guide on how you could make money online. In the past years I have been able to make over $12000 USD per month from my blogs and I am sharing this knowledge to give you a glimpse of my Secrets to my Blogging Success.


"Making money online is very simple and it doesn't require a lot of hardwork but proper knowledge about blog monetisation."


Learn how to start your own online business for less than $100. If you're tired of the 9-to-5 and working toward someone else's dream, take charge of your life and start monetizing your passions. This book contains all the resources and instruction to get your business up and running in less than one weekend. Get yourself a copy today and make an impact in your Blogging career.

Amazon Best Seller : How to Live Your Passion Through Online Businesses


Buy now


Many Bloggers around the world have been asking my secrets to online monetization and well today I am sharing with my secret in this awesome ebook. The normal price is $25 and due to this promotion we will be selling up to 5000 thousand copies for this week and on till 27 September 2015 .


Google Adsense Ad Code Converter

Having to invert an Adsense JavaScript code to an html code cannot be done simply by using your mind but would require a tool that will avoid any errors.


HTML codes have a great handling for codes containing symbols like < and > compared to other coding formats. That is the reason we have shared this widget to help our readers easily embed any codes from 3rd party servers to their blogs without having to face any errors.

This amazing code converting tool which we have designed for bloggers will not only be restricted to Adsense but will also cater for other Ad codes from advertising networks like chitika, AdBrite and any other network that you may use on your site. If you are also having trouble with embedding a Facebook Page widget then this html converter tool will work for you great results.
Code Converter for Blogs and Websites


Adsense Code Converter Form


The Benefits of Having a Professional Blog Design

Running a professional site has  Much bigger advantages that will boost the effectiveness of your site making it easier for you as an administrator to run campaigns that will help improve user engagement in your Blog because that is the main vision of any blogger.

 Professional Blog Design


If you are really serious about blogging and really interested in making real profits from your blog then you got to change the way you do things and get professional, Bloggers waste a lot of time blogging the wrong way which is why they don't get any profits out of it, Blogging should be all about business and maintaining a good relationship with readers because nobody would want to invest in a blog that is not producing any good results and that is the reason I wrote this post to help you know if your blog template is worth it.

Improves Reader trust

Reader trust is the first most important thing that everyblogger needs in their blogs because it will ensure consistent traffic and sales as more readers will trust your blog. The more profwssional your blog template is the better, will the readers want to read more of your blog.
Free Blog Templates are not recommended for blogs that are looking for potential growth but instead bloggers should use professional templates so that readers can trust your blog.

If it happens that you have a Template and wish to Remove and attribution and locked credit links please feel free to visit our services page and we will assist your for a gift of $5 .

Easily highlights your services and expertise

Your Professional template plays a very big role in the success of your blog because it will easily outline the best produce of your site. It is very easy for readers to know the quality of the site services as they had a chance to see the already been attracted by the quality of the site template.
The more professional is your site template, the more seriously the readers are going to trust the quality of your services. The same is with a free blogger template, nobody will take your services seriously unless you find a way to impress your readers.

Helps increase the number of sales on your site.

Well when it come selling affiliate products and your own products or services, then a professional blog template is a must have, to help improve sales because professional templates easily will easy outline your services and product making readers to take action.

Has the most widest browser compatibility

When it come to responsiveness, man it is a must for any Blog because errors in a blog template can really be a disturbance and barrier to the website growth. Professional blog template designs will help your blog be easily accessible from different user platforms and browsers, making it easier for readers to buy your products and services.

Reduces maintenance

If your template or site is giving you any bugs then I will recommend that you delete your former template and get a professional one instead, because seriously nobody will want to have any relations with a poorly managed site. I myself have not done very well with my blog recently as I have changed my Themes recently and that made some of readers to complain about how poorly I managed my site and this made me to find a very much professional way in which I will host it and keep my readers feeling at home.

You get increased search engine visibility

SEO is the most important part in running a professional blog because it ensures that your products will be sold and it also gives insurance to more readers and clients who will have interest in doing business with your site. A blog is not just a place where you just post just for the fun of doing but a blog is something very much more than a journal but it is about business.


How To Auto Update Template Credits in Blogger

Having to put credit Links and dates on Blog footer  is quite easy and can be updated manually by accessing your Template source code but there is a much better way That will help getting the job done for you with ease. The template footer credits plays a very big role on a blog template as they help make your blog look very much more professional as it will have special attributes that will help boost the trust of the blog reader.


The use of a footer credit will not only improve reader trust in your blog but will also create an awareness of the blog content ownership. When it comes to Blogging, there are many content thieves out there that steal blog content by using the copy paste method whereby they will simply copy content from the targeted blog page and they will paste it on their own blog page, This type of action is known as plagarism.


So if you really want to created an awareness for your blog content you will have to use a credit with an updated blog name because we bloggers rename our blogs more often depending on the changes we do to them, which may be a change in niche or any other change to improve the blog but it happens that the old name of the Blog on the Footer will remain unchanged making you blog to look out of order. In this tutorial I will show you how to auto update the Blog Trademark or Credit, and on how to auto update the blog date to the current one with the use of Javascript.


• Log into Blogger Dashboard and go to template and select Edit HTML to open the Template Source code


•  Once you are on the template code press 'CTRL' and 'F' Keys to open the search box.


• Search for the Text on Your Footer which is The date and Blog name seperately.

The date for most blogs is 2013, 2014 or any other date. Replace the date showing on your blog template footer with this automatic updating code.


<script
type='text/
javascript'>document.
write(new Date
().getFullYear());</script>


• Once your Have updated the Template date you can save your Template to see if your Template was updated.

• For most new templates the footer has the new update code but I will share for those using codes that are not yet updated. To get the new update for the Blog name in the footer you should look for the name that is showing after or before the © sign  and Replace it with this code and save:


<data:blog.title/>™


• The Last thing to do is to check the link in your template which will be before the <data:blog.title/>™ code, The link should be Replaced with this code


<a expr:href=' data:blog. homepageUrl'>


• At the end of the customizations your code should look in this way depending on the Template used


<a expr:href=' data:blog. homepageUrl'> <data:blog.title/>™ </a> © <script type='text/javascript'>document.write(new Date().getFullYear());</script>


The Output will be as follows


Ajaxsurf™ © 2015


its that simple :-)


This is one of the best ways to make your Blog an optimized blog by getting updated footer credits for your blogspot blog. Have any questions? please feel free to ask us and we will really love to help you.

10 Simple Steps to Build a Solid Business Plan for a Blog[Infographic]

Running a successful online business or a Blog will require you a lot of contribution and hardwork which will be much dedicated in keeping the Site working the way it should to keep it above the search results giving it an exposure to more visits and possible sales.
Most businesses need to be built on a solid plan which will keep them running above failure as it is very true that is not every business that would make it but only those built on a solid plan. Blogging is not just a hobbie but it is more of a business because running a blog successfully does require a lot of contribution.
Below is a infographic that will guide on how to create a solid business plan for a small business or a blog.

I hope you have loved this post on how to create a solid plan for an online business and if it happens that you have any questions related to this post please share them with us on the comments box below.

Search Engine Optimization Tips for Bloggers


As we are moving into 2016, Search Engine Optimization(SEO) has become the most important part of Blogging. Despite the increase in the number of Blogs on the internet SEO has played a very vital role in helping webpages rank well in the search engines.

In the past months Google and the other search engines have been improving their search services as they had brought into place many Algorithms which had caused the downfall of many sites and blogs on the internet, this damage had caused many sites on the internet to lose a lot of traffic and revenue which has lead to a great fall of websites on the internet.
Search Engine Optimization is divided into two parts which is the off-page optimization and the on-page optimization and within those optimizations is White hat SEO and Black hat SEO which will be discussed Below in good detail.

On-Page and Off-page SEO techniques

On-Page SEO
This type of Search Engine Optimization procedure widely has to do with the optimization of the post content, images, graphics html content and internal linking which strictly focuses on making the page rank better on its own.

Off-Page SEO
Off-page SEO deals with optimization procedures that are not done in a web page but deals with backlinks and linking to external pages that the site is linked to. This type of optimization is done once on the template file whereby the blogger will have to install some meta tags and meta descriptions which will fully Identify a site to the search engines.

White Hat and Black hat SEO

SEO has become the major topic discussed these days as many sites have been looking for ways to rank better on Search Engines by using Search Engine Optimization as a technique to help boost their sites. Due to so much competition on the internet some sites have introduced internet spam which could be used for boosting their sites better then other sites with having to manipulate the Search bots and spiders which led  search engines into introducing algorithms which were designed to end web spam.

White Hat SEO
White hat SEO is the use of optimization procedures to help a web page rank well without having to manipulate or violate the search engine's terms, this optimization requires a lot to of work to keep your web page on top of the net.

Black Hat SEO
Black hat SEO is almost done by everybody even though you were not intended to do it but it happens, bloggers do a lot of this SEO mistake but some get to do it on purpose by buying links from link parties only with the hope of ranking better on the search and while other bloggers use too many keywords on their blog posts which will eventually lead to keyword stuffing which is intended to manipulate the search engines.
This type of SEO works good only if you know how to fly below the radar level without being noticed by the search engines

Search Engine Optimization tips for Bloggers


Write more often
In one of our recent posts on How to increase the crawl rate of a blog we shared that the crawl rate of a blog is very much affected by how much often a site gets to be updated with new data, Search Engine bots are not interested in the blogger but they are interested very much in fetching data and getting it indexed on the index. Search Engines will absolutely cause the most updated sites to rank much better compared to sites that are not updated as they may happen to be abandoned sites.
Must Read: How to Create Evergreen Content on Blogger/Wordpress

Link to others sites and do internal linking
Linking to other sites online has been one of the secrets behind the optimization of some big sites like Mashable, Techcrunch and other media giants in getting to rank better on the search results. Linking is a very good strategy for ensuring some good ranking points from the search engines and I will motivate any blogger to use it as an advantage.
Another common type of linking is simple inbound links which includes external links pointing to your site which come from sources such as Social media sites, niche related blogs and news websites. This type of links plays a very great role in improving the quality of a domain rank both on Alexa, Moz and Search Engines. The best well known ways to  get backlinks are guest blogging, linking to other blogs, commenting on do follow blogs and listing blog to directories such as Alltop and Dmoz.

Improve The content quality of Blog posts
Quality is better than quantity as they say, the quality of a single blog post plays a very great role in representing the blog on the search engines because search engines use quality as an important ranking factor to rank site properly according to their post quality.
The minimum number of words required for a post to rank on the search engines  is confirmed to be 300 words but the most content should have at least 500 words to rank well. Try to keep your posts to at least 500 words plus.

Use Social media on your Blog
Social media makes things happen on blogger as many blogs online have been implementing social media widgets to make the sharing of blog posts easier which will boost you post into being seen by more audience online. The more visits that a site would get from social media the better will be the rank of that site.

Make a Special use of Keywords
Keywords are words that you use on your blog posts to help your site rank well on the internet for certain searches. Keywords are very important but it is advised that they should be used to certain extend to avoid stuffing as it may cause it to drop from it ranks in the search engines.

Write optimized post titles
Your Posts titles must be very descriptive and should be at most 60 characters in order to fully fit on the search results. Using very descriptive titles will help your blog posts rank better for certain keywords on Google.
Google uses a the click through rate of a post to rank it on the front page which means the more readers click on your post from the search results the better will the post rank on Google, Bing and other search engines.

Create meta tags
Meta tags are used to introduce the site to the search engines, meta tags will simplify and help search bots define your site the way you would like the most. It is mostly recommended that you should use keywords that define your blog most on the search on the meta tags.
Recommended: How to Add meta tags to Blogger

Reduce the site bounce rate
The bounce rate of a site is a measurement of how many visitors get to visit a single page from the search engine and then bounce back to the search results after finding.

Optimize Images
Optimize your blog images for better results by giving them Titles with keywords which are very useful in the image search. The best well known way to optimize images is by adding Alt and Title tags.

Must Read: Automatically Add Alt and Title tags to blogger images

The best way to help a site rank well in the search engines is non other than the tips mentioned in the above post. Suppose you got any questions concerning this topic let us know in the comment box below.

Best Proven Ways To Turn Facebook Fans into Blog Promoters

Facebook is currently the best network that bloggers can use to promote blog content as it has been the best leading blog promotion advantages.
Does your blog have a social media presence and yet lacks the traffic you want then this tutorial will be the guide to using facebook fans, friends or followers  to get your blog traffic running above the stakes.

Facebook has been the major marketing strategy for many sites on the internet by bringing in quality traffic and sales, big blogs like Mashable and Techcruch have got most of their traffic from social media more particularly Facebook and Twitter which are the current leading social media sites which shows a great growth potential for sites that have been able to market their sites. Facebook has been expanding itself to webmasters by producing widgets that can be embedded on blogs to bring about the best user experience that allows readers to easily share on facebook.
With social media being on top of the ladder whereby Facebook has been the second most used site after Google there is a great potential for your site to do well on social media. With looking at Mashable only it is noted that the site gets most of its traffic from social media .

How to turn Facebook fans into blog promoters
Turning your Facebook fans into blog promoters is nothing hard at all as it is only a matter of will and skill.
Recently some blogger mentioned that creating many facebook pages on one name will boost the blog which I would say that it indeed sounded promising but yet not true at all because it was never tested and secondly merging multiple pages will not increase the blog followers as because Facebook is smart they can easily see duplicate likes and they are counted as a single like so it wont work.
Facebook is currently the best social marketing site on the web with Billions of daily active users that on can get a stake of.

• The first thing that you have to do is to open a Page that will be based on your blog and get it updated daily with whats happening on your blog which will inlude updates and advertising offers that are being offered by the blog,
This how it works, The more they share your posts the more are the chances that your followers friends will get involved with your blog whereby they will start following your blog. It is simple you just have to keep you facebook page updated frequently to improve your blog and the readers will do the rest.

• As a blogger you probably Should have a Facebook account, but if it happens that you do not have one the I would motivate that you register your account at the Facebook home page and get to invite new friends from the options that are given by Facebook.
Once your account is fully setup and running then you will have to invite your friends into liking your page and if it happens that you dont have enough likes then ask your friends to invite their friends only and you will see a very great improvement on your site. There are also some sites that one can use to increase the Facebook page likes.

• Add Facebook share buttons on your blog posts and sidebars to increase social interactions on your your blog which will ensure more page likes. Also on Ajaxsurf we have have made social media the most important part of getting our blog content to as many readers as we could get from facebook and other social networks.
Social media is taking the world by storm and the only way to get something out of it is by getting involved in it.

Blogging Advise from Techcrunch founder Michael Arrington

Techcruch is a multi-millionaire Technology Blog with more than 9 million monthly visitors, which started as a one man blog ran by Michael Arrington into being a leading blog in it niche.

Today we I will be sharing with you Michael Arrington success secrets into successful blogging which had made made Techcruch a leader in Tech news.

Make a follow up on Niche Related Rumours - following up on rumours will really help you to create a solid background for your blog and mostly upon that you have to respect your blog sources. The best way to get a hold of the common rumours is by getting involved with famous people on your niche will improve your blog as they will consider sharing stories with your blog and most importantly respect what they may require you in exchange.

Have a Proper Sleep as a Blogger - Most Bloggers tend to sleep a very short time which is not healthy for their bodies as improper sleep will really cause a lack of concentration which will negatively affect the way a blogger works causing him not to post some posts at the best potential. Michael Arrington believes that bloggers should sleep for atleast 8 hours because he was once Admitted by his doctor due to a lack of sleep whereby the doctor recommended that he should start his day at 9am as he slept very late getting his blog running. But most importantly try to keep a healthy 8 hour sleep and don't "Die" because of blogging.

Post on your Blog regularly - Posting on your blog is simply the best way to get your blog running and active as it will boost the reader activity of your blog. This will not boost only the reader activity but will ensure a good alexa rank for your blog or website which will help boost the public authority of your blog making it a huge success.

Michael Arrington says the reward of posting regularly is to get the blog readers into commenting on your site which will boost the way in which your blog readers will be working on your site. This skill was also used by Pete Cashmore the founder of Mashable to make his site a masterpeace as it is valued at $300 million.

Must Read : Mashable Success Secrets

You will have Enemies online - In business there is always a potential for having enemies that would try to bring you down, Michael Arrington  has been having public enemies who would probably try to bring down your blog as they may fear that you are taking their blog readers but that should not stop you because you don't really need them and with or without them you can become a successful blogger.

Upon receiving his threats he mentioned that at a certain public conference somebody spat on his face which made him not to blog for about a month until he evantually went back into blogging. So you got to know that enemies are always there.

It hard to be a player and a coach - The greatest difficulty that  Michael Arrington has struggled with is playing two roles which is both blogging and coaching, I will highly agree with him because it comes out naturally, and learning to master both skills will require a skill.

Develop good relationships with bloggers you like - Blogger and wordpress are currently the biggest platforms that are used by many professional bloggers which shows that there are many potential bloggers and bad bloggers. Choosing a blogger that fully understand the operation of your blog will really help improve your blog, because spamers are not just on spam websites but also on blogger there is a great number of spamers. Michael Arrington has made it clearly that he does not want to have any relationships with spamers.

Having an interview with Michael Arrington has been very great for us as Ajaxsurf, please feel free to ask us some questions in the comment box below.

How to Customize or Edit Blogger Mobile Templates

After the mobile armegeddon which was known as the "Mobilegeddon" there has been a huge demand for high quality mobile Templates excluding blogger and Wordpress because the users are given an option to choose from a range of mobile templates. But upon looking at those facts we have found a great deal of websites that offer customizations for the traditional Blogger templates with very easy to use customization tools which has probably attracted thousands of bloggers into signing up for free and professional accounts to get their own blogger hosted mobile blogs into  stylish mobile themes.


Blogger itself has a variety of mobile template styles which as well can be work very well with any mobile device as they are made to respond very well to different screen Sizes in which I would really congratulate blogger for such great customizations.

To get your blogger mobile Template to work in a way that suites you does not need you to make any monthly payments on any other service or network as I am going to show you the changes that you should apply your blog Template code and If you are not really familiar with editing the Blogger HTML code then you will have to visit our Blogger Services page and we will simply do it for you.

How To Customise Blogger Mobile Template

I know that some online companies will hate me for this post but I am sure they will move on, Blogger is a free service and they shouldn't make bloggers to pay any monthly payments to keep their mobile themes running.

The Blogger mobile Template is fixed in this order as shown Below.


  • Header
  • Blog
  • Pagelist
  •  Adsense
  • Profile
  • Atrribution

To view the codes of these widget you will have to go to your blog Dashboard>>>Template>>>Edit html.
Within the Template html you can control the appearance of these widgets, by using a couple of attributes which will control how these widgets apear on your blog. These attributes are divided into three which are:

mobile="no"  Attribute

The mobile=no Attribute will hide/prevent any widget from appearing on your blog, most of the widgets on your blog are prevented by this attribute from appearing on the mobile Template.

mobile="yes" Attribute

The mobile="yes" attribute means that the widget will show both on the desktop version of the site and also on the site mobile version.

mobile="only" Attribute

The mobile="only" attribute will restrict any widget to appearing only on the mobile template, this means that particular widget will not appear on the desktop Version of your site.

Adding the Mobile Attributes to Blogger
Adding these attributes is not hard at all as you just have to open the Template html code and Right on to select Jump to widget and select the widget that you want to edit it properties. In this case I will use the attribution widget as an Example .
The default attribution code is :

<b:widget id='Attribution1' locked='true' title='' type='Attribution'/>

Now from the above code if you want to  hide the widget code from the mobile template you will have to use to add the mobile="no" attribute as shown in the example below.

<b:widget id='Attribution1' locked='true' mobile='no' title='' type='Attribution'/>

To show the widget on both the desktop version and on the mobile version of your blog you will have to to simply add the the mobile="yes" attribute to the code as shown below.

<b:widget id='Attribution1' locked='true' mobile='yes' title='' type='Attribution'/>

And lastly to restrict the widget to the mobile template only you will have to add the mobile="only" attribute which will cause the widget not to appear on the desktop version, adding it is simple you just have to add the attribute as shown below.

<b:widget id='Attribution1' locked='true' mobile='only' title='' type='Attribution'/>


Now  we are done with the showing of widgets on the blogger template which, implement the attributes as instructed and you will see the effectiveness of the blogger mobile template.
Save the Template changes and check your mobile template to see if it suites your blog.
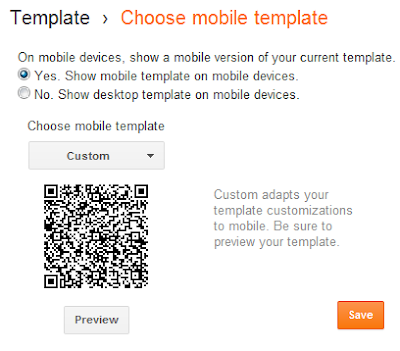
If your blog is not having a mobile Template them probably you have deactivated the mobile template from appearing on your blog, to activate the mobile Template you just have to follow these simple steps.

Step 1 : Go to Blogger Dashboard>>>Template and press on the Gear as shown on the Image below.


Step 2 : This trick works better on The custom Blogger mobile Template, so you will have to choose the custom template as shown below.


It is mostly recommended that you use the custom blogger mobile or Template as it works ver well but if it happens that it is not pleasing you then you may use the Simple, Awesome and the other featured blogger mobile template, they will all work very well with your blog.


How Can Instagram Be Used As A Marketing Tool For a Business?


 A Marketing Tool For a Business


If you pay time browsing through totally different skilled and private profiles on Instagram, you may  notice quickly that every profile encompasses a distinctive temperament or story that it's telling. for instance, you'll instantly see if one user loves cars or another one is concentrated on sports. Your business pictures on Instagram also will share an equivalent story or data regarding your company’s temperament and  company  philosophy.Is your company eco-friendly, targeted on social policy or budget-minded? outline what you wish to precise regarding your company to your users, and make certain that the photographs that you just choose illustrate this.

Use Short Descriptions

Many Instagram users can click on photos that capture their attention, they can browse through the outline that has been written regarding it at the side of the comments that others have announce regarding  it . With this in mind, you will think about getting ready a descriptive, sales-oriented endorsement that highlights mercantilism points or that entices your customers to require action.

Engage Your Audience

Instagram offers you over a unidirectional avenue of communication with customers. you'll encourage your customers to depart comments on your photos regarding their experiences together with your firms, feedback regarding changes they require to visualize and additional. additionally, you'll conjointly produce promotional offers that actively have interaction them which raise them to require specific action. There area unit easy ways in which to supercharge your content promoting efforts through partaking your audience. you need to comprehend them to prove your purpose to your audience.

Reward Followers and Likers

As a final step, you will think about satisfying your followers and people UN agency like your photos in several ways in which. for instance, new followers and likers might receive a promo code for a reduction on a web purchase or a coupon for a free item if they visit your brick and mortar location. Rewards encourage active user participation, and that they might even have an infectious agent impact for your promoting campaigns.


If you're finding out a good thanks to boost your promoting power in a very cost-efficient manner, social media promoting may be a fantastic choice. With the recognition of Instagram and its unimaginable reach, you will think about golf stroke Instagram to figure for you before long.


Add Facebook Fan Page widget/plugin to Blogger/blogspot using Shortcode

The New Facebook Page plugin is creating a lot of attention on the internet as many bloggers and webmasters are finding it hard to embed it, The Facebook page widget for Blogger is a new advanced plugin which keeps your blog readers right into your site instead of sending them out to Facebook because Facebook is a very addictive site I believe nobody would like to lose readers to it.
In this post I will share a short tutorial that will give you a simple way in which the page widget can be embedded to Blogger.

NB: Please make sure you have added the Shortcode Plugin to your Template

Must Read : Add The Shortcode Plugin to Blogger/Blogspot

Adding Facebook Java script SDK


Add Facebook Fan Page widget/plugin to Blogger/blogspot

Step 1: Go to Blogger dashboard>>>Template>>>Edit Html   to open the template code.

Step 2: on your template search for this code : 

<body>

Step 3: Just below body paste the following code


<div id='fb-root'/>
<script>
//<![CDATA[
(function(d, s, id) {
  var js, fjs = d.getElementsByTagName(s)[0];
  if (d.getElementById(id)) return;
  js = d.createElement(s); js.id = id;
  js.src = "//connect.facebook.net/en_US/sdk.js#xfbml=1&version=v2.3";
  fjs.parentNode.insertBefore(js, fjs);
}(document, 'script', 'facebook-jssdk'));
//]]>
</script>


Adding the Facebook Page widget to Blogger Post/page

Step 1 : On your Blogger dasboard, go to New Post/Page

Step 2 : Change your settings from Compose to HTML .

Step 3 : Paste this Facebook shortcode on the empty page


[facebook src="ajaxsurf" width="500" height="400" hide-cover="true" posts="true"/]

Step 4 : Press Publish and view your Facebook page widget in your blogspot blog.

Adding Facebook shortcode on Blogger sidebar

Step 1: Go to Blogger dashboard>>>Layout>>>Add Widget>>>Javascript/Html

Step 2: Paste the shortcode on the empty box and add the title you want for the Widget.

[facebook src="ajaxsurf" width="500" height="400" hide-cover="true" posts="true"/]

Step 3: Press Save to publish the widget to blogger.


And once you are done then the Facebook page plugin will show on your blog  and to adjust it the way that suites you, you will have to make  these changes.
All-in-One Social Widget for below posts on Blogger

All-in-One Social Widget for below posts on Blogger

The importance of transportation quality traffic from Social Media to your journal can’t be underestimated. we've developed a stimulating new all-in-one social gadget which might be put in to look below posts on a Blogger.

Personally, I feel that adding a social subscription/sharing gadget below the post is more practical than one on the sidebar because it falls within the flow of reading. once a scaner reads your journal post and is interested enough to read it through the top, it's quite liekly that he can use the one-click sharing buttons gift within the final AIO Social gadget we tend to square measure introducing. Also, this may assist you with our goals of meeting this 9 purpose listing – by creating it a hassle-free method for your readers to share your content.

I case you're curious why i'm not exploitation this gadget on Bloggeriser, I’m already testing its performance on Droidiser and can create a move to final AIO Social gadget pretty presently.


Before you choose whether or not to put in or to not install this gadget on your journal, cross-check this screenshot and also the live demo of the gadget.


The various options of this convenience, as ought to be evident from the Demo and also the screenshot:
•Light weight Social follow icons
•Large email subscription box
•Facebook Like box
•Google and Follow box
•Five one-click social sharing buttons


Let’s begin with the installation half. Follow the below guide step by step to induce this stunning convenience up and running on your diaryger blog.

  1. Sign in to your Blogger account and click the Template button.
  2. Then select Edit HTML and click anywhere in the code editor that appears. Now, press Ctrl. + F and look for the <data:post.body> tag.
  3. In most templates, the number of the tags you searched above will be more than one. Repeat the steps below for every <data:post.body> tag that you encounter till the widget works as expected.
  4. Just below the <data:post.body> tag, add the code below:


    <!--Ultimate All-in-one Social Widget Blogger by Ajaxsurf--> <;style> .dsgbox { background: #fff; border: 1px solid #ddd; height: 355px; margin: 10px auto; padding: 10px; width: 650px; -webkit-border-radius: 10px; border-radius: 10px; } .dsgsubscribe { border: 1px solid #D3D3D3; padding: 8px; width: 340px; height:172px;-webkit-transition: all 0.5s ease-in-out; -moz-transition: all 0.5s ease-in-out; -ms-transition: all 0.5s ease-in-out; -o-transition: all 0.5s ease-in-out; transition: all 0.5s ease-in-out; } .dsgsubscribe:hover { -moz-box-shadow: inset 1px 1px 20px 1px rgbaundefined91,148,253, 1); -webkit-box-shadow: inset 1px 1px 20px 1px rgbaundefined91,148,253, 1); box-shadow: inset 1px 1px 10px 1px rgbaundefined91,148,253, 1, 1); }.dsgmailbox { border: 1px solid #D3D3D3; -webkit-border-radius: 4px; border-radius: 4px; -moz-box-shadow: 1px 1px 1px 1px rgbaundefined255, 172, 84, 0.4) inset; -webkit-box-shadow: 1px 1px 1px 1px rgbaundefined0, 0, 0, 0.4) inset; box-shadow: 1px 1px 1px 1px rgbaundefined0, 0, 0, 0.4) inset; color: #666; font: 14px &quot;trebuchet ms&quot;, sans-serif; padding: 7px 15px; width: 160px; -webkit-transition: all 0.5s ease-in-out; -moz-transition: all 0.5s ease-in-out; -ms-transition: all 0.5s ease-in-out; -o-transition: all 0.5s ease-in-out; transition: all 0.5s ease-in-out; } .dsgmailbox:hover { -webkit-box-shadow: none; box-shadow: none; -webkit-transition: all 0.5s ease-in-out; -moz-transition: all 0.5s ease-in-out; -ms-transition: all 0.5s ease-in-out; -o-transition: all 0.5s ease-in-out; transition: all 0.5s ease-in-out; } .dsgsubmit { font: bold 18px Segoe UI,RobotoTahoma, Geneva, sans-serif; font-style: normal; color: #ffffff; background: #5b94fd; border: 1px dashed #ffffff; border-radius: 10px 10px 10px 10px; padding: 4px 15px; cursor: pointer; margin: 0 auto; } .dsgsubmit:active, .dsgsubmit:hover { cursor: pointer; color:#5b94fd;border: 1px dashed #fff;background:#000;position: relative; top: 1px; } .dsgsubmit::-moz-focus-inner { border: 0; padding: 0; margin: 0; } .dsgsharebox { border: 1px solid #D3D3D3; margin: -157px 0 0 350px; padding: 8px; height:130px;width: 273px; -webkit-transition: all 0.5s ease-in-out; -moz-transition: all 0.5s ease-in-out; -ms-transition: all 0.5s ease-in-out; -o-transition: all 0.5s ease-in-out; transition: all 0.5s ease-in-out; } .gplusholder {margin: -157px 0 0 350px;}.dsgsharebox:hover { -moz-box-shadow: 1px 1px 2px #CCC inset; -webkit-box-shadow: inset 1px 1px 20px 1px rgbaundefined91,148,253, 1); box-shadow: inset 1px 1px 20px 1px rgbaundefined91,148,253, 1); -webkit-transition: all 0.5s ease-in-out; -moz-transition: all 0.5s ease-in-out; -ms-transition: all 0.5s ease-in-out; -o-transition: all 0.5s ease-in-out; transition: all 0.5s ease-in-out; }</style> <div class="dsgbox"> <div class="dsgsubscribe"> <div style="color: #666666; font-weight: bold; font: 22px Segoe UI, Roboto, cursive; margin: 0px 0px 10px 15px;"> Loved our tip/guide? Get more of them in your Inbox! </div> <div style="margin: 10px 0 0 6px;"> <form action="http://feedburner.google.com/fb/a/mailverify" class="emailform" method="post" onsubmit="window.openundefined'http://feedburner.google.com/fb/a/mailverify?uri=YOUR_ACCOUNT', 'popupwindow', 'scrollbars=yes,width=550,height=520');return true" style="margin: 0pt;" target="popupwindow"> <input name="uri" type="hidden" value="YOUR_ACCOUNT"/> <input name="loc" type="hidden" value="en_US"/> <input class="dsgmailbox" name="email" onblur="if undefinedthis.value == &quot;&quot;) {this.value = &quot;Enter your email...&quot;;}" onfocus="if undefinedthis.value == &quot;Enter your email...&quot;) {this.value = &quot;&quot;}" type="text" value="Enter your email..."/> <input alt="" class="dsgsubmit" title="" type="submit" value="Subscribe"/> </form> </div> <div style="border: none; color: #666666; font: 19px Segoe UI, Roboto; margin: 25px 0 0 5px;"> Follow us on: </div> <div style="margin: -32px 0 0 120px;"> <a href="https://www.facebook.com/YOUR_ACCOUNT" target="_blank" title="Join us on Facebook"><img alt="facebook" src="https:https://blogger.googleusercontent.com/img/b/R29vZ2xl/AVvXsEi033NcLyrZfkwHDAXAjWiBJNK_nw_rsFI5RgOTmUg0MZntuaeMU6YBMR8zpbsfUrbE_48lwQxgAwQC-CtgBcxBV39B9t41LZzMhBZ0EZ0ps5BuhYNmp2oXYRibu-qFtrfZoUTP2VWo5Mw/s32/facebook500.png style=&quot;border: 0px; padding:2px;&quot;"/></a> <a href="https://www.twitter.com/YOUR_ACCOUNT" rel="nofollow" target="_blank" title="Follow us on Twitter"><img alt="twitter" src="https:https://blogger.googleusercontent.com/img/b/R29vZ2xl/AVvXsEhBsIctreFDLxo_24zla_gfXm7isJ3CHww7wyU1gz4LPHX1v8Bk8qVsKYvPURusJ89agEpgA8QZcnRse7ErlQDuICi6ob-1T2vB2zbRa7GmTOfck-H31DzCX-YdftoLhe08iPGXz-sqvLo/s32/twitter.png" style="border: 0px; padding: 2px;"/></a> <a href="https://plus.google.com/+YOUR_ACCOUNT" rel="nofollow" target="_blank" title="Follow us on Google+"><img alt="gplus" src="https:https://blogger.googleusercontent.com/img/b/R29vZ2xl/AVvXsEhLzediv8XwFOGRHiNrsoxHVqdpKAQMuiHEBOlIbYIAgqD2v57SPFVxqFNiToMZuH5lhQ2ylY3dM6bVT5rIc4w2fNhkFRtBZMakNAqA9lqm2uKlNB018IcuT3c4u0fVQdNKhLkdnA9zL_g/s32/googleplus-revised.png" style="border: 0px; padding: 2px;"/></a> <a href="http://pinterest.com/YOUR_ACCOUNT" rel="nofollow" target="_blank" title="Follow us on Pinterest"><img alt="pinterest" src="https:https://blogger.googleusercontent.com/img/b/R29vZ2xl/AVvXsEgi5vQ0hZJ24eOGcQSC-tO0N3RA01tuEVLpLPf6-SXYPEtYybkTFqIgrdeK3mS14-X3wMUJJDozbUHnx6xfcGmep0JLopgVkIJTAHME6du1abomqGAOLLnzV33Db1chr1C4kKSuLqQk5Lk/s32/pinterest.png" style="border: 0px; padding: 2px;"/></a> <a href="http://www.YOUR_ACCOUNT.com/feeds/posts/default?alt=rss" rel="nofollow" target="_blank" title="Subscribe to RSS"><img alt="rss" src="https:https://blogger.googleusercontent.com/img/b/R29vZ2xl/AVvXsEg_rpwS6VxkDb8zqCAZRqlYAiNolH57svETPut-RcardGfqx_7yp-ZS_MzSmLNu44MwuLVFpRbSFPTe9zDUzBVaivgrtJGm66clvwHXAzORVNmVHdVFoKjt5WD15vRYpOIJrjMhZSzBYyI/s32/rss.png" style="border: 0px; padding: 2px;"/></a> </div> </div> <div class="dsgsharebox"> <script type="text/javascript"> var switchTo5x = true; </script> <script src="//s7.addthis.com/js/300/addthis_widget.js" type="text/javascript"></script> <br/> <div style="margin: -15px 5px;"> <a class="addthis_button_facebook_like" fb:like:layout="button_count"> </a> </div> <div style="float: right; margin: -15px -5px 0 0;"> <a class="addthis_button_stumbleupon_badge"> </a> </div> <div class="addthis_toolbox addthis_default_style " style="margin: 16px 0 10px 98px;"> <a class="addthis_button_google_plusone" g:plusone:size="inline"> </a> </div> <div style="margin: 5px 5px;"> <a class="addthis_button_tweet"> </a> </div> <div style="float: right; margin: -30px -60px 0 0;"> <a class="addthis_button_pinterest_pinit" pi:pinit:layout="horizontal"></a> </div> </div> <div style="margin-top: 35px;"> <iframe allowtransparency="true" frameborder="0" scrolling="no" src="http://www.facebook.com/plugins/likebox.php?href=http%3A%2F%2Fwww.facebook.com%2FYOUR_ACCOUNT&amp;width=340&amp;colorscheme=light&amp; show_faces=true&amp;stream=false&amp;header=false&amp;height=170" style="border: none; height: 160px; overflow: hidden; width: 340px;"> </iframe> </div> <div class='gplusholder'> <div class='g-person' data-href='https://plus.google.com/YOUR_ACCOUNT' data-layout='landscape' data-showcoverphoto='false' data-showtagline='false' data-width='225'> </div> </div> </div> <!--Ultimate All-in-one Social Widget Blogger by Ajaxsurf-->


  5. In the code that you {just} just affixed, search for each instance of YOUR_ACCOUNT and replace it along with your social media accounts/blog computer address/ url feed. If you have got confusion regarding any of them, let American state apprehend within the comments section.
  6. Press Save template and go to any single post page of yours.
  7. If the widget doesn’t appear, delete all the code you pasted (it starts and ends with an HTML comment to help you remove it later on) and try steps 4-6 till you find the right <data:post.body> tag.
I have adjusted the margins within the sharing buttons on dsgsharebox category to regulate to my web log. If the 5 buttons don’t seem aligned just like the method they're meant to, attempt being silly with the margin values. things like this inspire Maine to advocate you to travel ahead and learn the fundamental markup language and CSS languages, so you'll edit and perceive basic codes.


If you choose to share this convenience together with your readers, please provides a link to the current original article. Also, be happy to share this text together with your blogger friends victimisation the social sharing buttons gift on this page.