Showing posts with label BLOGGER TRICKS. Show all posts

How to Remove No Comments Text Blogger Posts

How to Remove No Comments Text Blogger Posts

The comment box of blogger can be customised in a way that suites you, in this tutorial I will show you how to remove "No Comments" on Blogger because we have noticed that some readers want to comment but they do not want to be the first ones to comment, so this trick is very much likely to improve reader commenting on your blog thus giving a boost on the number of Page views your site gets just by the comment box.

Removing the no comments text on Blogger is very simply with this tutorial, because you don't need a lot of work but just a deletion of the no comments text code.


  • Step 1 : Log into Blogger Dashboard
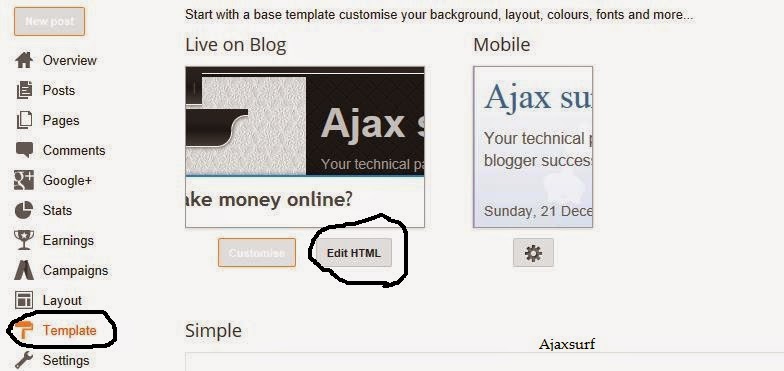
  • Step 2 : Go to Template and Select Edit Html  to edit your template code.

  • Step 3 : Press the "CTRL" + "F" keys to open the search box and search for this code

<span class='post-comment-link'>

  • Step 4 :  Now delete the entire span code which looks like this-

<span class='post-comment-link'>
   <b:if cond='data:blog.pageType != "item"'>  <!-- if the page is NOT an itempage, display the link -->
      <b:if cond='data:post.allowComments'>   <!-- if the post allows comment to be made, display the link -->
         <a class='comment-link' expr:href='data:post.addCommentUrl' expr:onclick='data:post.addCommentOnclick'>
            <b:if cond='data:post.numComments == 1'>1 <data:top.commentLabel/>
            <b:else/><data:post.numComments/> <data:top.commentLabelPlural/>
            </b:if>
         </a>
      </b:if>
   </b:if>
</span>

  • Step 5: Save your template to see the changes in your blog


If you liked this widget please let us know in the comment box below and we will be happy to help you with Anything you may require towards this tutorial.

Add The Shortcode Plugin to Blogger/Blogspot

 The Shortcode Plugin to Blogger/Blogspot

Shortcode is now on blogger which has been designed STC Network to allow bloggers to install widgets  easily using the shortcode plugin instead of using long junk codes, this plugin can be easily installed on Wordpress than in Blogger. In Wordpress this plugin is restricted only to the post content which has made it not much really used. This widget seemed to work very well in Blogger as it is not restricted but works everywhere on your blog including the comment box, post content , header, footbar and side bar, on Blogger this widget works really fine.

What is the Blogger Shortcode?

I am quite sure that most bloggers are not familiar with the term shortcode, A shortcode is a macro-code that gives instructions to show widgets. The Shortcode Plugin allows bloggers to have any type of widgets on their blogs easily installed, through the shortcode plugin you can easily install the Facebook plugin, Youtube channel,


Installing the Shortcode Plugin to Blogger/Blogspot


NB : Backup your template before making any changes

Step 1: Go to Blogger dashoard >>> Template >>> Edit HTML

Step 2: On your template source code find the following code.

<body/>

Step 3: Just above <body/> paste the following code.

<!-- Blogger Shortcode Plugin Dynamic JS File -->
<script src='http://downloads.mybloggertricks.com/shortcodes.js' type='text/javascript'></script>

Step 4: Search for this code.

<head>

Step 5: Just below it paste the following code to istall the updated CSS files on your templates which will make this plugin to work very well.


<script src='http://ajax.googleapis.com/ajax/libs/jquery/1/jquery.min.js' type='text/javascript'></script>
<link href='http://maxcdn.bootstrapcdn.com/font-awesome/4.3.0/css/font-awesome.min.css' rel='stylesheet'/>
<link href='http://fonts.googleapis.com/css?family=Oswald' rel='stylesheet' type='text/css'/>


Step 6: Save your template and your blog will be ready for shorcodes.

Possible Mistakes that Should be  Avoided when using shortcode

• Avoid using UPPERCASE and camelCASE because the plugin only works with lowercase .
• Dont Add spaces between Shortcode names and square brackets.
• Spaces are only allow to be used between attributes and square brackets should be used between attributes  i.e     [tag attribute="[Some value]"] 

Conclusion

The shortcode is simply an easier way introduced by My Blogger Tricks in which you can improve a blogspot blog by using simple short codes instead of Long complicated codes, If you have questions towards the Blogger Shortcode plugin please feel free to ask us at the comments box.

Add Whatsapp Share Button to Blogger/Blogspot

The Whatsapp Sharing button is now available on blogger giving you a chance to get traffic from Whatsapp, the most amazing part about this trick is that the readers can share  your post content directly to their trusted contacts and also to the whatsapp groups which will expose your Blog to quite a larger audience.
whatsapp share to blogger


This widget will only show in Android and IOS mobile , But in a couple of weeks we will be presenting a this widget for all mobile phones, If your target mobile audience is the Andriod mobile users then this widget will work very well for you.


Preview


Adding the Whatsapp Share Widget to Blogger

Step 1
Log into your blog dashboard

Step 2
Select Template and Select Edit Html  to open your template code .

 Edit Html


Step 3
Press the CTRL + "F" keys to open the Search box and search for this code :

  </body>

Step 4

Just above this code Paste this code .


<script type="text/javascript">if(typeof wabtn4fg==="undefined"){wabtn4fg=1;h=document.head||document.getElementsByTagName("head")[0],s=document.createElement("script");s.type="text/javascript";s.src="http://techwar24.googlecode.com/svn/whatsapp-button.js";h.appendChild(s);}</script>                        


•  Step 5

Save your Template

Step 6

Now go to Layout and Select Add Gadget and go to  HTML/
JavaScript paste one of these three codes  depending on the size that you want.


Small


 <a href="whatsapp://send" data-text="Take a look at this awesome website:" data-href="" class="wa_btn wa_btn_s" style="display:none">Share</a>


Medium


<a href="whatsapp://send" data-text="Take a look at this awesome website:" data-href="" class="wa_btn wa_btn_m" style="display:none">Share</a>             

Large


<a href="whatsapp://send" data-text="Take a look at this awesome website:" data-href="" class="wa_btn wa_btn_l" style="display:none">Share</a>

 • Step 7

Save your widget and you are done


Conclusion

This sharing widget is simply the best and we are looking forward to bring you more customisations  to this widget, so stay in touch with us and we will keep you amazed, please feel to leave your comments below and we would like to hear what you got to say.


Custom Background Title Trick For Blogger With Keywords

Custom blogger title tricks


It has been a battle of Keyword rich domains on the internet but getting that super domain to help your site rank better on Search Engines is mostly likely to be not available, but today I have decided to share this great trick that will allow you to change the appearance of your blog to search Engines without affecting the appearance of your blog title in search engines.


Basically your site is most likely to appear as seen below which bring you less search traffic.


But after this trick your custom background blog title will include keywords which will cause your Blog to rank better on Search engines.


The simple steps below I will show you this trich which will require you to edit your blog template html code


Must see : How to Add Meta tags on Blogger


  • Step 1

    Log in to Blogger dashboard and Select the Blog you want to customise
  • Step 2

    Select Template and select Edit html to edit you blog template code
  • Step 3

    Left click anywhere on your template text and press the 'CTRL' + 'F'  keys on your keyboard to open your search box .
  • Step 4

    Paste this code to your search box and press enter to search .
<title><data:blog.pageTitle/></title>

  • Step 5

    Replace with this code.
<title>Blogtitle | Keywords seperated, by ,a ,comma </title>
Step 6

  1. Replace Blogtitle with the the title of your blog
  2. Replace Keywords seperated, by ,a ,comma  with the keywords of your choice
  3. Save your template 


It might take some time for changes to occur maybe a day or two and you will start getting the traffic from the title keywords but you can also check if the title keyword tool has been optimised correctly using this meta tag Analyser. if you have any questions or improvements to this tutorial please feel free to share them with us.

3 Critical Blogging Mistakes That Every Blogger Must Avoid

You’d be amazed at how many people are making mistakes with their blog. Not just any mistakes either. These are big time no-no’s that are derailing even the most passionate, success driven bloggers. And the worst part? They actually think these mistakes are good things. And on the surface, they appear to be. But upon closer inspection, they are recipes for disaster.
Let’s take a look:

Common Mistakes made by blogger newbies


#1 – Keep it professional.

This is a mistake that mostly comes from people who used to be in the corporate world but have now taken up blogging. I mean hey, being professional with your blog is good right?

Well, there’s the professional way of dealing with customers, like following through on promises, being courteous and over-delivering. But with blogging you need to let your hair down and get up close and personal. That means being transparent about your life, any stories from your past that might help the reader with their own struggles, and speaking
to them as a friend, with empathy, compassion and grit.

Must read : Common Mistakes made by blogger newbies

You’ve probably heard that customers buy from those they know, like, and trust. Well it’s never been more true than with your blog. Maybe being in sales in my former life was an advantage after all. Since I had to go in person to make sales calls, all I knew was to be myself. ..warts and all.


#2 – Stay serious.

Hey you’re only human. Maybe you deal with serious problems like losing weight, broken
marriages, or debilitating diseases. Your blog readers are human too, and they
don’t want you to be a downer. Most people read blogs for entertainment, for escape and
for some stress relief. If you keep it on the lighter side they will come back for more.
Plus, you never know what humor might go viral, which can be a game changer for your
blog overnight.


#3 – Content is king.

This one is cunning. It’s a master of deception, because it looks good on paper. Heck, it’s practically a cliché. Plant lots of content on the internet. Harvest dollars in your bank account, right? Well, yes and no. Content is one thing, knowing how to translate that content into profit is a whole other animal. People have a voracious appetite for juicy content, but there’s a right way and a wrong way to disseminate it to a waiting world. It takes a little secret sauce.

Happy Blogging

Automatically add ALT and Title tags to Blogger Images

We as writers forget to add title ALT and the Title tags on Blogger post images and that may cause our blogs to loose traffic which is probably a bad thing. Google bots and spiders hate images because they have difficulty reading them but with using the ALT and Title tags on Blogger and wordpress makes it easier for search engines to read through images.

Automatically add ALT and Title tags to Blogger Images


Below I have provided a couple of steps that will help guide you into adding the code which will create automatic Title tags on your blog.


How to Automatically add ALT and Title tags to Blogger Images 
  • Step 1

    Log in to Blogger Dashboard and Select the blog you want to Edit
  • Step 2

    Go to Template and Select Edit HTML as shown Below


  • Step 3

    Left Click anywhere on the Template code and press the 'CTRL' +  'F' keys on your keyboard to open the search box
  • Step 4

    Paste this on the Search box and press enter to serach
</body>
  • Step 5


    Just above </body>  paste this code
 <scriptsrc='http://ajax.googleapis.com/ajax/libs/jquery/1.7.2/jquery.min.js' type='text/javascript'/> <script type='text/javascript'> //<![CDATA[$(document).ready(function() {$('img').each(function(){ var $img = $(this); var filename = $img.attr('src')$img.attr('title', filename.substring((filename.lastIndexOf('/'))+1, filename.lastIndexOf('.')));$img.attr('alt', filename.substring((filename.lastIndexOf('/'))+1, filename.lastIndexOf('.'))); }); });//]]> </script

  • Step 6

    Save your template

Well if you have completed these six steps then probably your blog images have automatic title tags, please feel free to share your thoughts in the comments section.