Showing posts with label ZZ - needs 2017 theme review. Show all posts

Removing the label values from the blog-post header or footer

This article explains how to stop label values from showing in the header or footer lines for each post in a blog that is made with Google's Blogger.


If you have used the Labels / Page-gadget approach to putting your blogposts into separate pages, then each of your posts will have one or more Labels attached to them.

Most Blogger templates are set up so that these label values are shown with the posts, too, in either just underneath the post-title or in the post-footer. And when a reader clicks one of these post-specific label values, they are shown a "post-listing format" blog page, which includes (the first part of) all posts which have that label.

However some people want to stop their blogs from displaying this these label values perhaps because:
  • They want their blog to look more like a real website
  • They are using some labels which are meaningful to them as administrators but not to readers (eg at the moment, I'm using a label "ZZZ - needs 2013 review" to identify posts that I need to check to make sure they're up to date.
  • They just don't like having the label list shown for each post.

Note that you can select which Label values are shown in the Label gadget, but there is no way to do this in the label list shown for each post.


How to turn off the list of labels shown with each blog-post


Log in to the Blogger dashboard with an account that has administrative rights to the blog


Choose Layout from the options for the blog


Locate the Blog Post gadget in layout screen, and click the Edit link for it.


In the list of options that is shown, un-tick the Labels option


Save the changes, using the Save button (currently in the bottom left corner)


Click the Save Arrangement button for the layout (currently in the top right corner of the layout editor).


Job done! The next time anyone looks at your blog, the list of labels for each post should not be visible.


Troubleshooting

Sometimes, changes that are made in the Blog Post gadget don't appear to have been applied when people look at your blog. For example, the labels may still be shown for each post, even though the Labels check-box is turned off.

If this happens, the most likely cause is that your post template (ref: parts of a blogger blog) has become corrupt. The only ways I know to fix this are to either
  • Change to a different template:
    This needs to be a total change, eg Simple to Picture Window, not just changing from one to another option within the same template.
  • Resetting the blog-post gadget - described in detail here.

The disadvantage of of either of these approaches is that customizations you have made to your blog are lost - this can be easy to forget when your customizations include important-but-more-subtle things like ensuring your Analytics profile gets Adsense data or installing Facebook Open-Graph tags - or just plain annoying if you have put sharing buttons into individual posts, and have to re-instate these


Related Articles:

What are the components of a Blogger blog

How to put posts into pages in blogger

Labels: a way to categorize Blogger posts

Posts and Pages - navigating while you are reading a blog

Making a blog look like a real website

AdWords external keywords research tool is going to be retired

This quick article shares an observation about the likelihood that Google's free Keywords Research Tool is being turned off.


Most SEO advice says that if SEO is important for your blog, then you should use a keyword research tool to find out the words and phrases that people are actually searching for, and then use these words (so-called "keywords") a lot, because they are most likely to get more visitors for your blog.

There are many tools that can be used to look for keywords, but Google's own keywords research tool is often recommended:  it's free, and no one knows more about key-words than Google does.

The tool is provided as part of the AdWords product (ref AdSense vs AdWords what's the difference).

Usually, you need to sign in to an AdWords account to use their tools.   An AdWords account may be based on your usual Google account, but because it can be used to buy advertising, Google ask you to put a small amount of money into it, so you can use it to pay for advertising campaigns immediately.    (They don't charge you immediately, they just want your account to have a positive balance, so it's able to be used.)

However their Search-based Keywords tool (announced back in 2009) and it's upgraded version, the Keywords-tool ( http://www.adwords.google.com/keywordtool or https://adwords.google.com/select/KeywordToolExternal - both which currently re-direct to https://adwords.google.com/o/Targeting/Explorer?__c=1000000000&__u=1000000000&ideaRequestType=KEYWORD_IDEAS ) have been available without logging in, provided you complete a simple captcha-text .

Today, though, I've noticed this announcement at the top of the page:
In the coming months, the external Keyword Tool will no longer be available. To get keyword ideas, sign in to your AdWords account and try Keyword Planner.

I cannot see any announcements about this in the AdWords blog.   But this actually has very little information about the keywords tool anyway, most of what is there dates from 2008/09, and they haven't used "keyword" as a label for their posts.  

Google aren't in the habit of putting up notices like that which are wrong, so my guess is that, sooner or later, this tool is going to be removed, and their only keywords-research option will be the Keyword Planner, which isn't free .

So maybe it's time to start finding a new favourite free keyword research tool.   Some reviews to get started with:

Or maybe bloggers should just forget about keyword research, and focus SEO-basics, and then on writing good quality, natural-language, unique content.


Related Articles


AdSense vs AdWords what's the difference

 Five reasons why SEO is irrelevant for your blog

Getting started with SEO for Blogger users

How to re-direct an old custom domain - and all its posts - to a new one

This article describes options for making link to a blog's old URL automatically point to the blog's new URL after a custom domain change.


If you have a blog made with Blogger which has a custom domain, then it's easy enough to switch this blog to use a different domain. Doing this moves both the content (posts and pages) and template (layout, structure, colour-scheme).

Often when people make this type of change, they want to set up re-directs so that if anyone clicks an external link to the old custom domain, they are re-directed to the same content on the new domain.
For example, www.old-domain.com/current-Page.html should redirect to www.new-domain.com/current-page.html.)

With many other website building tools, the .htaccess file for the site lets you set up re-directs like this. But things are little different when you use Blogger.


Your Blogspot address VS your custom domain

Your blog always has a blogspot addresss - let's call it: www.yourBlog.blogspot.com

When you publish to a custom domain, Blogger automatically handles the re-direction from www.yourBlog.blogspot.com to www.yourCustomdomain.com for you. This works at all levels, so the home page and every individual post/page are all redirected correctly.

To move your blog from from www.yourCustomDomain.com to www.newCustomDomain.com, you simply tell Blogger to
  1. Stop publishing your blog to www.oldCustomDomain.com and then to
  2. Start publishing it to www.newCustomDomain.com

(See Switching your blog to a different custom domain for more information about this.)

Once you have done this (and afer a little bit of transition time), Blogger handles the re-direction from www.yourBlog.blogspot.com to www.newCustomdomain.com for you - as before, this works at all levels, so the home page and every individual post/page are redirected correctly.

One point that many people mis-understand, is that after you have done this, there is no connection between Blogger and your old custom domain. You have various options (listed below) for what to do with www.oldCustomDomain.com - and you aren't limited to the features that Blogger offers. The only limits are based on what your domain registrar allows, and what tools you can (learn to) use.


Options for re-directing your old custom domain

Option 1: Registrar re-direction

Once you have stopped publishing your blog to www.yourCustomDomain.com, Blogger has no connection with it at all.

How you manage re-directions from it is totally up to the tools provided by the domain registrar. The simplest approach is to set up a "301 redirect" on the domain, which simply sends all traffic to it to another domain of your choice.

The method for setting this up depends on the tools used by your domain registrar - search their help files for terms like "301 redirect" to find out what is possible with tools.

See Using a custom domain for something other than your blog for advice about accessing your domain registrar account for the domain.

Advantages

  • This is the easiest approach, and doesn't require you to make a website of any type.
  • Visitors are automatically re-directed.

Disadvantages

  • Depending on how the registrar's tools work, visitors may be automatically redirected to your new home page, not the the post that they specifically followed a link to.


Option 2: Another website tool

If you know how to use another website development tool that does provide access to the .htaccess file for the site, then you could make a "site" that just contains page-and-post level redirections for all your existing posts and pages.

Advantages

  • This approach sends people to the exact content that they followed a link to.

Disadvantages

  • It could be tedious setting this up for every post and page, if you have a lot of them at the time when you change domains.
  • You need to choose and learn a very different type of website building tool to do this.


Option 3: use Blogger to make a site-level re-direction message

Make a totally new blog (eg    www.myBlogHasMoved.blogspot.com),

Publish it to your old custom domain

Give it one post that says
"www.oldCustomDomain.com has moved to www.newCustomDomain.com please update your links"

Use the Settings > Search preferences > Errors and redirections > Custom Redirect Custom Page Not Found  option to explain that your blog has moved, and send any traffic to that one post.

Advantages

  • This is a simple approach, using tools that you already know.
  • It will work forever (because blogspot domains don't expire).

Disadvantages

  • Visitors will not be automatically redirected: the best you can do is show a link which goes to a selected post or page in your blog, which the visitor needs to click to go to the blog.
  • The re-direction link is only to one specific page, not to the exact content that was linked to iniitially.  This is quite different from what many people want to achieve - blogger simply does not have that functionality.


A non-option: Blogger's custom redirect tool


Blogger has a function under Settings > Search preferences > Errors and redirections > Custom Redirects  that lets you set up custom redirects for individual pages.

However this isn't suitable when you change your custom-domain totally, because it only supports re-direction within the same blog, not to an external URL.

(And anyway, if you have a significant number of posts, it would not be practical.)


Other options

Have you found any other ways around this? Or any good tool for setting up .htaccess redirects on a domain that you used to use for a blog?  Share your experience in the comments area below.


Related Articles:

Using a custom domain for something other than your blog

Linking your blog and your website.

How to make a real website using Blogger

Switching your blog to a different custom domain

SEO Basics for Bloggers

Introducing Maps Engine Lite - a better tool for customizing maps

This article is an introduction to Google's Maps Engine Lite, which is a tool for creating custom maps.


What is Google Maps Engine Lite

In late March 2013, Google announced a beta (ie late-stage test) of Maps Engine Lite - and now it is available from the main Google Maps interface, without the word "beta" in sight.

This is a web application to let you "Create powerful custom maps", and it has more features than the current  "My Maps" custom-map editor in Google Maps, which I've used until now to put certain maps into one of my blogs.

You can access it at: https://mapsengine.google.com/

Once you have signed in to a Google account, you can either view/edit an existing map that you have make with Maps Engine Lite or which has been shared with you in MEL, or create a new one.


How to create a custom map using Maps Engine Lite

Click on the New Map button from the front screen, or the New map link from the manage-files folder (top left side of the screen).

Use the arrow beside Base Map to choose the style that you want applied: this covers both what is shown, and the colour scheme. At the moment the options are:
  • Map (ie ordinary - like regular Google maps)
  • Satellite
  • Terrain
  • Light Political
  • Mono City
  • Simple Atlas
  • Light Landmass
  • Dark Landmass
  • Whitewater


Add places to the map by:

Drawing them - You add things to the map with the Placemark and line or shape-drawing tools.  These are similar to those for Google Custom Maps, though they're now separate into two items.

or

Importing them - from either CSV/Excel files or you existing Google Custom Maps - see http://support.google.com/mapsengine/?p=lite_addplaces for details about what is possible.


You can separate the map into multiple layers, and you have access to Google Maps regular search feature: search-results are placed on non-permanent "search" layer, and you can select a result, right click on it and Save it to the map you are currently editing.


While editing the map, you have these options
  • Style - lets you choose whether to show individual markers, or a sequence of letters/colours
  • Table - Edit the list of placemarkers and lines - giving each a name or description
  • Labels - lets you choose whether to show marker labels on the map or not - and whether to use the name or description field.


Sharing maps you have made

The map can be shared using the green Share button in the top right corner, via gmail, G+, Facebook, Twitter or anything else which lets you use a link like this:


Putting Custom Maps on your website or blog

In Maps Engine Lite, the "embed on my website" option is available under the Save icon (currently at the top left, with options New map, Open and  Embed).  

However it only works if you have first clicked the green Share button, and set the map-visibility to Public (ie not just "anyone with the link").

This gives you a simple iframe statement like this:
<iframe height="480" src="http://mapsengine.google.com/map/view?mid=zV9FBQ3J7L1o.kzRGlAso0tmU" width="640"></iframe>
You can easily change the size via the height and width options, but there is no zoom level option - and I assume that the centre of the displayed map is represented in the coding  (this doesn't always work so well for Custom Maps - I usually recommend that people use the customization option).

And once you have the code, you can put it into your blog in the same way you would add any other 3rd party HTML.   The code above gives a map like this:


Notice that the map itself tells you that it was made with Maps Engine, and that it says it is for non-commercial use:   commercial users can buy access to a far more powerful version of the Maps Engine.


Advantages and disadvantages of Maps Engine Lite


So far I've only done a quick test, but initial impressions are:

Advantages:

Richer interface than custom maps - you can do more things.

Layers are a particularly good addition - it would be great if individual layers could be turned on/off from embedded version of the map.

Alternative colour scheme - will make it easier to create maps that are more suitable for certain circumstances, eg with a faded background.

Sequential markers - I don't have to use my own set of custom markers any more.

Uses the same base data as regular Google Maps - so the Follow Your World service can be used to get you updates about changes to the image-data.


Disadvantages:

No access to Google Streetview while you are editing the map.

Currently if you choose sequential markers, the labels and colours in the key on the left are not always the same as the ones used inside the map.

No Snap-to-roads option for lines

No custom map markers:  if you import a map from My Maps (aka Google Custom Maps), then any custom markers that you have are retained, and you can choose to use them again, but there is no way to add new custom markers.


What else have you found?


Related Articles:


Creating a Google Custom Map

Adding a Google Custom Map to your blog

Adding 3rd party HTML to your blog

What happens to your blog if your Google account becomes inactive?

This article describes Google's Inactive Account Manager, a new tool that gives you control over what happens to your Google account if you don't log on to it for a period of time.


Ages ago, I read a thought-provoking article on ProBlogger about making a "blogging will". His main aim was to ensure that his family could access his business assets (ie his blogs etc) if something untoward happened to him.

Now, Google's Data Liberation Front have annnounced a new tool called the Inactive Account Manager, which lets Google account owners say what should happen if they ever stop using their account.

This tool lets you decide
  1. If and when your account should be treated as inactive
  2. What happens with your data if it becomes inactive, and
  3. Who else is notified, and what is said to them.

At the moment, it covers these Google tools - which are attached to your Google account:
  • +1s
  • Blogger
  • Contacts and Circles
  • Drive (which I guess means Docs too)
  • Gmail
  • Google+ Profiles, Pages and Streams
  • Picasa Web Albums
  • Google Voice
  • YouTube.

AdSense is a notable exception: I don't know what happens to your outstanding balance and income if your AdSense account becomes inactive.   But I suspect that it might be managed in the same way as a bank account or book royalties - and because each country will have different laws about managing estates and the like, it's not possible to let you "opt-out" in the same way as it is for regular data.


What situations is this for

There are a few scenarios that the IAM ("Inactive Account Manager" is such a mouthful) might be useful for.

Death / Serious illness or injury

The most obvious thing that you could use the IAM to provide for is if you unexpectedly die, or become so sick/injured that you cannot log in any more.

In this case, if your blog and other Google content (eg YouTube videos) is personal, you may or may not want family or friends to access it - and you may or may not want it to be deleted.

But if your blog belongs to an organisation or a business, it's quite a different scenario:   you will almost certainly want someone else to have access.

And if it contains material about a hobby or public interest topic, you may well want to have it transferred to some kind of "data steward" - or you may want your estate to manage it as an asset, if it is profitable.

Losing access to your account

Some people lose access to their Google account because they:
  1. Set them up with an external email address
  2. Lose access to that email address
  3. Forget the Google account password
  4. Cannot remember enough details to regain access via the forgotten-password wizard.
The IAM will only help these people if they have set it up, and if they (or a friend) still has access to the alternative email address they entered.   So it's not a universal cure for this problem, but may help a little.

Losing interest in your account

People's lives and priorities change over time.   The blog that was all-important ten years ago may now be a distant memory.   In this case, if IAM is set up, people will at least get a chance to think about whether they want to maintain what was there, or not

The best approach?

There is no "one right way" to use the IAM to look after your blog when you stop updating it.   It's a very private decision, and depends on what risks you think you want to cover off, and how you are using your Google account.

Personally, I don't think that losing interest or losing access are likely to happen.    So I've set up my IAM information to cover the first case, ie death or incapacity, and used it to send messages to carefully selected friends and relatives.  I could do more, eg include details about selling a couple of blogs that would be "assets" in the right hands, and send messages to the firm who would be looking after my affairs.   But it's a start - and as with so many "death and taxes" type of issues making a start is half the battle.


How to set up your inactive account information


Once you have thought about what sort of situations you want to deal with, then setting up your inactive-account information is pretty easy.

To start with, go to the Account Management option your Google account settings page.   Once you're there, there is an easy set-up wizard, which covers the following points.

Warning that you're in danger of becoming inactive

Google doesn't want your account to suddenly become inactive.   So they collect details are used to warn you by sending a text message to your cellphone and email to an alternative address, saying that your account is close to becoming inactive. The current definition of "close" is one-month. Basically, this is your chance to stop the account becoming inactive by logging in.  

They ask for:
  • A mobile phone number (which needs to be verified - so it must be one that you can access now)
  • An alternative email address (which isn't verified - yet!)

Setting the timeout period

You need to choose how much time needs to go by without you logging in before your account is considered to be inactive. The default is three months, and other options are six, nine and 12 months.

Who else to tell

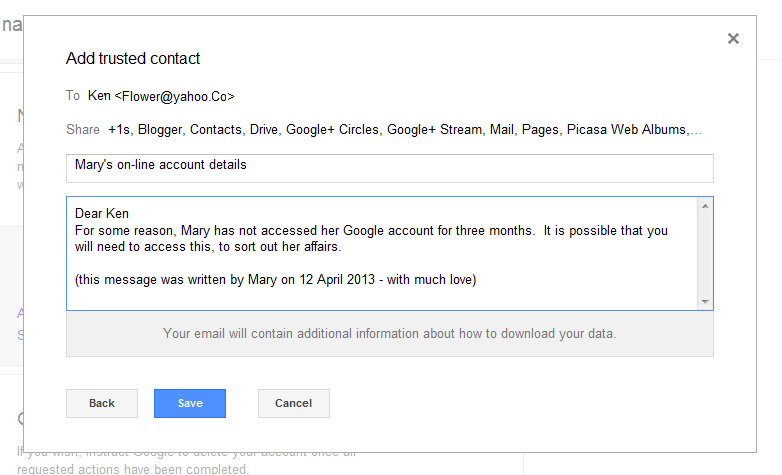
You can nominate one or more trusted contacts - ie email addresses that receive notification, and (if you choose, access to your data), once your account actually becomes inactive.


For each trusted contact, you need to give some message-text and also say which specific Google products they should get access too.


You can also set up an auto-reply to messages to your Gmail account, which is sent in response to all incoming messages after your account becomes inactive - or at most once every 4 days if one account sends you lots of messages.


What happens to your account:

Finally, you choose whether to delete your data once your account is inactive - the default value is "no", but you should change it to "yes" if you want to be sure that your blog etc are removed.


Confirmation

After you have saved your settings, you will get an email confirming that you entered.    (In my case, this message took several days to arrive - possibly because I get up my IAM settings fairly shortly after it had been introduced.   Hopefully it's got quicker now.


Limitations of the IAM

At the moment, IAM lets you set thresholds, notifications and actions for a whole Google account - there is no way to say that some blogs should be kept, and some deleted.

And there are still lots of things that we don't know about how IAM will work in practise.
  • Do you get only one reminder - or one every time you reach the inactive-account threshold again  (ie every 3, 6, 9 or 12 months)?
  • What happens if you're one administrator of a team blog, and your account becomes inactive with instructions to delete it - but there are other member or administrators who are still actively contributing?   (I would hope that the presence of these people means that your "delete" instruction is ignores, at least for the blog.   But I suspect that this won't be an easy scenario to provide for - and it's possible that Google haven't worked through all the options here.

    Ditto other shared resources (YouTube Channels, Shared folder/documents in Drive, etc)?  The dimensions will be different in each product, but the underlying problem is the same.


So while I think that IAM is a great idea, I'm also a little nervous about what problems it could cause if people choose to delete things without thinking through all the consequences.

And if you are going to set it up for your own personal blogs, then maybe now is a good time to transfer ownership of blogs that you made for clubs / societies / organisations / businesses to generic accounts being managed for them.


Related Posts

Understanding Google accounts

Team blogs:  letting other people write to your blog

Transferring blog ownership

Understanding how Blogger and Picasa-web-albums work together

Setting up AdSense for your blog

Introducing Google's tools for measuring how fast your blog loads

This quick-tip describes some tools that I've recently discovered that measure page-load speed and make suggestions about how to improve it.


quick-tips logo
Google have said a number of times that page-load-speed (ie how quickly a visitor to your blog sees it load onto the screen) is one of the factors in SEO.

And even if SEO isn't important to your blog in terms of getting visitors, page-load speed is important for making your visitors happy: even your mother isn't going to be happy if your blog takes five minutes to show her the pictures of your new baby.

So Google's tools for measuring and improving page-load speed are valuable tools for most bloggers.


Where to find them:

The tools are available at https://developers.google.com/speed/pagespeed/

The most important one for Bloggers is in the Analyze section, called Insights, found under the "Analyze your site online" link.

There are other tools there, too (eg an API, the Page-speed service, extensions for certain browsers), but they are well outside what Bloggers need to know.


How to use the Pagespeed tool

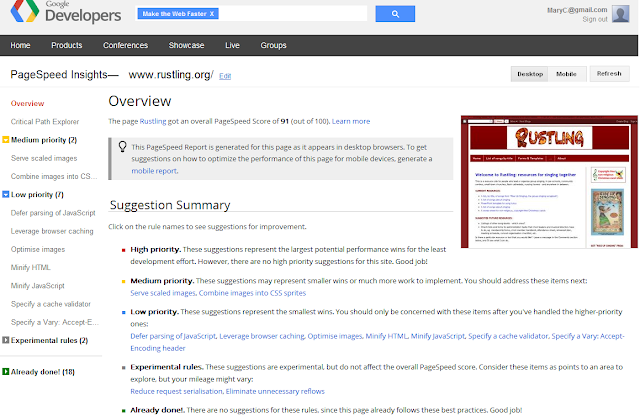
To find out what Google thinks of your blog's page-load speed, simply type your web-address into the box in the middle of the Pagespeed  Insights screen, and click the Analyse button.


In a few moments, the screen refreshes with the results.

At the top of the results, there is your site's score out of 100.

Then there is a list of suggestions, broken down by priority (high, medlium, low) based on their "potential performance wins" (how much difference they make) and amount of "development effort" ie how hard they are to do).


Not all of these suggestions are relevant for Blogger users, because we don't have total control over how our posts are converted into website pages. However ones that are relevant include:
  • Optimize images
  • Serve scaled images,
  • Putting CSS into the document head  (in our case, putting it into the template rather than into individual posts)


If you go into the details of the particular suggestions (using the entries in the left hand sidebar), you can see how much impact they will have, and get information about what  you need to change to implement the suggestion.


Why bother

Given that so many of the suggestions aren't relevant for Blogger why use the tool at all?

One reason is that it gives you a way of looking at the effect of gadgets that you add to your blog:  looking at the page load score before and after adding the gadget shows if it makes much difference to your load time.   Based on this, you may decide to only show certain gadgets on a particular page.