Showing posts with label ZZ - needs 2017 theme review. Show all posts

How to change the date of a photograph in Google Photos

This article shows how to change the date associated with a picture in Google Photos.


Update- August 2015

There is now a feature to change the date of individual pictures or videos in Google Photos.

To use it:

  • Navigate to the picture / video you want to set a new date for
  • Click the "information" icon (small "i" currently near the top-right of the photo viewer screen)
  • In the right hand panel, hover your mouse over the item in Details which has a picture of a calendar beside it.
  • Click on the pen icon which appears while you are hovering
  • Enter the new year, month, date and/or time (in 24-hour clock) for your photo or video.
  • Click Save.
Job Done!   You have now changed the date stored with your image or video.


There are still some photos that you cannot see through Google Photos (eg ones uploaded directly through Blogger with some settings, or shared in Google Hangouts).   For these you need to use the date-editing features in Picasa-web-albums, which are described below.


Original Article

When you open Google Photos by default you see the All Photos tab, which shows every picture in your Google account, sorted by the date on which the picture was taken, with the newest at the top.

This works well for recent photos that were taken with smartphones, and so most likely have the correct date-time attached to them.

But for older photos, that were added to Google in bulk when you finally uploaded them from your camera's memory card, the attached date may not be right.

It's even possible to have some photos with no date attached to them - and it looks like Google Photos, very confusingly, shows a nominal date figure in 2075 for these.

One way to avoid the confusion caused by these wrong dates is just to use the Collections tab to view your pictures, and to put photos with the wrong dates into appropriate collections (aka albums) yourself.

But if you want to keep using the All Photos view, you may want to alter the date for some of your  individual photographs, so they show up in the right order.


How to change the date for a picture in Google Photos

Unfortunately Google Photos doesn't have a feature for doign this (yet).   But you can adjust the date assocaited with with a picture by using Picasa Web Albums - provided you have at least some aspects of a Google+ profile (eg a Google+ Page) associated with your Google account.

Follow these steps:

Go to Picasa Web Albums, using the no-re-direct link: https://picasaweb.google.com/lh/myphotos?noredirect=1

Find the album that the photo(s) you want to change are in

Click on the album - this will open the album, and display each picture in it.

Click on the photo you whose date you want to change.

From the menu bar, choose Actions > Edit on Google+.   This opens the photo in Google+'s photo viewer mode.


Click on the drop-down beside Photo Details in the right hand information bar.


Use the options in the pop-up window to choose the correct date, time and even time-zone.


Click Save


Job Done! If you now look at the picture in Google Photos, you will see if with your newly changed date associated with it.


What if you don't have Google+

If Edit in Google+ is greyed out and cannot be selected, then this means you do not have Google+ associated with your Google account.

 The only work-around for this currently is to share the photo (from Google Photos) with another Google account that does have Google+, and use that to change the date.


Where to get more information


Introducing Google Photos - another tool for managing your photo collection.

Understanding Picasa desktop vs Picasa-web-albums

All about Google accounts

Blogger and Google Photos - what's changed, and what hasn't (yet)

This article gives a brief introduction to Google Photos, and how it relates to both Blogger and Google+ Photos.


Google's recent announcement of Google Photos opens the door for Blogger to make some improvements to how it works with pictures.

Why? Well Google+Photos simply wasn't a way forward.   Too many Blogger users chose not to "upgrade" their Google accounts to Google+ accounts, so it wasn't possible for Blogger to force Google+ features on everyone. And that was even after they removed the rule about one G+ account per person, and allowed Google+ Pages to be turned into stand alone accounts with their own passwords.

However Google Photos is basically Google+ Photos, without the need to have a "plus" account, and with some other nice features, like

  • Free picture and video storage (any number of pictures, provided they aren't "too big"), 
  • Image recognition and search
  • Sorting pictures by date, but giving options for you to group them into albums

Read more about these Google Photos options here.  

This means it will be possible for Google to replace Picasa-web-albums features with Google Photos features at some time in the future, even if they're not ready to do this yet.


What's changed - and what hasn't (yet)?

So far, I haven't noticed any changes to the photo-upload or image-choice features in Blogger.

There's still an upload option, there's still a tab to choose photos from Picasa and one for your phone - and I don't know what the criteria for showing photos in the latter tab is, but it's certainly not listing all the photos I've taken from my phone.


I am expecting they will change to become more Google-Photos-esque, sooner or later.

But for now, though, not that much has changed.

Your Google account still only has one collection of pictures.

Your pictures may be photographs you have taken or other image files that you have created and uploaded (eg like the thumbnail picture that I constructed for this post).

As well as the various mobile phone applications (official ones for iOS and Android, unofficial ones from various other companies), there is now one more (to make six) pieces of desktop software or websites from Google that you can use to manage (aspects of) your picture collection:

Note:   Even though you only have one photo collection, each tool may need to build it's own "index" (or whatever it calls it) to work with your photos.  Making all your photos (especially the historic ones) available in each tool might take a while to do: For example, not all my photos are visible on Drive yet: when I scroll to the bottom of the display I get a message saying "Stay tuned, your older photos are coming soon" - and looking at what is displayed, it's only photos that I have posted from my current smartphone (not the old one) to one particular blog.


And the tools don't all do the same things. In particular, there are features like albums and slideshows are still best done from Picasa (more info here: http://picasageeks.com/2015/05/google-photos-announcementthis-is-big/) - and  Picasa Desktop's photo editing tools are still vastly better.


edits you can do in Picasa dessktop but not on-line
Example of a photo editing effect which is possible in Picasa Desktop, but not in Google Photos


Where to find more information


Use Google Takeout to back up all your blogs at once

This article shows how to use Google's Takeout service to make a copy of the contents of all your blogs at the same time.


A backup is a copy that you can use to restore from if something goes wrong.  For your personal compter, you may have a backup copy of the files on your hard-drive, so that if you lose the machine, you can get the files back, usually with a little work.

In blogging terms, a backup of your blog is a copy that you can use if you accidentally delete a post, or lose control of your blog, or perhaps even a copy of a blog that you have deleted but still want some last-chance access to.

Unfortunately Blogger does not offer a complete solution for backing up our blogs.    Instead, we need to take separate actions to back up our gadget settings, our template when it is being edited, and our post-contents.

You can back up the posts from one content from the Settings > Other > Blog Tools tab.  If you choose the Export Blog link, Blogger makes an xml file containing a copy of your posts and pages, and puts it onto your computer (typically in your Downloads folder), without affecting your blog in any way

This approach is fine if you only have a few blogs.   But if you have several blogs it can get tedious:   for example, for each blog that I run, I also have another one or two private blogs for preparing posts and keeping documentation.

Luckily the Google Take-out service takes the pain away, by backing up all your blogs (and other Google product contents too, if your choose) at the same time.


How to back up using Google Takeout

Log in to your Google account, and go to the Takeout home-page at     www.google.com/settings/takeout

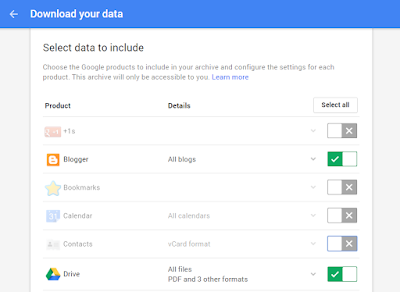
In the Select Data to Include section, make sure that Blogger stays ticked - but turn off the other types of content that you do not want.
  • I usually leave Drive ticked, because a good number of the files on my Google Drive relate to my blog.
  • You may also want to leave Google Photos ticked, if a lot of your pictures relate to your blog.


Click Next (bottom left of the screen - there's a long way to scroll down.)

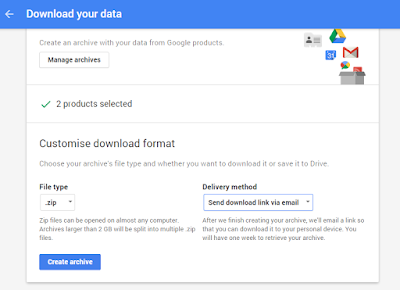
Choose the file type that you want your backup file to be saved in.
  • Currently the options are zip, tbz and tgz.   If you are not sure, and are using a Windows computer, then just leave it on .zip.

Choose how you want to manage the backup file which Takeout makes:
  • If you choose Send download link via email then Google will send you an email message with a link to the file - click on this link, and save the file to your computer etc.  You need to do this within one week of doing the backup, because after that Google delete it.
  • If you choose Add to Drive, then Google will put the the file on your Google Drive, and send you an email to tell you that it's there.  This approach works well, but the szie of the archive file counts towards your storage qoute, and of course it's only useful if you don't lose access to your account.


Click Create Archive.
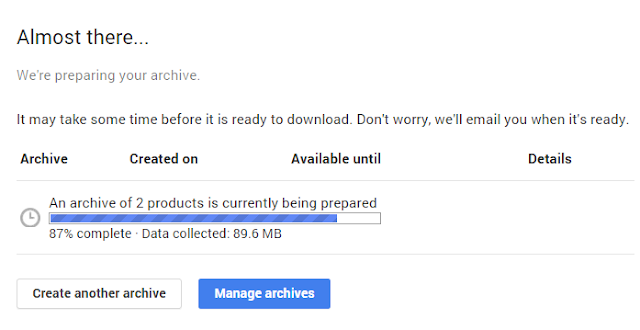
Google will make an archive file, using the settings you have provided.   They show a progress monitor, and this can take some time.    When the process is finished, they send your and email, and show a link to your archive file on the screen.


Job Done!     You now have made a backup file, containing the posts from all of your blogs.   When you look at this file, you will find that it contains one sub folder for each of your blogs (and possibly others too, if you included other services in your backup.


Restoring from your archive file

You may have noticed at the start of this article that I said that a backup is "a file you can use to recover from".   This is important - a copy that you do not know you can use might make you feel secure, but really it may be a waste of space.

How exactly you restore depends on where you saved the file, and what file type it is.   But I highly recommend:
  • Downloading the file to your computer
  • Extracting it
  • Checking that the extract has one file in its Blogger folder for each of your blogs
  • Saving this file for one of your blogs
  • Opening a private test blog, and using the Settings > Other > Blog Tools > Import blog function. 

This will set you see the effect of restoring from this file made from Takeout, reassure you that the file you have really is a backup, and let you see what other items you need to back up.


Limits to backing up and restoring a blog from an archive file

Pictures and videos

Blogger does not actually store videos or pictures that you have put into your posts inside your blog.   Instead it stores links to them in YouTube, Picasa web-albums / Google Photos, or whatever other stoage service you have used.

Your backup will have these links, too, not the original pictures.    And if you do back up the pictures separately and then restore them, they will not have the same URL, so the links in your blog posts may not work.

Pages

The export and import function does include the content of Pages, so these will be available in your restored blog.   (Tested to check that this is working, 1 June 2015).

Comments

Comments will be included in your backup and in blogs that are restored from it.

Menus, templates, gadget, themes etc

None of these are included in your blog posts, so they are not included in your backup file, no matter whether you make it individually or through Takeout.

The only exception is gadgets that you have put inside posts:  because these are inserted using HTML, they will be included.

Draft and scheduled posts

Post status (Published, Draft, Scheduled) is not retained in your backup:   if you choose to automatically restore all posts when you were importing to the recovery blog, then all the posts will be published.    If not, then they will all be draft.


Related Articles:

Backing up the settings for your gadgets

How to put a gadget into a blog post

How to back up and then edit your Blogger template

Getting posts right in private, before publishing them

How to put a picture into a blog-post

How to change the author for a published blog-post

This article explains how to change the author of a post that has already been published in Blogger.

Blogger posts and changing post-authors

When you Publish a post in Blogger, a number of features are set up for the post, as well as the contents.  These include:

Some of these can be changed by editing the published post.

But there are some features that cannot be altered after they are set.

In particular, Author is not changed even if a different Google account is used to edit the post - or if the original author has their permission to write to the blog removed.

This can lead to interesting situations on multi-author blogs, especially when one writer leaves the team and perhaps even deletes their Google account.   Because of this, some blog owners choose to not show the "Posted-by"field (set on the Layout > Blog Posts edit > "Posted by" option).

But even if post-author is not displayed on the blog, it is useful for administrator to know who exactly posted each post.

That said, when someone asks how to change the posted-by (ie author) value, the simple, and correct, answer is "You can't."

But there is a way to make it look like the author has been changed, so that only the most eagle-eyed readers will be able to tell the difference.


How to change the author of an existing blog-post

In short, you need to make a new post with the same contents, and then use a custom-redirect so that anyone who tries to look at the old post (eg by following a link to it) is automatically taken to the new post.


Follow these steps:

You need to take note of several values during this procedure, which are used later on. It may good to open a text-editor (eg Notepad) before you start.


1   Look at the URL of the existing post, and note the part that is from the single-slash after your blog's name,  For example in
http://www.Example.blogspot.com/2012/06/my-post-title   
the part you are looking for is the bold part, ie "/2012/06/my-post-title" - including the single slash a the start.


2    Edit the existing post, go to the HTML tab and


3    Log in to Blogger with the account that you want to use as the new post author-name.


4    Create a new post, and make sure you have the same setting under Options > Line breaks, to be sure that you get the spacing right.


5   Edit the post to be just like the old one:
  • Put the HTML that you copied into in the HTML view of the new post.
  • Apply any Labels or Location values that applied to the old post.
  • Make the title the same as it was in the old post.
  • Change the date to the same as the old post.


6   Make the URL of the new post similar but not quite the same:
  • Put the value you found in 1 step into the custom-permalink field
  • Add some text to it so that it is not the same as the original value,
    eg make "my-post-title" into "my-post-title1"


7   Publish the post and  note the part of  the post-URL from the single-slash after your blog's name


8   Set up a re-direct from the old post to the new post:
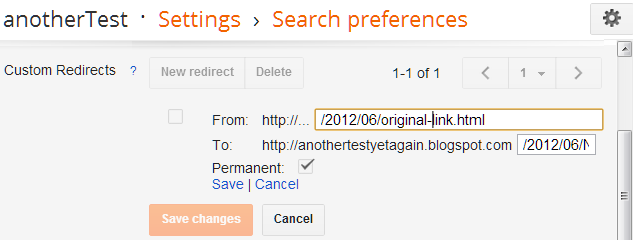
  • Go to Settings > Search Preferences
  • Edit the Custom Redirects
  • Add a new redirection (only needed if you already have some)
  • Enter the value from step 1 into From
  • Enter the value from step 7 into To
  • Tick Permanent
  • Click the save link for this particular re-direction, and then the Save Changes button.

picture of the Settings > Search Preferences > add re-direction settings screen in Google's Blogger tool


9   Check your blog, to make sure that the re-direction is working correctly.


10  Once you are happy that the re-direction is working correctly, delete the old post.
You will need either the existing author account, or a Google account with administrator rights, to do this.   If SEO matters for your blog, then it is good to do it as soon as you can, so you are not penalized for having duplicate content.


What your readers will see

eyeglasses underneath orange RSS chiclet icon
Everyone who is subscribed to your blog's RSS-feed or follow-by-email gadget will see a new post.
(I you don't want this, turn your feed off before you start - but don't forget to turn on again when you are finished!)

Visitors who browse your blog posts will see the "old" post, with the new author, in the original place.

Visitors who try to go directly to the old post via an existing link or from search-engine results will automatically be re-directed to the "new" version of the post. Very observant ones may notice that the URL is slightly different from the original. Most won't.


A quicker way:  get control of the original Author account

The method described above is fiddly and tedious - especially if you want to change the author of many posts.

An alternative is to ask the original author if they still want the Google account  that they used to make the posts. If you are lucky they
  • Don't want it, and 
  • Are willing to hand the password over to you. 

In this case, you could
  1. Quickly change the password (before they change their mind!), and
  2. Edit their profile to the new author name that you would like to have displayed. You may also want to change some other details - and if they are using a Google+ profile and you already have one, then you should probably delete this.

This isn't a total solution, of course: no matter how you edit their profile, it will still be different to your own profile. But it may be better than nothing.


Related Articles

How to edit a post that has already been published

Understanding Google accounts

Copying a post from one blog to another

Giving someone permission to author posts

Changing the publication date for a blogger post

Setting the URL for Blogger posts

Why SEO doesn't matter for some blogs

Stop people from submitting a Google Form more than once

This article explains how to stop more than one person providing a response to a questionnaire that you have made using Google Forms.


Previously I've shown how to use Google Forms to put a survey or questionnaire into your blog.

Sometimes when you put a form into a blog-post, it is OK for people to respond more than once - and Forms even has an option to submit another entry immediately.

But sometimes it's not.

For example, if you are researching a particular topic, you probably want each person's opinion to count once, rather than having an enthusiastic person (effectively a human bot) enter their responses many times and so bias your results.

Google Forms has now a feature which lets you require everyone who wants to submit results to your survey to be logged in to a Google account, and then only lets each Google Account submit the form once.


How to stop people submitting a Google Form more than once

Follow these steps to stop the same user entering a form multiple times:
  1. Edit the form.
  2. Click the Settings bar
  3. Turn on the "Allow only one response per user" option.


Job done!   You will now only get one answer from each person.   Read one to find out more effects of doing this, and some more issues that you need to consider.


The effect of the one-response-per-user checkbox

When this option is turned in, each response is guaranteed to come from a unique Google-account.

People who want to respond to your form must log-in using a Google account before they can see the form.

The person's email address isn't recorded in the results sheet but Forms won't accept another entry from the same Google Account.

If someone tries to complete your Google Form again, a warning is shown, saying "You've already responded. You can only fill out this form once. Try contacting the owner of the form if you think this is a mistake."


Is the Google account name available to the form-owner?

No. Google Forms checks the currently-logged-in account against the list of accounts that have submitted a response, but it does not display the account-names anywhere in the form results page.

Disadvantages of this approach

  • People who do not have Google Account cannot use your form.
  • People who are skeptical about linking their email address with their form entry may be unwilling to respond  - no matter how you try to re-assure them that you don't see it.
  • Other's may think that you have their email address, and so get annoyed if you ask for it on your form.
  • People who have multiple Google Accounts can still respond multiple times: a single person can control many different Google accounts, and could (if they were sufficiently evil / motivated) sign out and in again using each one to submit multiple results.


Are people who responded before the option was turned on counted?

No:   Google only tracks users who complete your form after the "Allow only one response per user" option is first turned on.   If you turn it on for an existing form, people will still have one more chance to respond.

However if you turn the option off and then on again, it does remember which Google accounts have responded during the time that the option was off, and stops them from responding again.


Some other things to consider

Is it really necessary

Some people may turn this option on because it seems like the right thing to do, even if it really doesn't not matter if someone entered more than one response. This could annoy some visitors - for example, someone who completes your questionnaire today, and then remembers later on that there is something else they would like to say.

My recommendation is that you should only use the Allow only one response per user option if it really makes sense for your form to be like this.   Otherwise, leave it turned off.


Don't let it stop YOU from testing your form

If your form is even slightly complicated, it is a good idea to test it (perhaps from a private test blog) before you start using it.

However if "Allow only one response per user" is turned on, then you will only be able to enter one response yourself.

The solution to this is to:
  • Leave the option off while you are testing your form
  • Only turn it on again just before you install the form it into your blog.

Other ways to guarantee unique responses

If you decide that allowing only one response per Google account is not a good approach for your form, then you may want to consider other ways of ensuring that each person only participates once. For example:
  • Ask each person to enter their email address on the form, and only accept results from unique addresses. (But do remember that you cannot be certain that the addresses are associated with the people who provided them.)
  • Make completing the form "inviation only" and email respondents a unique code that they have to input, then don't take account of any responses that don't have a valid code: you may need to enlist help from a neutral 3rd party to help with this, if you want respondents to believe that their input in anonymous.
  • If your form is made with a Google Apps user-account, rather than a standard Google account, then you have an option to limit a Google Form to only accept responses from users who are in your domain - and if you do this, the responses-sheet records the person's username as well.

    So in this case, you could simply sort by user-name, and leave our responses where the one user-name responded more than once.


Related Articles:

How to show a survey / questionnaire / form in blogger

Understanding Google accounts

Advertising & Blogger: things to consider

This article discusses some things to keep in mind when you are putting advertising on your blog.


If you are considering putting advertising onto your blog, there are some basic things that you need to think about.  These include broader philosophical questions, right down to nuts-and-bolts technical concerns.

This article is not a definitive guide - see somewhere like ProBlogger for that.   Rather it's a collections of thoughts about the issues specifically related to Google's Blogger and its relationship with advertisers.   And it may include some thoughts about philosophical and policy issues, if I do any deep research or thinkng about these in the future.


Terms and Conditions

There are lots and lots of possible advertising and affiliate marketing programmes.

Staying within the programme of terms and conditions (often called T&C's) for every programme that you participate in is important.   Every advertising programme has terms and conditions.   You need to find the ones that apply to the programme(s) you are considering.  Read them.  Remember them.  Follow them.   Keep up-to-date.

Also, keep an eye on Blogger's T&C's and content policy too, in case they have any impact on what advertising you are allowed to carry.


Advert Co-location

Not every type of advertising can be shown on the same web-page as every other type of advertising.  See the point about about terms-and-conditions.   And besides - you need some space on your blog for content, which is what keeps advertisement-viewers coming to you in the first place!

Blogger doesn't have any automatic support for conditionally showing advertising.  If any programme you have has constraints like this, then you may need to do some programming in order to use that programme.


Placing ads

If you want to use advertising that isn't integrated with Blogger through the Monetize tab, then you're going to have to place blocks of HTML code into gadgets or into pages.

You don't have to write the code (the advertising network does that), or change it.  You just have to copy and paste it, and put the HTML into your blog, wherever you want the advertising to do.   (Note:  HTML and Javascript are the only types of code you can use.   No SQL.   No php.)

If you're not comfortable-enough doing this with the Blogger template that you have, then stick to the Blogger-endorsed programmes that can be added through the Monetize tab.


Experiment, and Track Progress

Marketing is an art and science.   So can use scientific techniques for data gathering.   Experiment with altrnative ad-placement.   Maybe even create a 2nd non-public blog where you can test how things look when you set up ads (and other gadgets, for that matter).  Only put them into your real blog when you're happy with how they work.   Once your ad is live, track your progress.

To effectively track progress, you need to keep a list of the date when you made changes to your site, and then do regular data-analysis to see what effect these changes have on your number of visitors, and their behaviour.    This is tedious - but if you really want to know what works and what doesn't, it needs to be done.


Watch your ad-contents

Make sure you know what types of things the programme you have chosen is advertising.  With Blogger, you (we!) are getting web-hosting for "free" (we have to watch their ads), and domain registration very cheaply.   Make sure that the advertising you use doesn't cause you to violate Blogger's terms and conditions.  I'm thinking especially about Adult/Pornographic content here, but I guess it could apply to other things too.

If you are using AdSense, it's pretty much essential to manage the categories of ads that AdSense displays.


How will you get paid

Some advertising programmes are very easy to be part of:  they give you ad, and pay you regularly.   Other's are more difficult.   Worst case, you may find that some options are totally unuseable for you, because they cannot make payments in your contry.   Or the cost of getting paid is extremely high - ProBlogger has written before about the transaction time and cost of every payment he receives from Amazon.com.


Related Articles


Managing the categories of ads that AdSense displays.

Putting HTML from advertisers into your blog

A short list of advertising and affiliate marketing programmes