How to edit a picture in Picasa Web Albums or Google+ Photos

This article is about how to edit pictures in Picasa web albums, and how to use Picasa-destop to edit pictures in your Google+ Photos.


Picasa-web-albums vs Google+ Photos

Picasa-web-albums is a on-line photo storage and management tool, now owned by Google.   It is the on-line version of Picasa, a desktop-tool.   (Learn more about PWA and Picasa here.).

Google would ideally  like everyone to use Google+ Photos.

But there are many people who store pictures in albums that are not associated with their personal Google+ accounts:  these may be for businesses, schools, clubs, etc.

So it is likely PWA will continue to exist for a good while yet.   And I am sure that Google appreciate this:  they have made a number of changes to Picasa-web-albums to make it work better both with Google+ and without it.


Options for editing pictures that are are uploaded to Google

  • If you have a Google+ account, then there are two ways of editing photos that you have loaded to Google (it doesn't matter whether you loaded them using Picasa-web or Google+Photos).  

    Both of these options are described below.   Using the Google+ editor (option 1) doesn't need any software installed on your PC.   But it's very slow to load, offers you less control, and is currently missing some key features - and it only works if you are using Chrome as your web-browser, not Firefox or Internet Explorer.
  • If you don't have a Google+ account, then Google / Blogger only provides only one way to edit photos that you have loaded to it (apart from downloading the photo, editing it on your PC and re-uploading it - which changes the URL you need to use to link to the photo).   This is Option 2 below.

Option 1: Using Google + edit a picture in Picasa-web-albums

Log in to Picasa-web-albums, using your Google+ account.  
(See here for what do to if you are automatically re-directed from PWA to Google + Photos)


Navigate to the photo that you want to edit.  
(Make sure you're looking just at that photo, not at the album it is in - this can be confusing in cases when the photo is also the album cover.)

Choose Edit in Google+ from the Actions drop-down menu.

This opens a new window or tab.

If you are not signed in with your Google + account, you will be invited to join.

If necessary, sign-up for Google+, or sign in with the correct account, and start again.

Now, you will be looking at the photo in the Google+ Photos picture view.   From here you can do simple edits:
  • Crop the photo
  • Tag people
  • Rotate the photo
as well as using the other Google+ Photos features (share, slideshow, delete, zoom)

To do more changes, choose Edit (yes, you need to choose it a 2nd time) from the top menu.

If you are not using Google Chrome, then you will get a message saying that the Google+ photo editor only works with Chrome, and giving you a link to download it.    If necessary, switch to Chrome and start again.

Wait while the photo editing tools are loaded  (this does take a while, perhaps even a minute or two).

Once loading is finished, the current Google + Photo editor functions are available from the right-hand bar, like this:


At the moment these are:
  • Tune (brightness, contrast, saturation, shadows, warmth)
  • Selective Adjustment (lets you specific areas for other options to be applied to)
  • Details (sharpness and structure)
  • Crop and Rotate
  • Black and white
  • Centre focus (adjust brightness and blur around the centre)
  • Drama
  • Frames
  • Tilt-shift
  • Vintage
  • Retrolux.

When you  are happy with your photo, click the Finished Editing tick box at the bottom of the right-hand bar, and the changes will be saved (this may take a few moments).

You are left in the open Google+ Photos tab or window, not returned to Picasa-web-albums.   When you go back to Picasa-web-albums and refresh the page (F5), the changes that you made in Google+ photos will be shown.


Option 2:   How to use Picasa-desktop edit a picture in Picasa-web-albums

This option only works if you have Picasa desktop software installed on your computer.

Log in to Picasa-web-albums, using your Google account.

Navigate to the photo that you want to edit.   (Make sure you're looking just at that photo, not at the album it is in - this can be confusing in cases when the photo is also the album cover.)

Choose Edit in Picasa from the Actions drop-down menu.

A pop-up window will tell you that your web browser wants to open another program (ie Picasa-desktop) to do the editing.

(The exact text is something like:   "External Protocol Request:  [your web browser] needs to launch an external application to handle picasa: links.   The link requested is ... The following application will be launched if you accept this request   c:\Program Files\Google\Picasa\Picasa3.exe ... If you did not initiate this request, it may represent an attempted attack on your system.   Unless you took an explicit action to initiate this request, you should press Do Nothing.")

Choose Launch Application.

Picasa will load on your computer, and you will be asked to confirm that you do want to edit the selected picture.   Choose Edit Image.

A copy of the picture that you want to edit is opened in the desktop-Picasa editing tools window.

From here you have access to all Picasa's standard photo editing tools (including the text tool for adding watermarks).

The photo you are working in is a copy taken from your Picasa-web-albums, it is not the same as the copy of the picture which may already be on your computer.   It is stored in a directory of your Picasa-installation called "Online Edits", not in your main My Pictures directory.   So if you choose a function like "Back to Library" you are taken to the Online Edits folder inside Picasa-desktop.

From here you can use all of Picasa-desktop's editing features, including straightening, red-eye reduction, text-editing, re-setting the neutral colour.    The only exception is the Edit in Creative Kit option:  this is still one of the options in Picasa-desktop, but if you use it, it takes a long time to load and then eventually says "Error connecting to Creative Kit... error 500" - and explains that Creative Kit has now been discontinued.

When you are finished editing, to put the edited photo back into the same Picasa-web-album that it came from, with the same file name and URL:
  • Make sure that you are logged in from Picasa-desktop to the same Google account that you were using initially.  
    (Picasa-desktop remembers your sign-in details from the last time you used it - if it's different from what you need, just choose sign-out from the top-right corner, and then sign in to the correct account when asked.)    
  • EITHER:
  • Choose Share on Google+    (if you are using a Google + account)
  • In the sharing-details window that opens, change the Album-name from Online Edits to  the album that the photo came from originally and choose Upload

    OR
  • Return to the Online Edits folder / library
  • Save the changes using the Save icon
  • Choose Enable Synch from the Sharing drop down.
  • Wait for the changed photo to upload.

    (I think Google have some work to do here - you can only control synching for the whole album, not for individual photos.   I expect this to be improved in the future.)


Job Done:  your Picasa-desktop-edited photo appears back in your online Picasa-web-albums with the changes that you just made, and any existing links to it (eg from your blog posts) will show the changed version of the picture.   And you can put the edited picture into your blog posts or other websites in the usual way.


Related Articles

Introducing Picasa and Picasa-web-albums:   an overview

Stop automatic redirection to Google+ Photos

How to put a picture into a blog-post

Tools for applying copyright protection to your blog

What is Creative-Kit, and how to use it

This article describes Creative Kit, which was a photo-editing tool for enhancing pictures in your Picasa-web and Google+ albums.


A little history: Picasa, Picnik and Creative Kit

In 2002, a company called Lifescape created a program called Picasa, which people could use to manage photos on their PC.

Google purchased this in 2004 and then integrated it with web-storage, linked to a person's Google account, to make Picasa-web-albums: see Understanding Picasa and Picasa-web-albums for more information about how they work together with Blogger.

Picasa has some photo-editing functions (cropping, red-eye removal, sharpening, lightening, making collages, etc).  Useful, far easier to use than Photoshop - but without features that some people wanted. So in 2010, Google integrated a photo-editing tool from Picnik, a small company that was offering a subscription-based photo hosting and editing service.

Picnik's editor did some cooler things than Picasa, (applying visual effects, watermarks, etc).   The tool  had some serious fans, and a quirky culture which saw them show messages like "packing the lunch" "watching the flowers", "chasing butterflys" while Picnik was loading.  The type of messages that are funny the first few times, but quickly get tedious. And people using Picnik via Piscasa-web-albums often found that it was very slow.

In 2012:
  • Picnik announced that they were closing down their separate photo hosting service, and moving the product to Google+.
  • Google's announced that they were were closing Picnik, and using Picnik's engineers to “continue creating photo-editing magic across Google products."   (ref:  closure announcement).

Today, the original Picnik photo-hosting-and-editing service is most definitely closed.

The Picnik photo editor has been either replaced with or re-badged as "Creative Kit", and is available through Google+.  They may have intended to make it available through Picasa-web-albums too - but as I noted in previously, this feature isn't working. Possibly this is about selling additional storage space:   Picasa-web-albums are available to any Google account, while Google+ Photos is only available to named individuals.   So each person can have lots of Google / Picasa accounts (with free storage on each one), but only one account Google+ account.


How to access Creative Kit

To start creative Kit, so you can edit a photo with it:
  • Go to Google+, and log in to your Google account that has Google-Plus enabled.
  • Go to your Photos page (which may be on the left-sidebar, or under the More tab on the left sidebar if your screen is small)
  • Go into an album, and open the photo you want to edit.
  • On the menu at the top of the screen, click the Edit button.


This opens the photo inside a window with photo-editing tools. The screen just looks like another set of options within Google-Plus, but actually you are now inside Creative Kit, and you can use it to edit your photo.


When you are finished editing, choose the Save button from the top-left hand side. This give you an option to apply your changes to the current file, or to save a new copy of the file.
  • If you choose Replace then any places (eg blog-posts) that link to the existing photo will now link to the edited photo.
  • If you choose Save a new copy then your existing file is not changed and a new copy of the file will be made in the same folder as the existing one but with a slightly different name.

If you upload pictures into your blog-posts inside Blogger, then the picture files are stored in Picasa-web-albums LINK. If you have Google+ enabled for your account, then you can access these photos directly through either Picasa-web-albums or through Google+, even if you have not linked your blog and your Google+ profile. So you can use the Creative-kit method of editing these pictures, even if you didn't load them via Google+.


What features are available in Creative Kit

At one point Picnik used a "fremium" approach: Basic features were free for everyone to use for free, while people needed to sign up and pay a subscription to use the Premium ones. This has changed, though,and now features are are all free.

At the time of writing, the features include:

Basics

  • Black and White
  • Bocal B&W
  • Boost
  • Soften

Camera

  • Lomo-ish
  • Holga-ish
  • HRD-ish
  • CinemaScope
  • Orton-ish
  • 1960s

Colours

  • Tint
  • Vibrance
  • Duo-Tone
  • Heat Map 2.0
  • Cross-Process

Touchup

  • Blemish Fix
  • Shine-be-Gone
  • Airbrush
  • Sunless Tan

Google Plus Exclusives

  • Daguerreotype
  • Reala 400
  • Green Fade
  • Magenta Fade
  • Polaroid* Plus
  • Sun Aged


Troubleshooting / Where to get help

Creative Kit uses Adobe Flash Player. If Creative Kit doesn't work inside Google+, try installing a newer version of Flash Player.

If that doesn't help, try:
  • Clearing your cache
  • Clearing Flash shared objects
    These are data files are created by the Creative Kit on your computer, like cookies.  To clear them, go to Abobe's Flash Player help web site.
    The Settings Manager that you see is not just an image; it's the actual Flash Player Settings Manager. Scroll through the list of sites and select www.picnik.com and www.gstatic.com.

    Click the Delete Website button for each, and confirm the deletion.

    Open the Global Storage Settings Panel. Check both of the following boxes:
    - Allow third-party Flash content to store data on your computer.
    - Store common Flash components to reduce download times.

    Once you've cleared your local shared objects, clear your browser cache again.
  • Using a different browser, eg Chrome or Firefox.
  • Disabling ad-blocker or flash-blocking extensions

For more assistance, there is a Creative Kit help-centre in Google:
https://plus.google.com/100432630524345907101#100432630524345907101/posts


Is Creative Kit just Picnik with a new name?

Most probably: the controls and features are very similar, and the press-releases seem to tie up. There is one screen that names both while the photo-editor is loading in Google+>Pictures.

But on the other hand there's no official confirmation either, and there are some product differences. It's possible that Google's engineers were simply inspired by the former Picnik colleagues to create similar controls, and that the underlying photo-editing tool is different. Who knows.

What we do know is that many of the much-loved Picnik features are available in Creative-Kit, provided you're willing to load your photos to a Google+ account.


TL;DR

You can edit a photo in Creative Kit by uploading it to your Google+ account, then choosing the Edit button when you are viewing it.

This may be the same Picnik photo editor that was available in Picasa-web-albums until 2012. Or it may not. Either way it lets you crop, re-colour, apply lots of filters etc for free.

Don't want to put your photos into Google+? Bad luck, there's no other way to use Creative Kit / Picnik on them at the moment. Find another on-line editor instead.


Update

In mid 2013, Google Plus replaced CreateKit with a new photo editor (which only works on computers running the Chrome web-browser).    Therefore it is no longer possible to use Creative Kit. 

Picasa-web-albums still has  a link to Creative Kit.   But this does not work, and PWA now has other options for editing pictures that have been uploaded to it via Blogger or otherwise.


Related Articles

Creative-kit works with pictures accessed through Google+, but not Picasa-web-albums

Adding a picture to a blog post

Introducing Picasa vs Picasa-web-albums

How to set up Twitter's "view summary" cards to work with Blogger posts

This article shows how to install Twitter Cards into Blogger - and explains why you might do this if Twitter could be an important source of visitors for your blog.


What are Twitter Cards

Recently, Neil Patel explained why having social sharing tags installed into your blog can be important, and I've written a little more about it specifically for Facebook and Blogger here.

Twitter, for reasons best known to themselves, have developed their own version of social media meta-tags, called "Twitter Cards".    (Apparently they do make some use of Open Graph tags - but not for Twitter cards displays.)


Two things happen inside Twitter when someone tweets a message including a link to a website or blog that has Twitter-cards installed.  

Firstly, the message has the words "View Summary" under it, instead of just "Expand".


Secondly, when someone in Twitter clicks the View Summary link, more information (ie a "Twitter Card") is shown about the contents of the link - like this:


In his post, Neil Patel also stated that if you don't use Wordpress,
"you’ll need to manually generate meta tags for each page on your site"
but fortunately for Blogger users who are brave enough to edit their template that's not quite true.


How to install Twitter Cards into a blog made with Blogger

There are two simple steps needed to set up Twitter sharing tags for your blog:
  • Adding the code to your template, and then 
  • Asking Twitter if you've got it right.    
The 2nd step is necessary because (for whatever reason) Twitter won't use the tags you have installed until you've tested them in Twitter's own validation tool.


Step 1   Add the Twitter Card meta-tags to your template


Edit your template in the usual way.


Find the   </head   statement, and just before it add the following lines of code:

<!--  START - TWITTER CARD TAGS   -->
<meta name="twitter:card" content="summary"/> 
<meta name="twitter:site" content="@YOUR-TWITTER-ACCOUNT-NAME"/> <meta name="twitter:domain" content="YOUR-BLOG-URL"/>

<b:if cond='data:blog.pageType == &quot;item&quot;'><meta name="twitter:title" expr:content='data:blog.pageName'/><b:else/>
<meta expr:content='data:blog.homepageUrl' name='twitter:url'/>
<meta expr:content='data:blog.pageTitle' name='twitter:title'/></b:if>
<b:if cond='data:blog.postImageThumbnailUrl'><meta name="twitter:image:src" expr:content='data:blog.postImageThumbnailUrl'/><b:else/><meta name="twitter:image:src" content='URL-FOR-IMAGE-YOU-WANT-TO-USE-IF-THERE-IS-NOT-A-THUMBNAIL-PHOTO-IN-THE-POST' /></b:if> 
<b:if cond='data:blog.metaDescription'><meta name="twitter:description" expr:content='data:blog.metaDescription'/><b:else/><!-- Still looking for a way to use the post snippet if there's no description --></b:if>

<meta name='twitter:url' expr:content='data:blog.canonicalUrl'/>
<!--  END - TWITTER CARD TAGS   -->


Except, you need to replace a few items with your own values:
  • YOUR-BLOG-URL - with your blog's address (eg for me, it's areyoublogger.blogspot.com)
  • YOUR-TWITTER-ACCOUNT-NAME - with the Twitter account name for your blog. (This line is optional)
  • URL-FOR-IMAGE-YOU-WANT-TO-USE-IF-THERE-IS-NOT-A-THUMBNAIL-PHOTO-IN-THE-POST - with the web-address of an alternative picture to use if the post doesn't have a thumbnail image.

Save the template changes.


(Twitter also have a code-generator - but it's for websites in general, while I have configured the code above to use some of the values that Blogger makes available to us.)


Step 2   Validate your domain


After you have done the first step, go  https://dev.twitter.com/docs/cards/validation/validator.  This is Twitter's validating tool, where they check if your code meets their requirements.


Log in using your Twitter account.  
You do need to have a Twitter account yourself - or at least one that is dedicated to the blog - to use the validator and thus to install Twitter Cards.


Click the Validate and Apply tab.


Enter the address of a post from your blog and press Go.


If you're using a browser that supports showing Twitter Cards, then a preview of the card for your post will be shown in the right side of the screen.   Check that this looks correct.


Look at the list of results of your Twitter-card values shown on the left of the screen.   If any of them show a red-dot, then there is a problem that you need to fix.   Typically this will be because you've accidentally left out a quote mark when you were adding your custom values.


Fix any problems, and enter the blog-post URL again - keep going until you get a green dot at the top of the list.    (Some of the twitter card values are option, so it doesn't matter if they show as grey because they're irrelevant for a Blogger site.)


Enter the URL of your blog overall  (ie not a specific post).
  • If you do nothave a custom domain (ie your blog is  myBlog.blogspot.com), then make sure you enter the blogspot.com URL, not the country-specific one (eg   myBlog.blogspot.in).   This is important later in the validation process.
  • Fix any problems for this as well.   (There shouldn't be any, but I think it's worth double-checking, especially if you modify the twitter-cards code in any way.)


Press the Request Approval button at the top of the left hand sidebar.


Confirm the administrative details on the screen that opens - by default it will be filled in with details from your Twitter account.   You may be asked for:
  • Contact information for the person responsible for administering cards on your website (name, email address, Twitter handle)
  • Website information:   the URL (ie the domain), and a description.   Note:  if you are based outside the USA and don't have a custom domain, then most probably your country-specific address will be shown here.    Change it to the blogspot.com   address.
  • Whether your site publishes images or videos that may contain sensitive content (eg nudity, violence, or medical procedures) - so that Twitter can warn viewers before showing them.
  • The website's Twitter-name.


Press Submit Request.


After a moment, if your details are correct, Twitter shows a message saying 
"Thanks for applying to be part of Twitter's cards service. We'll review your request as soon as possible. Expect a few weeks for turn-around time. You will receive an email when your request has been reviewed."

I'm not sure if they apply this to all (or indeed any) countries or Twitter accounts:   when I installed Twitter Cards for this site, I got an email in a few minutes saying .
Your Twitter card is ready!
We've activated the summary card for areyoublogger.blogspot.com.
If you want to use other kinds of Twitter cards (and we know you do), please make another request.

And the cards themselves were activated on a test-tweet that I did a few minutes after that.


What your readers see

If you have installed the Twitter Cards correctly, your current readers should see nothing different when they visit your blog or when they read your posts via email or and RSS feeder.

But when they include a reference to your blog in something that they send out inside Twitter, the content that they (and their followers) see is a nicely formatted card rather than an ugly-url.


Troubleshooting


Search Descriptions

Twitter cards will only work properly if you have enabled Search Descriptions for your blog, and if you have entered one for every post that is tweeted.    I looked for ways around this using the post-snippet, but haven't found a way to make this work yet.


Country-specific redirects

Neil Patel suggested one tag that is not included in the standard Twitter Cards documentation: twitter:url

Using it gets around the problems associated with country-specifc URLs for blogspot domain blogs, by changing any Tweets of them to the blogspot.com page, instead of having your tweets split across multiple urls.

I've included it in my list of tags, customized to take its value from Blogger.    However I'm not yet 100% sure if it will work - and will update this article accordingly.


Pictures

I've set up the image tag to use the thumbnail picture for each post - because that is the only one that you can access on a systematic way for each post.

Twitter's rules say that pictures must be less than 1mb in file size, at least 60px by 60px, and that ones larger than 120px by 120px will be resized.    However Blogger may have a thumbnail photo for some of your posts that is less than 60-by-60.   For these it is likely that your default image will be used instead.

The only way to over-ride this is to use a post-specific Twitter meta-tag which points to a larger photo like:
<b:if cond='data:blog.postURL == &quot;URL-OF-THE-POST&quot;'><meta name="twitter:image:src" content='URL-FOR-IMAGE-YOU-WANT-TO-USE-FOR-THIS-POST' />
</b:if>

Domains

Twiter's documentation was initially a little sketchy about which specific domain should be validated. Some people reported having to validate all three possible URLs, ie
www.your-blog.blogspot.com
your-blog.blogspot.com
/*your-blog.blogspot.com
although it is possible that this has now been resolved.


What other problems have you encountered with Twitter Cards?


Related Articles:


Adding Facebook's Open Graph tags to your blog

How to edit your template


How to automatically share every Blogger post you publish on your Google+ page or profile

How to automatically share every Blogger post you publish on your Google+ page or profile

This quick-tip is about Google's new feature for automagically sharing every Blogger post to Google+


This post explains how to do it:


(How did I do that? Using Google+'s new embed feature. Do you like it? Should I make more quick-tips like this?)


Something I haven't been able to figure out yet is whether this happens for all posts (including edits of existing posts) or just for newly published posts. If it's the former, then getting your posts right before you publish them is probably more important than ever.

How to embed a Google+ post into your blog post or website - and what happens when you do

This article explains how you can put a Google+ post (your own or someone else's) into your blog or website, provide the post was shared publicly on Google+.


Recently, Google+ announced a couple of new features.   One of them, embeddable posts, has a lot of potential for bloggers.


Look what s/he said on Google+

Embedding a Google+ post into a blog post is an example of the "look what he/she/I said over there" approach to linking blogs and social-networking sites.

It gives people who are reading your blog up-to-date information about how many other people have plus-1'd the linked content, and an easy way to interact with it "over there" themselves - without leaving your blog.


Why would you want to do this?

The short answer: 

Because you want to write about a Google+ post, and give your readers an easy way to +1 it or comment on it without leaving your blog.

The long answer: 

Because blogs are better than social-networking sites for developing ideas your ideas.

Recently CopyBlogger described 8 reasons why blogs and social media tools (especially Google+) are complementary. He makes excellent points.  But I think he glosses over one fundamental issue: social media posts are short, and give you limited control over their formatting.   Blog posts can be (and usually are) longer, including several pictures, several ideas - and they are constructed to show the connections between the pieces.  They let you develop a case, discuss, compare and contrast - and all the other types of writing that you learned in school.    And as we all learned in school, presentation matters. Showing a picture of what you're writing about gets you better "marks" and more positive feedback.

So - embedding a Google+ post which you're writing, rather than just describing it, makes a blog post far more interesting.

And because they're embedded rather than just shown as a screenshot, these types of Google+ posts get updated +1 counts and comments, without your readers having to leave your blog.


How to put a Google+ post into your blog


Log into your Google+ account - or simply follow a link that someone else gives you, and view a public Google Plus post - this can be from either a personal profile or a Google+ page.


When you are looking at a G+ post that you want to put into a blog or website, click on the drop-down menu in the top right corner.


If the post is public, then there will be an Embed option in the menu-list.   Choose Embed.


Copy the code that is shown, and put it into a post or gadget the same way you would install any other 3rd party code.


OPTIONAL:
If you have already got a plus+1 button anywhere on your blog, you can leave out the first part of the code, ie:
<!-- Place this tag in your head or just before your close body tag. -->
<script type="text/javascript" src="https://apis.google.com/js/plusone.js"></script>
However it doesn't hurt (except very slightly in terms of speed page-load speed) to leave it in.


Customizing the code:

The code that Google give you looks like this:
<!-- Place this tag in your head or just before your close body tag. -->
<script type="text/javascript" src="https://apis.google.com/js/plusone.js"></script>
<!-- Place this tag where you want the widget to render. -->
<div class="g-post" data-href="https://plus.google.com/116176459448466735273/posts/cFPSW8FgZ7U"></div>

Obviously there's not a lot you can change.

But it is interesting to see that you don't actually need to use the G+ embed-code-generator; if you know the Google+ ID and the post ID, then you can easily construct the embed code.

Also, provided you don't change Google's formatting of the G+ post, you are free to put the embed code inside a div statement, which lets you do certain formatting things.  For example, to centre-align the embedded post, use code like this:
<div style="clear: both; margin-left: auto; margin-right: auto; text-align: center;">
PUT THE CODE FROM GOOGLE+ HERE
</div>


Embedded Google+ posts and the Blogger post-editor

If you put the Google+ embed code into a blog post, the post-editor isn't able to show the Google+ item while you are editing the post.

Instead, you see a gap like this:


And you simply have to be carefully not to accidentally delete the embedded item by typing in the gad or deleting it.  

One way to make this easier is to temporarily put a border around the item's code while you're working on the post, using code like this
<div style="clear: both; margin-left: auto; margin-right: auto; text-align: center; border: 1px dotted black;">PUT THE CODE FROM GOOGLE+ HERE</div> 


What do your readers see


Browser-based visitors

People who see your blog or website in a regular browser will see an embedded Google Plus post looking like this:


But what they see is not just an image: it's a fully-functional Google Plus post, where they can:
  • Plus-one the original post, and see the faces of (some) others who've +1'd it.
  • Follow or un-follow the poster themselves
  • Expand / Collapse the comments.
  • Add to the comments.
  • +1 individual comments


Most of these features are shown even if the read isn't logged in to a Google+ account themselves at the time:   when they go to use the feature, they simply have the Google+   "log in or sign up" screen shown to them in a new page.


Readers who subscribe to your blog using RSS

The experience for people who follow your blog via RSS partly depends on what RSS reader they use.

Someone who is using The Old Reader (my current preferred RSS reader) just sees a gap - and even the dotted line that I have around the above post above isn't showing.


Readers who follow-by-email

Readers who follow your blog by email will post probably not see embedded Google+ posts. Again, I'll update this post in a day or two (after Feedburner has delivered my own subscription) with a report about how it looks in Thunderbird. Readers who use other email clients may have a different experience.


What are the terms and conditions

Every time you get Goolge+ post embed code, there is a reminder that "By embedding Google+ posts, you agree to our policies."

It's possible that these rules will change over time. But you can read today's version here.

And I'm no lawyer, this isn't legal advice - but my interpretation of the current version is:
  • You're not allowed to put Google+ posts on sites that break the Google+ User Content and Conduct Policy.   Eg pages that promote illegal things, have sexually explicit material, or includes malicious code.
  • You must not put Google+ content in ways that amount to bad behaviour, eg bullying or harassment.
  • You cannot put Google+ content inside advertisements "or for other commercial purposes" - this bit is interesting. I've put some Google+ content inside a blog that has advertisements - I wonder if this means I'm breaking the rules?
  • You cannot change the Google+ content or the stuff that Google+ puts around it.
  • You cannot try to find out the identity of users who comment on embedded Google+ content unless they agree to share their identity with you.
  • You cannot use, sell or give other people any data from embedded Google+ content, including any use of pixels, cookies,
  • You give Google permission to review and analyze your website by putting Google+ content on it.

If Google find out that you've broken the rules, they may review and take action, including blocking you from using embedded Google+ content on your website.   (And I'd guess that it won't do good things for your site's search rating either.)


Final thoughts

The elephant in the terms-and-conditions room is, of course, copyright.   But for now I'm assuming that somewhere in Google+'s T&Cs they have a non-exclusive right to display things that their users post, and that this right extends to G+ content that is embedded.   Fingers crossed.


What do you think:  would you be annoyed if I embedded your Google Plus post on my website? 

And is this a feature you will use on your blog?   


Related Articles:


Ways of linking your blog and the social networks

How to put 3rd-party HTML/Javascript into Blogger

Introducing Google+ Pages

How to center items in Blogger

Put a survey questionnaire in your blog, using Google Drive's forms tool

This article shows how to use a Google Drive form to put a survey questionnaire into your blog or website.


How to make simple questionnaire forms in Blogger

Blogger's Poll gadget is a tool for putting a question onto your blog, which you visitors can answer. The gadget collects the answers for you, and shows the results.

This is very easy to do: you just add a gadget in the usual way, and set up the question and answer options, and the expiry date (ie the date after which you won't accept any more answers).

And with some template editing, you can arrange to put this gadget either above or below your blog-post gadget and only show it on certain posts or pages - so it's an easy way of running a very simple survey on your blog.

But it has a lot of limits: you can only ask one question, answers must be from a pre-defined list of possible answers, there is no other way for you to collate the results, etc.


Google Drive Forms are a better way to build a poll or survey

There are lots of tools that let you build a survey which you can embed into your website.   Some are paid services, while others (eg Survey-Monkey) are called "freemium services" - they give you a limited service for free (eg up to 100 responses) but have a charge for services above that.
.
Google Drive's Forms feature is another option.    Being from Google, you can be fairly sure that it will always be compatible with Blogger.   And it's set up so responses are put straight into a spreadsheet -  you don't have to manually receive and do data-entry for each one, thus saving you time.

Forms lets you build a data-collection page which you can put into your blog as a survey (or as a feedback form, etc).   It's better than using the Blogger Poll because it lets you:
  • Ask more than one question (I think there is no limit on the maximum number that can be asked)
  • Have different types of answers
  • Choose a theme (ie a standard graphic / layout format for the form)
  • Choose whether or not you are currently accepting survey responses (the "accepting answers" field is a toggle between accepting and not-accepting)
  • Choose whether the answers are stored inside the form itself, or in a separate Google Drive Spreadsheet file - the latter lets you do analysis of the results, without affecting the form.


The types of answers that you can choose from are:
  • Text - ie a short phrase, which includes numbers and other special characters.
  • Paragraph text - ie a longer field
  • Multiple choice (you set a list of valid values, a person can only choose one)
  • Checkbox (you set a list of valid values, a person can select as many as they want)
  • Choose from a list (you set a list of values which are shown as a drop-down list, a person must select one)
  • Scale  (eg "rate this between 1-5 where 1=outstanding, 5 = dreadful).
  • Grid  (a matrix of subquestions and possible answers - see the example form below)
  • Date  (a date value, with or without a time component)
  • Time  (a time value, measured in hours, minutes and seconds, am/pm)

You can break up the survey over multiple pages (by selecting Insert > Page Break in the form editor. And you can add section headers (text), pictures, videos the same way.


How to build a questionnaire for your survey using Google Forms


Log in to Google Drive, using the account that you want to own the form and the response data.  Note that this does not have to be your blogger account.


Choose Create > Form


Give the form a title and choose a theme from the list that is displayed.


Create your first question:
  • Enter the question and help text, 
  • Choose the question type and answer options, 
  • Set up any data validation rules, 
  • Click Done when finished.


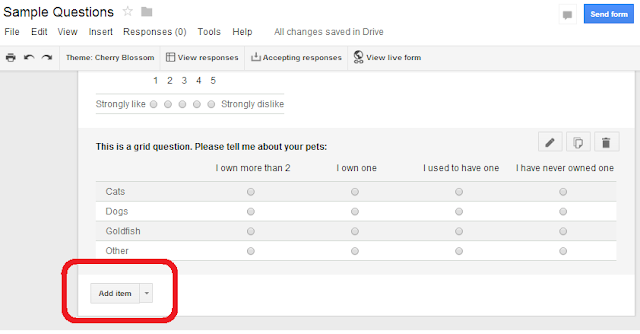
If you want to add another question, click the Add Item button - and keep doing this until all the questions you want are on the form.
(Hint:  it's often easier to sketch out your questions on paper or a wordprocessor first - it's easier to think about how you should ask good questions when you're not worring about the mechanics of setting them them up in the system at the same time.)


Re-arrange the questions by clicking on the bar at the left and side, and drag them up or down to the right place.


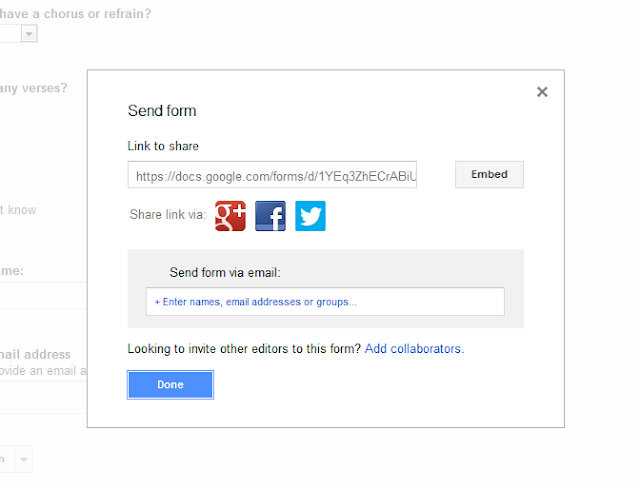
When you have finished adding questions, click the Send Form button.


This opens a pop-up window where you can choose to send the form on Google+, Facebook or Twitter - and it gives a link to the form that you can put into emails etc.


To put the form, instead of just a link to it, onto your blog or website, click the Embed button.


Set the height and width, then click into the code field. Press Ctrl/A to select the whole field, and then Ctrl/C to copy the HTML code that is provided.


You can then install this code into your blog etc the same way you would install any other 3rd party code.


Job done!   

You now have a questionnaire form on your blog - and people who answer the it will do the data-entry for you.


What do your readers see

People who visit your blog using a web-browser will see a survey-questionnaire, which has all the questions you set up, and had radio buttons, checkboxes etc if you use them.

I'm still discovering what email and RSS subscribers see - it may depend on what type of email software and feed-reader they are using.   (I hope to update this sentence shortly after publishing this post.)

A sample questionnaire looks like the one below.  This doesn't contain real questions.   Rather I've just made one question of each type to show you what they look like:   feel free to enter some answers and  experiment with how the options work.   It has a very strong pretty theme / colour-scheme:   I chose this to make sure that it stuck out, but there are some more subtle / professional-looking themes available too.


Troubleshooting the form creator


Changing the form size

The code for an embedded survey form looks like this:
<iframe src="https://docs.google.com/forms/d/GEEKY-NUMBERS-REMOVED/viewform?embedded=true" width="500" height="500" frameborder="0" marginheight="0" marginwidth="0">Loading...</iframe>
You can change the values for width and height, margin width and height (all measured in pixels) without going into the Forms editor.   You can also set the frame border - not yet sure what the unit of measure and options for this are.

Cannot add another question

If you enter a question and select Done, but the Add Item button is greyed out, then your internet connection may be slow: check it, or try again at a later time.


What other trouble-shooting tips or questions do you have?


Related Articles:


Installing 3rd party HTML into Blogger

Adding a gadget to your blog

Showing a gadget only on a specific post or page