This article describes making a Facebook badge to promote your page, and putting it onto your blog.
 This article is about how to make a badge to promote a Facebook Page.
This is an example of the "follow me" approach to linking your blog and the social networks, although for Facebook pages your reader becomes a Fan rather than a Friend.
Many people are confused about when they should use each of the types of "thing" in Facebook, ie
(Facebook chance the place for actions like this from time to time - you may need to look around to find your pages.)
Copy the URL for the Page you want to promote
(One way is to right click on its name, and choose copy-link-location- or whatever phrase your browser uses. Another is to to go the page, and copy the URLfrom your address bar.)
Come back to this article and click here --- Facebook Social Plugins, to reach Facebook's tools.
(I used to have instructions to launch this from Facebook - but I cannot find any link to it from my Pages page any more.)
Choose Page Plugin / Web.
Scroll down the page, and set the options for your badge. The first one is critical - the others optional:

When you are happy with the selections, choose Get Code.
Copy the code provided
Install the code into your blog - there several options for installing the HTML, depending on where you want to put the badge or button.
Job Done! Your blog will now display a gadget that promotes the selected Facebook page - people can view and like your Page from within your blog.
 People who visit your blog through a web-browser will see a Facebook area, including a Like button and whatever other options you have chosen.
This can be quite a powerful tool: you can easily use two or three different combinations on different parts of your blog: one that has no border, no faces and no header but does show a Stream can effectively look like a "live" feed from your Facebook page to your blog, while another one with different options can show off the size of your fan-base.
Be aware that the Like button shown in this button gives people the option to Like your Page in facebook - not your blog directly, and not the current post that they are reading. If you want them to be able to Like your blog or blog-posts, you need to provide this option separately (and many of your visitors are likely to be confused by the different).
As always, people who read your blog via a feed reader (Bloglines, Google Reader, etc), or by email subscription (eg having used follow-by-email) may not see the Facebook item, depending on where is places and what options their email program has.
fyi, I could have just quoted this code, and said to use it on your blog. But I don't usually do this when I'm describing how to link Blogger and any third party product, because it's likely that Facebook (or whoever) will change their code in the future: it's always safest to get the most up-to-date copy of the code from the source-site when you need it.
The facebook page where you get the code from also has more information about controls you can set in the code, too. Check it out for more information.
At one stage, the first step in these instructions was to
But that's no longer necessary. You can promote any Facebook page that you want to, on your blog.
But be aware that if you show the page-feed on your blog, and you don't own the page, then you have no control over what is shown. It's possible that a feed from someone else's Page will show material which breaks Blogger's terms and conditions - or which you simply don't want on your blog. For this reason along, I'd recommend only promoting your own, or closely trusted, pages on your blog.
How the data in Blogger blogs is organised
Linking Blogs and Websites
Tools for linking Blogger and the Social Networking sites
Putting a Facebook "share this" button on your blog
Copyright, Blogs and Bloggers
Why RSS / Subscribe to Posts is important for bloggers
What is a Facebook page

This is an example of the "follow me" approach to linking your blog and the social networks, although for Facebook pages your reader becomes a Fan rather than a Friend.
Many people are confused about when they should use each of the types of "thing" in Facebook, ie
- Profiles - accounts for flesh-and-blood, living, breathing, individual people
- Pages - for websites, brands, and organisations that don't want to approve all their Facebook members
- Groups - for organisations that want to approve individual members who join (and in return, group-owners can send private messages to individual members.
How to make a badge to promote a Facebook Page
View all your Pages using the arrow drop-down at the very top right of Facebook's toobar.(Facebook chance the place for actions like this from time to time - you may need to look around to find your pages.)
Copy the URL for the Page you want to promote
(One way is to right click on its name, and choose copy-link-location- or whatever phrase your browser uses. Another is to to go the page, and copy the URLfrom your address bar.)
Come back to this article and click here --- Facebook Social Plugins, to reach Facebook's tools.
(I used to have instructions to launch this from Facebook - but I cannot find any link to it from my Pages page any more.)
Choose Page Plugin / Web.
Scroll down the page, and set the options for your badge. The first one is critical - the others optional:
- Facebook Page URL - this needs to be changed to the URL of your page (which you copied earlier)
If you have less than 25 Fans already, then your page's URL will be something like http://www.facebook.com/pages/Are-You-Blogger/144194435594821 and you can get it by copying the link from the list of Pages for your account.
Once you have more than 25 fans, you can choose a page-url on the Edit Info > Username screen.
- Tab - the tab on your page that is shown
- Width - choose a value that suits the space on your template where you want to put the box.
- Show faces, show header: choose options that suit your purpose and blog template
- Show stream: this controls whether you show posting from the Page inside your blog

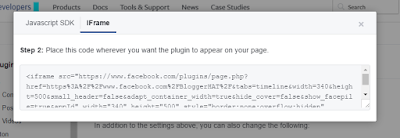
When you are happy with the selections, choose Get Code.
- Currently, there are options for an iframe or Javascript SDK: I recommend using the iframe, unless you are comfortable with the two-part installation needed for the Javascripit, and you are sure that the visitors you want to target will have Javascripti enabled.

Copy the code provided
Install the code into your blog - there several options for installing the HTML, depending on where you want to put the badge or button.
Job Done! Your blog will now display a gadget that promotes the selected Facebook page - people can view and like your Page from within your blog.
What your visitors will see
This can be quite a powerful tool: you can easily use two or three different combinations on different parts of your blog: one that has no border, no faces and no header but does show a Stream can effectively look like a "live" feed from your Facebook page to your blog, while another one with different options can show off the size of your fan-base.
Be aware that the Like button shown in this button gives people the option to Like your Page in facebook - not your blog directly, and not the current post that they are reading. If you want them to be able to Like your blog or blog-posts, you need to provide this option separately (and many of your visitors are likely to be confused by the different).
As always, people who read your blog via a feed reader (Bloglines, Google Reader, etc), or by email subscription (eg having used follow-by-email) may not see the Facebook item, depending on where is places and what options their email program has.
Customizing the code
You can change the characteristics of the box without having to generate the code from Facebook again. For example you can later the width and/or height - just remember to do it in both of the places required if you are using the iframe option:<iframe src="http://www.facebook.com/plugins/likebox.php?href=http%3A%2F%2Fwww.facebook.com%2Fpages%2FBlogger-Hints-and-Tips%2F144194435594821&width=160&colorscheme=light&show_faces=false&border_color=purple&stream=true&header=false&height=395" scrolling="no" frameborder="0" style="border:none; overflow:hidden; width:160px; height:395px;" allowTransparency="true"></iframe>
fyi, I could have just quoted this code, and said to use it on your blog. But I don't usually do this when I'm describing how to link Blogger and any third party product, because it's likely that Facebook (or whoever) will change their code in the future: it's always safest to get the most up-to-date copy of the code from the source-site when you need it.
The facebook page where you get the code from also has more information about controls you can set in the code, too. Check it out for more information.
Do you need to own the page you want to promote?
No - not any more.At one stage, the first step in these instructions was to
"Log into Facebook with a profile (ie personal account) that has administrator rights for the page you want to promote."
But that's no longer necessary. You can promote any Facebook page that you want to, on your blog.
But be aware that if you show the page-feed on your blog, and you don't own the page, then you have no control over what is shown. It's possible that a feed from someone else's Page will show material which breaks Blogger's terms and conditions - or which you simply don't want on your blog. For this reason along, I'd recommend only promoting your own, or closely trusted, pages on your blog.
Related Articles
Putting HTML from a third-party into your blogHow the data in Blogger blogs is organised
Linking Blogs and Websites
Tools for linking Blogger and the Social Networking sites
Putting a Facebook "share this" button on your blog
Copyright, Blogs and Bloggers
Why RSS / Subscribe to Posts is important for bloggers


