Saving a post if Blogger's Publish button doesn't work

Saving a post if Blogger's Publish button doesn't work

This article is about how you can save a  post even if Blogger's Publish button won't let you save your work.


Imagine you've been working on a Blogger post for several hours.    It's finally ready: you've got the wording exactly right, everything is formatted with bold, italics and bullet-points, your pictures and links are all correct, etc.   

But then your internet connection stops working.   Or you click the Publish button - and get a message like  "Post cannot be saved due to HTML errors".   You can't work out how fix the problem, and you need to stop working on it now!

This may seem like a disaster - hours of work wasted.

But luckily there's a very easy way to save your work, and tools to help you diagnose problems.

Saving your work and recovering it later

How to save the post that you have written

  • Switch to Edit HTML mode (this is a tab at the top left corner of the editing window. 
  • Select all the text in the window (Ctrl / A does this in most browsers)
  • Copy it.
  • Go to somewhere outside of Blogger that you can save text:
    Perhaps a text-editor like Notepad, or a plain-text formatted email message.   Even a word processor like MS Word can work, provided you remember to save your file as text.  Or you may want to use a source code editor - see the section below about fixing code errors.
  • Paste in the contents that you copied earlier.
  • Save the file.
  • Switch to Compost mode (this is optional - I usually recommend it so that you don't get confused the next time you come back to Blogger and see the "funny codes")
  • Exit the Blogger post-editor by closing the window - say "ok" if the system asks if you really want to leave the page without saving. 

Recovering your work later on

This is the reverse of what you did to save the work:   open the text file, copy the contents, go to Edit HTML mode in Blogger and paste them in.

You should then be able to go in to Compose mode, and see the post as it was when you stopped working on it.

At this point, if the HTML is ok and you have fixed the issues with your internet connection, you can Publish your post.


Fixing problems with your HTML

If there are problems with the HTML, then you need to find them, and fix them.    Usually, fixing them is easy, once you've found them - but the finding can be  hard if you have a large and complicated post.

Sometimes Blogger will tell you what the problem with your HTML is, and show where it's happening by putting the "wrong" code into reverse text when you try to Publish it:  this makes it easy to see if you scan through the HTML for the post.

However sometimes Blogger doesn't show you where the problem is - I've noticed this more often recently when using IE 9.0 on complex posts.   Instead you get an error message like
Your HTML cannot be accepted: Closing tag has no matching opening tag: SPAN
or whatever the specific problem is, but none of your code is highlighted. This can make it hard to track down and fix the problem.

A low-tech way to find the problem is to paste the code from the saved file into Blogger's Edit HTML window in smaller sections, and Publish to work out if the problem is in the code that you just pasted:  if everything in the first section of code can be published, but there is an error message for the next part, then you know what section the error is in.

A major disadvantage of this approach is that you need to publish the post many times, and the first time it will definitely not be "finished".   this is OK if you use a pre-publication blog to prepare your posts, but if you don't do that, it can cause your RSS subscribers to form a bad impression of the quality of your posts.

A better option is to use a source-code editor like Notepad++ (free, Windows only) or XMLSpy (30 day free trial, far more complex code editor), which has tools to help you find and fix problems with your code.


Related Articles

Get your posts right before you publish them for all to see

What is RSS and why it matters for your blog

Getting the HTML to put a picture into your blog

Putting text and pictures alongside each other

Putting a badge for a Facebook Page into your Blog

This article describes making a Facebook badge to promote your page, and putting it onto your blog.

What is a Facebook page

This article is about how to make a badge to promote a Facebook Page.

This is an example of the "follow me" approach to linking your blog and the social networks, although for Facebook pages your reader becomes a Fan rather than a Friend.

Many people are confused about when they should use each of the types of "thing" in Facebook, ie
  • Profiles - accounts for flesh-and-blood, living, breathing, individual people
  • Pages - for websites, brands, and organisations that don't want to approve all their Facebook members
  • Groups -  for organisations that want to approve individual members who join (and in return, group-owners can send private messages to individual members.
The most common "thing" for blogs to have is a Page - and a Badge is the tool which Facebook provides to help you to promote a Page on your blog or other website.


How to make a badge to promote a Facebook Page

View all your Pages using the arrow drop-down at the very top right of Facebook's toobar.
(Facebook chance the place for actions like this from time to time - you may need to look around to find your pages.)

Copy the URL for the Page you want to promote
(One way is to right click on its name, and choose copy-link-location- or whatever phrase your browser uses.   Another is to to go the page, and copy the URLfrom your address bar.)

Come back to this article and click  here --- Facebook Social Plugins, to reach Facebook's tools.
(I used to have instructions to launch this from Facebook - but I cannot find any link to it from my Pages page any more.)

Choose Page Plugin  / Web.  

Scroll down the page, and set the options for your badge.  The first one is critical - the others optional:
  • Facebook Page URL - this needs to be changed to the URL of your page (which you copied earlier)
    If you have less than 25 Fans already, then your page's URL will be something like http://www.facebook.com/pages/Are-You-Blogger/144194435594821 and you can get it by copying the link from the list of Pages for your account.
    Once you have more than 25 fans, you can choose a  page-url on the Edit Info > Username screen.
  • Tab - the tab on your page that is shown
  • Width - choose a value that suits the space on your template where you want to put the box.
  • Show faces, show header:  choose options that suit your purpose and blog template
  • Show stream:  this controls whether you show posting from the Page inside your blog
As you choose options, the preview at the bottom updates to show what the button will look like:


When you are happy with the selections, choose Get Code.
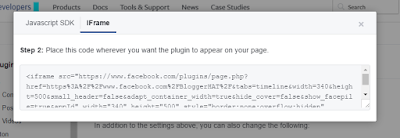
  • Currently, there are options for an iframe or Javascript SDK:   I recommend using the iframe, unless you are comfortable with the two-part installation needed for the Javascripit, and you are sure that the visitors you want to target will have Javascripti enabled. 


Copy the code provided

Install the code into your blog - there several options for installing the HTML, depending on where you want to put the badge or button.


Job Done!   Your blog will now display a gadget that promotes the selected Facebook page - people can view and like your Page from within your blog.


What your visitors will see

People who visit your blog through a web-browser will see a Facebook area, including a Like button and whatever other options you have chosen.

This can be quite a powerful tool:  you can easily use two or three different combinations on different parts of your blog:  one that has no border, no faces and no header but does show a Stream can effectively look like a "live" feed from your Facebook page to your blog, while another one with different options can show off the size of your fan-base.

Be aware that the Like button shown in this button gives people the option to Like your Page in facebook  - not your blog directly, and not the current post that they are reading.   If you want them to be able to Like your blog or blog-posts, you need to provide this option separately (and many of your visitors are likely to be confused by the different).

As always, people who read your blog via a feed reader (Bloglines, Google Reader, etc), or by email subscription (eg having used follow-by-email) may not see the Facebook item, depending on where is places and what options their email program has.


Customizing the code

You can change the characteristics of the box without having to generate the code from Facebook again.   For example you can later the width and/or height - just remember to do it in both of the places required if you are using the iframe option:
<iframe src="http://www.facebook.com/plugins/likebox.php?href=http%3A%2F%2Fwww.facebook.com%2Fpages%2FBlogger-Hints-and-Tips%2F144194435594821&amp;width=160&amp;colorscheme=light&amp;show_faces=false&amp;border_color=purple&amp;stream=true&amp;header=false&amp;height=395" scrolling="no" frameborder="0" style="border:none; overflow:hidden; width:160px; height:395px;" allowTransparency="true"></iframe>

fyi, I could have just quoted this code, and said to use it on your blog.  But I don't usually do this when I'm describing how to link Blogger and any third party product, because it's likely that Facebook (or whoever) will change their code in the future:  it's always safest to get the most up-to-date copy of the code from the source-site when you need it.

The facebook page where you get the code from also has more information about controls you can set in the code, too.   Check it out for more information.


Do you need to own the page you want to promote?

No - not any more.

At one stage, the first step in these instructions was to
"Log into Facebook with a profile (ie personal account) that has administrator rights for the page you want to promote."

But that's no longer necessary.   You can promote any Facebook page that you want to, on your blog.

But be aware that if you show the page-feed on your blog, and you don't own the page, then you have no control over what is shown.   It's possible that a feed from someone else's Page will show material which breaks Blogger's terms and conditions - or which you simply don't want on your blog.    For this reason along, I'd recommend only promoting your own, or closely trusted, pages on your blog.


Related Articles

Putting HTML from a third-party into your blog

How the data in Blogger blogs is organised

Linking Blogs and Websites

Tools for linking Blogger and the Social Networking sites

Putting a Facebook "share this" button on your blog

Copyright, Blogs and Bloggers

Why RSS / Subscribe to Posts is important for bloggers

How to rename picture files in Picasa-desktop

This article is about re-naming files from within Picasa-desktop, to provide SEO benefits for your blog.


Picasa's desktop software is a good tool for organizing and editing photos on your local computer.   And it is still available for you to use, even though Picasa-web-albums has been replaced by Google Albums + Google Album Archive.

For pictures that are important in your blog, I still recommend preparing them in a tool like Picasa-desktop and then uploading the finished versions to Google Photos before putting them into a post, because:
  • The desktop tool has better editing tools (cropping, zooming, auto adjustment, adding watermarks) and Picasa-web-albums does.
  • It lets you control the size of the uploaded file
  • It's easier to ensure sure that you still have full-size files on my local machine for printing etc, as well as smaller, more optimized, copies to use on web-pages.

Picasa-desktop folders have a very nice relationship with files and directories with the Windows file system:
Each Picasa folder = one directory on your computer
Each Picasa photo = one file on your computer.

And this means that you can set various properties (eg file name) from either inside Picasa or from Windows.


Ways to associate keywords with photos in Picasa-desktop

Picasa-desktop has two tools for adding keywords to photographs:
  • You can enter a caption for each photo. This is basically some text, which is stored "inside" the photo, in a hidden-field that is only visible when you are using a software tool that displays the captions. (In technical terms, the caption is stored inside the  IPTC/XMP Description field inside the JPEG etc file that you have.)
  • You can enter one or more tags for each photo - again, text (individual words or phrases) that is stored in the  IPTC/XMP Keyword field.

Unfortunately captions and tags aren't shown when you put a photo in your blog.

This means that the captions and tags are possibly not used by Google in understanding what the photo is about: I've never heard any SEO experts recommending that the  IPTC/XMP fields should be keyword optimized.   For some bloggers this won't be an issue - but it is if SEO is important for you blog.

Another approach is to put the keyword(s) into the file-name, because file-name is one of the factors that Google looks at when it is indexing images.   And this has a nice spin-off for you as well - it means that they keywords are available to any file-search tools that you use on your computer, not just to specialised ones that work with images.

For a long time, I believed that to change the name of a file, I had to go out to my Windows files (using Windows Explorer or similar, and rename them there) - and then wait for Picasa to catch up with the change that I'd made in the file system.   But one day I accidentally hit the F2 key, and found that it opens up a very useful dialog box indeed.


How to Change the name of a file in Picasa desktop

Navigate to the picture that you want to change the file-name for, using the Picasa-desktop software.

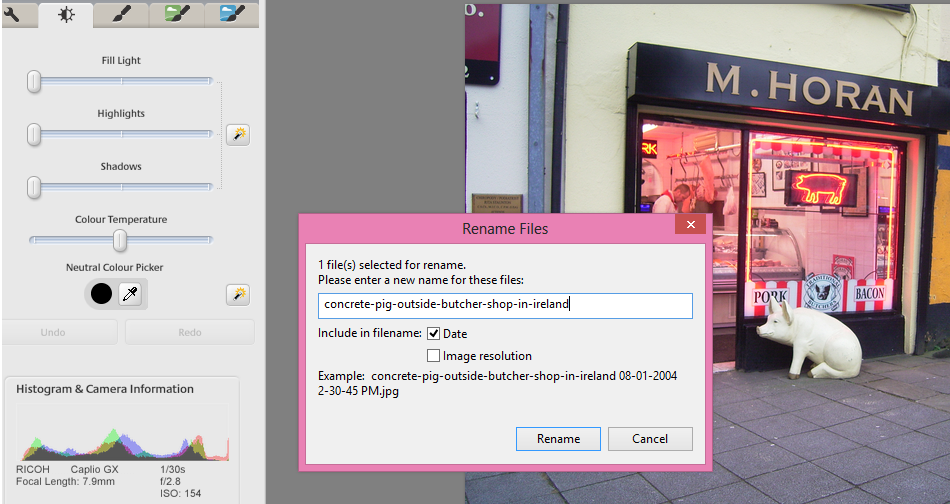
Press the F2 key. This opens a Rename Files window.

Type in a new name for the file, for example    concrete-pig-outside-butcher-shop-in-ireland

Click the option buttons if you want to include today's date or the file-resolution in the name  (I don't usually do this, because I organise my photos into folders according to the date they were taken)


Click Rename to save the change


Job done!    The file has a new name in your computer's file system, and is still loaded in your Picasa database.


How to change the name of a file in Google Album Archive or Google Photos

Currently there is no way to change the name of a file after it is uploaded it to either Google Album Archive or Google Photos:  .

One option is to download the photo, rename the file on your desktop, and re-upload it.   But if you change the name in this way, you also need to change the link to the file in every place that it has already been used.   That said, if you only use your photos in one place each, then making a new copy with a different name, uploading it and changing all the existing links can be a good way to deal with copyright theives who have hot-linked directly to your photos.


How to choose "good" names for your picture files

Early SEO advice was to use:
  • Lowercase letters only (some computers don't like uppercase)
  • Only hyphens between words (not spaces, underscores, etc)
  • Regular characters only (no á é etc)

Today, I'm not sure if it matters so much. In most cases, it's probably more important to use rich, descriptive key words  that describe all the aspects of the photo, than to worry about how they're laid out.   But I do tend to follow the advice anyway - just in case.


Related Articles

How to show your photos in a slideshow from Picasa

Does SEO matter for your blog?

How to put a picture into your blog.

Understanding Picasa-desktop vs Picasa-web-albums

Taking action when someone has copied your blog without permission

Learn to trade Forex In Richards bay


Forex trading has become one of the most profitable careers in the world which one could use to make money online without having to work hard but your mind will do the work, we are offering investors an opportunity to make money the smart way like banks and investors do, Ajaxsurf with Valutrades broker are giving you an opportunity to invest in the Financial markets.

Book a class with Ajaxsurf and learn to trade the Forex Market with professional bank traders.
We also do surrounding areas such as Empangeni.


Centering gadgets in Blogger

This article is about centering gadgets from 3rd parties that you install onto your blog.


Previously, I've described how to put HTML code from a 3rd party into your blog.

When code like this is put into a gadget, one common question is "how do I center it?"

There are (at least) three options for doing this, ie for putting a gadget into the middle (horizontally) of the area it is located in.   These are described below.


Option 1: Centre all the gadgets in your blog

To center-align every single gadget in your blog, just, add a CSS rule to your blog.  The rule to add is:
.widget {
  text-align: center;

This will centre the contents and title of every gadget on your blog.


Option 2: Only center-align the specific gadget

To only centre-align one gadget, which is made from HTML/Javascript code, you can just put the gadget-code from the 3rd party (eg PayPal, Amazon, etc) inside a centering statement, like this:

<div style="text-align: center;">

PUT THE CODE FROM THE 3RD PARTY HERE

</div>
Install the code into your blog the way you would usually install this 3rd party code.

This will centre-align the contents (not title) of the specific gadget that you add.

Note the American spelling of the word "center" - and don't forget to put the closing </div> statement at the end.

There may be some gadgets where it would be possible to add the centring statement to the gadget code itself, rather than putting it outside.    I don't recommend this (unless you're so comfortable with HTML and CSS that you don't need to be reading this article), because it introduces a risk that you will interfere with some other aspect, or that you will lose the centering if you ever need to refresh the code.


Option 3 - Make a new style rule just for the gadget

If you only want to centre one (or several) gadgets - not all of them - then it's best to define a new style that is to be used on specific gadgets:  put this new style into your template, and then apply it to the gadgets like this.
<div class="YourNewSytle">

PUT THE CODE FROM THE 3RD PARTY HERE

</div>

This approach will only centre the gadget contents - not any header that you give to it.

There are lots of options that you could put into the new style rule, but at a minimum it needs to have
.YourNewStyle
{
  text-align: center;
}
Notice that there is a "." (ie a full-stop) before the name of your new style.

Also, it's best not to use a number as the style-name (eg "2nd-gadgetStyle"), because this doesn't work with some browsers.


Related Articles

Putting HTML code from a 3rd party into your blog

Adding a new CSS style into your template

Centering the header in your blog

Putting a gadget above your blog's header

Removing the attribution gadget from Designer-template blogs 

Lining up the first post and the sidebar

In some Blogger templates, there is a big gap between the bottom of the header and the start of the first post, and this means that the posts and the sidebar are not aligned.  This article explains how to adjust the gap, and so remove that problem.


In the templates that Blogger provides, as well as all third-party templates, the amount of space between elements on the screen is not accidental:   designers put a lot of effort into working out what spacing will look good, and then finding ways to put CSS code into the template so that the spacing they want is shown in any browser software that Blogger supports.


But there are times when you may want to change this spacing, and this is easy to do, provided you are willing to accept the disadvantages of editing your template, and if  you can work out exactly which part of the template code to change.


The pre-Header gap

A pet-hate of mine is the blank space above the first post, which looks strange unless you put something else in to the space.  In this example, I've got an AdSense link-unit in the area highlighted in red, just to fill in the empty area:


How to change the gap above the post header

1  Edit your template  - don't forget to take a backup.


2  Find this code
h3.post-title, .comments h4 {
  font: $(post.title.font);
  margin: .75em 0 0;
}
The exact numbers used in your template may be different:  the key thing is to find the CSS command that is putting a margin above the post header.  In the template that I took this example from (Simple), it's the "0.75em" - which puts 75% of the space of a the post-header characters as a blank space above the header.


3   Change the first margin value:  how much to change it by depends on your template, but in some cases I've used 0 successfully.

In CSS, when a margin statement has three numbers beside it, they refer to the
  • top, 
  • left-and-right, 
  • bottom 
margins respectively.   So if you want to do something else to the post-header, eg indent it, this is the place to make changes


4   Click Preview to see what the blog will look like - keep doing this until you get the right setting.


5   When you are happy with the spacing, click Save Template to apply the changes to your blog.   (Or Clear Edits if you cannot get it right and need to stop trying).


Note:  If you make a big change to your template like this, it would be a good idea to check out out in at least one version of the other browsers that your readers use - at the moment, this usually means Internet Explorer 8, Firefox and Chrome.   But it may depend on your niche - a tool like Google Analytics will give you some statistics about what browsers, and screen sizes, your visitors have.

Also, it is possible to make this change by just installing a new CSS rule for h3.post-title into your blog - because the latest one found is always the one used, and because the template designer's Add CSS function puts the rules you add after the othr rules.   I don't recommend it here, though, because working with the original rule makes it easier to see the effect of making changes to any of the values in the area.


Other affected spacing

If you have more than one post per page, then this change will also reduce the amount of space between the bottom of one post and the header of the next one.   Depending on your template, you want want to add a little more space into the margin statement in the bottom of the post-footer, eg
.post-footer {
  margin: 20px -2px 20;
  padding: 5px 10px;
}

If you display comments in your blog, you also need to check the impact on comments, because the original command applied to h4 items in comments as well.

If you are making a lot of changes, you may want to make a test blog, and plan your changes in private before applying them to your main blog.


Related Articles

Setting up Google Analytics to get statistics about for your visitors

Adding a new CSS rule to your blog's template

Advantanges and disadvantages of editing your template.

How to edit your blogger template

Who did your blogger template come from - the quick way of finding out

Making a test-blog for template changes

Planning changes to your blog in private

Getting the HTML code to put a picture into your blog's sidebar, header or footer

You can use the Post Editor to get the HTML code that you need to put a picture into your sidebar (or header or footer, or anywhere else a gadget can go).


The Picture gadget is the normal tool for adding a picture to your blog's sidebar.

But sometimes you want more control over the picture size or behaviour.  Eg, you may want to have two pictures very close to each other and guarantee that they're the same size.

To do this, you need to get the HTML code for the picture, and then put it into your blog as an HTML-gadget.  Fortunately, Blogger's Post-editor make it very easy to do this without writing the code yourself.


Using the Post Editor to generate the HTML for a picture

1  Start a new Post  (NB   you're not ever going to publish this:  it's just a work-area)

2  Don't enter any text:   just use the Picture icon on the toolbar to add a picture.   Blogger will prompt you to upload the picture, or to choose it from a Google-album-archive or to enter its URL:  add the picture the way that you usually would.

3  Switch to the HTML tab   (top left of the editing window).

This show you the HTML code for displaying the picture, as it is set to display in the Post (depending on the picture-settings you've chosen, it may be centered or right/left aligned, and the size may vary).

Copy the HTML.

5  Switch back to Compose, so that you don't get confused the next time you edit a post.

Return to the list of posts:  you may be asked if you want to leave the page without saving - the answer is Yes.  Or you may have a new draft-status post, which you can delete.


Job Done!   You now have some HTML code in your memory which you can paste into an HTML/Javascript gadget, or anywhere else that you may need it - even into another post that you are editing in a separate window, or into a totally different tool.


Related Articles

Stopping pictures on your blog from being "clickable"

Inserting a Picture into a blog Post.

Putting 3rd party HTML into your blog

Center-align the gadgets on your blog

Hosting pictures outside of Google / Picasa

Inserting a picture into your blog as a gadget

Showing your oldest blog-post first - and the rest in reverse order.

Blogger does not have an option to display your posts in reverse order - so that the oldest post is first, and the most recent post is last.  

But this article describes displaying your posts in this way by manipulating their post dates.  And it links to an article about some other possible options.


Overview

Previously I've discussed the options for giving your blog a home page.  One option is to organise the post-date for each of your posts, so that you control the order posts are displayed in.

This is easy enough to do, although there are a couple of risks that you need to be aware of as discussed below.


Blogger Posts and the Post-date

Each Post in your blog has a date-time value, which is called its "post-date".   Normally , this is set to the date/time when you publish the post for the first time.  But you can change the post date for any post, and you can do this either when you post it first or later on.

The post-date is important because it controls the order that posts are shown in:
  • The post that appears first when a reader visits your blog is the one with the most-recent Post-date.
  • If you have more than one post-per-screen, then the next-most-recent post is on the screen underneath the first one.  And then the second-next-most-recent, etc.

When a reader is looking at any post, and they click Newer-Posts or Older-Posts, the post-date is used to decide what posts to show on the next screen.

This means that you can make your posts appear in the order than you wrote them (ie first post first, second post second, etc) by changing the Post-date so that:
  • your first post has the most-recent post-date, 
  • your second post has the next-most-recent-date, 
  • your third post has the third-most-recent poste date
  • etc

An alternative approach is to just make one post always appear first, and let the other posts appear in the order that you posted them.


How to make your posts appear in reverse order, using dates

1  Give your first Post a post-date (eg today), AND remember that date.

2  Give all other posts (even ones that you write next week, or next year) a post-date that is earlier than the post-date you picked in Step 1.
  • If you want your posts is strictly reverse order, you need to give each one a date that is earlier than any existing post.  This is quite easy:  just look at the list of posts in Posting > Edit Posts and scroll to the bottom of the list to see the oldest date used so far.
3  Turn off the post-date display on your posts (since the post-date won't make sense, because you're manipulating the dates).

  • To do this, go to the Layout tab.  
  • Choose Blog-posts (edit).    
  • Un-tick the date under "Post Page Options".

4  Remember to make the same date change for every post you write from now on.


Also, if it might be relevant for your readers to know when you wrote a post, make sure that you always manually put the date into each post.


Risks of this approach

If you follow this approach, you will give a far-in-the-past date to pages that you never want to appear first.  There is a risk that Google might convert the data behind older posts at some time.   If your post-dates get too far into the past, then it's possible that they might not cope well this.   This could be for reasons that seem logical, or because of things that are totally to do with the internal workings of Blogger's database, and make no sense to you at all.

Also, be aware that Google might choose to force the post-date to appear on posts at some time in the future.  At the moment, they don't:  it's your choice.   But you cannot guarantee that they won't change their minds about this, one day.   (Personally I think they probably won't, and I've built a couple of "real" websites that make use of the technique described here.   Just remember it's not guaranteed.)


An Alternative Approach

Adam of Too-Clever-by-Half has suggested a totally different way to display your posts in reverse order.   I haven't used it, but think that it has a lot of potential in some situations, provided you are comfortable using Yahoo pipes and RSS feeds to display things on your blog.

He has also recently shared another approach he found, which uses a script to manipulate elements within Blogger, and so is more robust than his first approach.


Related Articles

Changing the post date for any post

Giving your blog a home page

Using a gadget instead of a post as your home page
 
Stopping certain pages from ever appearing on the home page

Blogs, Blogger and blogger, Posts, Pages and Screens - understanding how blogger works.

mail2Post: How to update your blog by email, instead of using Blogger

Blogger's mail2Post tool lets authors make blog-posts, without using the Blogger software.   All you need to do is set it up, and write posts using your regular email tools.

Mail2Post and Blogger

The mail2Post feature, sometimes known as Post-to-profile, is a way of putting content on your blog without using the full Blogger software for writing the post.

It's not quite as good as using Blogger itself - there are a few features missing - but it is good enough in many situations.


How to set up mail2Post

Log in to Blogger with the Google account that you want to have mail2Post rights to your blog:  this account needs to already be set up as an author for the the blog.

Go to
  • The Settings tab - if you are logged on with an author account, or
  • The Settings > Email tab if you are using an administrator account  

Beside Posting using email, there is a place where you can enter some "secretWords", to make up an email address that you can use to post to your blog.

Enter some suitable words:  make sure it's not too easy to guess (your surname would not be a good choice!), so that spammers cannot get into it:


Choose either to publish emailed updates as soon as they arrive, or to save email as drafts so that you,  or another administrator, can review them before posting.

Note down the full email address, ie   NAME.your-secret-words@blogger.com   (you will need this later - and unfortunately because of the way it's displayed, it is not easy to copy-and-paste the value).

Click Save Settings.


Job Done!   Your blog is now set up so that posts can be created by being emailed to it, instead of requiring someone to use the Blogger software to write each post.


Using the mail2Post address

Once mail2Post is set up, anyone who sends an email message to the email address you copied can post to your blog, with what ever restrictions you set.

You might put message on your blog saying
 "send contributions to YOURNAME.YOURSECRETWORDS@blogger.com"
But be aware that this could generate a lot of spam.   And in the worse case, the spam could get your blog deleted for breaking Blogger's terms and conditions.

Alternatively, you might just tell the address to selected people - or perhaps even just use it yourself.


How is a Blogger Post made from an email message

When a message is sent to your mail2Post address:
  • The subject-line of your email message becomes the Post-title
  • The body of the email message becomes the body of the post
  • I think:  If you automatically publish emailed posts, then the post date-and-time is the moment at which Blogger's servers received the incoming email message - expressed in Blogger's default time zone (PST OR PDT, I think).
  • No labels are applied to the post
  • The post-author is the profile name of the blog-author who set up the mail2Post address.

Pictures and Videos
People have reported various results when they include images and videos inside messages sent via mail2Post.   Personally, I have tested:
  • An attached picture - posted ok, the image is show before all the text from the body of the email message
  • An attached video file (4meg) - posted ok with the video appearing to be above the text from the email message
  • An in-line photo - worked perfectly, the picture is placed in the post in the same position (relative to the text) that it was in the original email.

I suspect that the results  depend on they type of picture, the email client you are using, and the message format settings.   My testing was with Mozilla Thunderbird, which has a particular way of thinking about "attachments", slightly different from other email systems that I have used (eg Microsoft Outlook).

Probably the only way to discover how photos are handled when you use your email to send them is to set up a test-blog and experiment with different options.


What your readers see

People who read your blog in a web-browser see mail2Post entries just like any other posts.   If your blog displays the poster's name, then mail2Post entries have the name of the blog-author who set up the mail2Post address.

As mentioned before, the positioning of pictures and videos may not always be as good:  attached pictures, in particular, may be shown as the very stop of the post.

Apart from that, there is nothing to show visitors that the post was created using email - in either the post or in the blog's RSS feed.


Related Articles

Giving someone write access (ie author permissions) to your blog

Setting up a blog administrator

Understanding Google accounts

Setting up a test-blog to try things out in private

RSS, and why it matters for your blog

How Can I benefit from Ajaxsurf Trading And Investments


Easy, through Forex. So what is forex...?

Forex (Foreign Exchange or Currency Market) is a global market for the trading of currencies.
The Forex market is the most traded market in the world with a daily turnover of  $5.7 Trillion. This market is open 24hrs a day. It includes of all aspects of buying and selling of currencies at the current price. This gives you a chance to trade with forex and make a  lot of money out of it. And here at Ajaxsurf we can give you all the skills and tools required to trade Forex successfully. with only R5000 for full month you can learn  to be a quality Forex trader. We also do investments with a 7% return and our investments start at R10 000 only t&s apply.  

How to put a gadget above your blog's header

This article is about how to put an item (any type of gadget) above the Title section in a blog made with Google Blogger.


If your blog has a layout or designer template, then (almost?) all of Blogger's templates start out with a nav-bar at the top of the screen, followed by a Header section showing your blogs title & description, or a custom header image if you've uploaded one.

And even if you go into the place in the layout-designer where you can re-arrange the layout by drag-and-dropping items, you cannot drag any gadgets to above the header.

But this is easy to change, provided you are willing to accept the disadvantages of editing your blog's layout template.


How to allow changes above your blog's header

Follow these steps to make it possible for you (or any blog administrator) to add gadgets to the area about your blog's heading section:

Edit your blog's template in the usual way

2  Find this code in your template:
<b:section class='header' id='header' maxwidgets='1' showaddelement='no'>
<b:widget id='Header1' locked='true' title='YOUR BLOG TITLE(Header)' type='Header'/>
Hint:  use the template-editor search tool, to look for a key phrase like "id='Header1'

Change it to
<b:section class='header' id='header' maxwidgets='4' showaddelement='yes'>
<b:widget id='Header1' locked='true' title='YOUR BLOG TITLE(Header)' type='Header'/>
Notice that there are two changes made:
  • Setting maxwidgets to greater than 1, and
  • Setting showaddelement to Yes, instead of No


Job Done:   after you have successfully saved this change, then the next time you edit your blog layout  (Dashboard > Layout  ), then you will find that you can add or drag-and-drop up to three gadgets to the Heading section of the blog, making a total of four.

You can add even more gadgets by changing the number for maxwidgets to something else.


Related Articles

Disadvantages of editing your blog's layout template

How to set up an extra administrator for your blog

Types of Blogger template

Planning changes to your blog - in private

How the data in Blogger blogs is organised

How to edit your Blogger template

How to use Picasa-web-albums without being re-directed - August 2016 update

This article explains what has happened to Picasa-web-albums, why it is now re-directing to Google Album Archive, and what you can do about it.


picasa web-albums logo behind a closing theatrical curtain
Back in July 2013, I described how many people who started Picasa-web-albums were being immediately re-directed to Google+ photos and what they could to to return to using PWA again without being re-directed.

Quite a few things have changed in the last three years - and especially in the last six months or so.   In particular, Google have:
  • Changed their strategy around Google+
  • Released Google Photos and retired Google+ Photos
  • Changed the Picasa-web-albums re-direct to go to Google Photos instead of Google+ Photos
  • Stopped supporting Picasa (announcement)
  • Stopped supporting Picasa-web-albums (announcement)
  • Released a new tool called Google Album Archive, which gives you access to photos, photo-albums and data about photos that you created in Blogger (and other Google tools) - which isn't available in Google Photos.
  • Changed the re-direct on Picasa-web-albums, so that it goes to Google Album Archive instead of to  Google Photos.

That is why you see this:


Instead of this:


when you go to www.picasaweb.google.com.


How to stop Picasa-web-albums from re-directing to Google Album Archive

Bad news:    As Google's Album Archive product is turned on around the world, and specifically once it is turned on for your, there is no way to to use Picasa-web-albums, without being sent to Google Album Archive.

Our only option is to use to Google Photos directly, or to work with pictures only through Blogger's post-editor.


Is there a problem with using Google Album Archive and Google Photos instead of Picasa-web-albums?

There are posts on help-forums etc from people who are unhappy about this change:   Picasa-web-albums and Picasa-desktop had a number of features which Google have simply decided not to provide in Google Photos.   These features include:
  • Making slideshows and putting them into blog-posts or websites.
  • Embedding Picasa Web albums and photos in blog-posts or websites.
  • Linking to photos, albums, and Public Galleries which an URL that contains your usename 
  • Photo tags, tagging people, likes, +1's, and Picasa Web comments. 
  • Making slideshows.
  • Following people based soley on their photo collection
  • Viewing public galleries.

People who used those features didn't want to lose them, and they certainly see a problem with the changes.  Personally, I think that things are a little more nuanced.  

  • There is one particular missing feature (not listed above that I'm annoyed to have lost - but I've found a work around, and will be writing a post showing how to use it as soon as I've finished this one.
  • There is a lot of detail behind what you can and cannot do in Album Archive - and why certain actions are and aren't available.   This isn't always consistent with the documentation - eg the documentation says that we can delete photos in Album Archive, but I've got at least one album / photo with no delete icon showing.   Other people have reported that they had albums which aren't showing up in their Album Archive.     Some are unhappy because they cannot create new albums, only work with ones that they've already made.    

But for all that, I haven't yet found a total show-stopper issue that stops me from using the Google tools to work with images for my blogs.    Have you?


Related Articles

Using Picasa-web-albums without being re-directed to Google Photos.

What was Picasa vs Picasa-web-albums - a basic introduction

Options for showing photos in Blogger

The Danger of Identity Theft


Any business owner or even every single person should be well-conscious of the current state of identity theft. And we all must know how important it is to to protect your customers and your own business from fraud to maintain its well-known reputation and stable development.

What is identity theft?

Identity theft is defined as the fraud of someone to make money from using your confidential document or illegally enter any transaction under your identity. An example can be the “credit card cloning”. The culprit may use someone else’ information and apply for credit cards, bank accounts to buy items through the Internet, One other of the most common identity theft cases is tax fraud and scams that may be greatly damaging under any tax season no matter how safe and secured your personal info is. Specifically, the identity thieves use made-up Social Security Numbers (SNN) randomly and file the tax forms to try to claim any possible return. And sadly, the chances of being the random victim can be you.

The consequences can be terrific and time-consuming for anyone, which which can lead to nonstop amount of unknown debts, bankruptcy, etc. Even worse, solving your identity theft case or reversing the harm from the fraud is also as troublesome as it can go for years to settle.

Facts of Identity Theft

Frank Agagnale once said, ‘the police can't protect everyone. Individuals should be more mindful and instructed about identity fraud or theft. You should be a little bit wiser, and smarter; plus, nothing is wrong with being skeptical. We live in a world where if you make it easy for someone to steal from you, they will eventually.’ And I believe this always stays true. Up until now, there have been over 8,513,000 identity theft victims worldwide, which is happening every two seconds. Identity theft is a growing serious issue in the United States which has risen alarmingly over the last decades. Another surprising fact is that currently, medical sector has been on top of those that have data stolen by identity thieves since five years ago. Hence, protecting your own health insurance is as crucial as your SSN.

How do you protect your identity from being theft?

This question must be constantly asked right after the frightening facts above have been shown.Fortunately, there are many easy and effective ways to protect yourself. First of all, having the  best paper shredders  can be the foremost solution to dispose of any sensitive information and that info will stay safe and secured within your organization. Other possible ways can be regularly checking your credit reports to let your bank know about any suspecting spending amount, strengthening your passwords and well securing any of your contact information or important accounts. Personally, I would recommend that you change your passwords for any highly-secured accounts every 6 months. Also, you should be smart and wary in using social media because there have been plenty of scams online. Social media has become tremendously so popular that even a company will look at the profiles of their job candidates through those media sites. Hence, people tend to upload most of their personal data but forget that they themselves make it easier for scammers to duplicate their information.

By implementing these steps, any top secret documents such as employee files, social security numbers, banking details, medial insurance information, and addresses cannot be stolen and frauded. If you can secure yourself first, the chance of the information being stolen can be surely eliminated. And your company can avoid being sued for violating regulations on information protection. Likewise, Bill Nelson once said, “If we don’t act now to safeguard our privacy, we could all become the victims of identity theft”.

Criminals look at identity theft and say only 1 in 700 criminals gets convicted of it. And they look at check forgery and they know that for every 1,400 forgers arrested, only about 123 get convicted and about 26 go to jail. So the rewards are great, but the risks are very slim. So that's one of the reasons that make it very popular.


How Will Technology Change The World?


Almost a decade before, none of us had predicted we will be tech-savvy to an extent that would astonish us all. Today, we all have smartphones in our hands, internet in every corner of the world, we can communicate, can eat, can travel and drive, can do online shopping and many more impressive technological innovations are on their ways to invade the world. Education has become easier, communication improved, the world turned into a global village, and it will be a big injustice if we don’t expect much better in the offing. According to the United Nations sources, in 2050 the world will be accommodating 9.7 billion people- that mean more loads on the planet, more severe problems, and more energy crisis but there is few ways technology will revolutionize the contemporary world. Let’s have a look at what is more in the next episode.


Balloon Internet

Though most parts of the world are provided with internet access and the 4th generation is spreading rapidly to serve the world all around, there are so many underdeveloped countries with such areas with no access to the internet. Provision of the internet on such large scales will require building infrastructure and the finance is a bigger hurdle on the way. To overcome the very issue and promise equity in providing the internet, the internet giant, Google is planning to bring balloons that will be called balloon internet.
The work has kicked off, and some countries like Sri Lanka and India are benefiting from this installation by Google. 2015 observed and experienced many practices, and 2016 will see much more in the offing as well. Thus, it can be generalized, the internet scarcity will be handled ultimately, and it will indeed change the world in upcoming years.

Food Shortage Will No Longer Be a Problem

The technology in the offing will be more fruitful in obtaining more crops and combat the traditional food production methods. It will become easy to produce genetically-modified crops in the house as well. That means the pest and environmental issues regarding food will be achieved and we will be getting sustainable and healthier foods.

Artificial Neural Networks

Artificial neural networks on their way to impress the world but there would be much bigger soon as well. These are the stimulated brains used in the traditional computers. Thus, these can be used to tackle the problems that we can never solve. In short, these ANNs will be in the limelight in the future. These are being used nowadays by Facebook to detect photos, by shipment companies for route identifications and credit card companies use them to find out frauds.

Social Purchasing

Social purchasing is not a new thing in the commerce but Facebook offered a sort of social buying through its ads, and so did Pinterest. All this leads to more demands and more purchasing opportunities in the future. Rather than the paid ads and posting, the content marketers will have to look forward to getting more sustainable ways. The only left solution is influence marketing, but that again carries paid marketing through influential personalities. However, influence marketing can also be done via collaboration, and this will become the future choice of every marketer.

Digital Networking

Nowadays, though, the global internet provision is managing all the resources and facilitating the world, in the offing, we will observe how the wireless networks will take over the digital networking. The time is near and only till 2025 cars, home appliances, and everything will be digitally connected. Technology will be stored for future consumptions and in one or the other way, energy crisis will be managed at all.

Augmented Reality

Virtual and augmented reality has reached and reshaped the content consumption. Facebook, one of the best and most social media forums, owns VR and using it all over the world. We will be able to see more products based on virtual and augmented realities.

Final Thoughts

We can expect everything from age reversing to overcoming food scarcity and a hell more is all awaited for the future lifestyles. This is time to brace ourselves for these innovative technological advancements. In short, technology will present the current world into a much modified version sooner or later.

Author Bio: 

Nicki works as a senior editor and writer at TheOneSpy Blog. She is an ardent reader and a professional writer. She spends most of her time browsing through technology related subjects such as operation of various devices and use of mobile applications. Her writing niche includes posts on fix-ups of common problems related to cell phones and gadgets and the use of monitoring application in business, social and personal circles.


Facebook Will Now Translate Page Posts

You don't need to post bilingual posts on facebook as the social media giant brings a new technology that will allow users to read posts on their preferred languages.


The AI-powered translation tool has been tested from the beginning of the year by the company owners and had been made available to certain facebook users and now has been made available to the public. The company already had a translation engine as many frequent users have noticed on the social network but this move by Facebook will bring an improvement to translation of text into a variety of languages to allow easily accessibility to some pages and services on the platform.

This amazing tool by Facebook is currently limited only to desktop users which lets users select from a variety of languages while composing a post. The post will be published in the language that has been selected by the the composer but it will appear to readers in the language that they prefer for example, English will be automatically to translated to Spanish to a Spanish Facebook user, so users will receive posts in the languages that they prefer.

The translation feature is available to those who are managing pages already, so if you are using a page then you check activate it on your page setting as the feature going through even though it is made available to use. the feature can be enabled in the language section on Facebook settings and also on the page settings.


If you have something interesting to add to this story please feel free to share with us in the comments box below and wish you the best week ahead.

7 Stylish Water-resistant Watches for summer

Summer is around the corner, and we cannot over emphasize what it means to look fashionable and stylish during that period. One of the best ways to look cool and fashionable is to have an elegant and stylish timepiece shining on your wrist. It is important to get one that is water-resistant so that you do not have to keep worrying whether water splashes on it as you get wet and wild on the lakeside. Here are seven watches that will take your summer wear to the next level.

Stylish Water-resistant Watches


1. Timex Weekender
The Timex Weekender is a great gem for those who want to put on the casual look. It is perfect and can be used anywhere with almost any kind of outfit. It comes with interchangeable nylon straps that offer over 40 colors for you to choose from. It is easy to read during the day and is can also be readable at night due to its indigo night light. You can still be time conscious as you take beach talks at night. These are the current fuse crunch tech news.

2. Suunto Essential Slate
When it comes to climbing mountains, very few can match the kind of quality equipment that Suunto produces. The Suunto Essential Slate is a very refined timepiece and comes with some essential features. This is a valuable asset for those who can’t keep away from the mountains. It has a compass, altimeter and barometer all perfectly combined in a steel case. It also has an elegant sapphire crystal and a textile strap.

3. Victorinox Swiss Army INOX
The INOX is a combination of style, elegance, and durability. The company ran numerous tests on it to ensure that it would water pressure, extended UV exposure, and even temperature extremes.  You can be sure that it will stand all the wild activities you are planning to partake this coming summer.

4. Casio G-Shock Ga.100Cm-8A
 If you are a lover of watches, then you already know that the legendary G-Shock has made a name for itself. From rap stars to soldiers in the Special Forces, this watch has beaten its competition hands down. Carry it to your summer vacation for durability, style and its ability to camouflage.

5. Autodromo Stradale
Summer does not mean swimming for everyone; there are those of us who enjoy the wonders of a powerful engine. If you are planning to participate in top-down motoring, then this timepiece is exactly what you need. It complements any driving ensemble with its Japanese automatic movement and the padded leather strap. Its styling will remind you of the gauge of an Italian sports car.

6. O Clock
O Clock has hit the market with its vibrant series of amazing silicon watches. The watches are available in four different sizes and over thirty-three colors. For those who love to mix and match, O Clock offers more than 60 different faces. If you are planning to take a dive, then you can comfortably do so since it is completely waterproof. As if that is not enough, all the watches come sealed in a pop top can.

7. Michelangelo Watch
The Michelangelo Watch is an elegant unisex watch that offers a great combination of water resistance and style. It is made of stainless steel that has been brushed and has two crowns. The button that is located at the 2 o’clock position is a light up button. You can use it to light the watch and get a clearer view of the time. The watch is water resistant to the depth of 100 feet.

Conclusion:
A watch is an important piece of fashion for summer or any other time of the year for that matter. Getting the right watch that offers water resistance and durability for summer could be a hectic process considering the activities that people enjoy during summer. Luckily, these watches allow you to enjoy a fun-filled summer while looking fashionable and stylish. Whether you are going diving, climbing a mountain or just strolling along the beach, there is something for everyone.  

Author Bio
Kathy Mitchell is a technology and gadget geek, writer & blogger by profession. She loves to write articles for many on-line communities, blogs, & websites related to gadgets & new technologies.Connect with her on  Google+, Facebook and  Twitter.