This article shows how to use Google's Takeout service to make a copy of the contents of all your blogs at the same time.
A backup is a copy that you can use to restore from if something goes wrong. For your personal compter, you may have a backup copy of the files on your hard-drive, so that if you lose the machine, you can get the files back, usually with a little work.
In blogging terms, a backup of your blog is a copy that you can use if you accidentally delete a post, or lose control of your blog, or perhaps even a copy of a blog that you have deleted but still want some last-chance access to.
Unfortunately Blogger does not offer a complete solution for backing up our blogs. Instead, we need to take separate actions to back up our gadget settings, our template when it is being edited, and our post-contents.
You can back up the posts from one content from the Settings > Other > Blog Tools tab. If you choose the Export Blog link, Blogger makes an xml file containing a copy of your posts and pages, and puts it onto your computer (typically in your Downloads folder), without affecting your blog in any way
This approach is fine if you only have a few blogs. But if you have several blogs it can get tedious: for example, for each blog that I run, I also have another one or two private blogs for preparing posts and keeping documentation.
Luckily the Google Take-out service takes the pain away, by backing up all your blogs (and other Google product contents too, if your choose) at the same time.
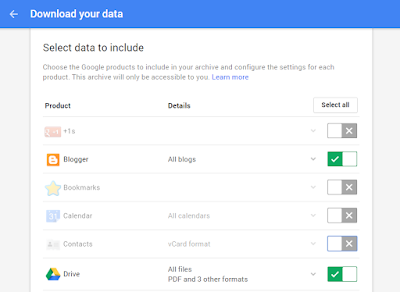
In the Select Data to Include section, make sure that Blogger stays ticked - but turn off the other types of content that you do not want.
Click Next (bottom left of the screen - there's a long way to scroll down.)
Choose the file type that you want your backup file to be saved in.
Choose how you want to manage the backup file which Takeout makes:
Click Create Archive.
Google will make an archive file, using the settings you have provided. They show a progress monitor, and this can take some time. When the process is finished, they send your and email, and show a link to your archive file on the screen.
Job Done! You now have made a backup file, containing the posts from all of your blogs. When you look at this file, you will find that it contains one sub folder for each of your blogs (and possibly others too, if you included other services in your backup.
How exactly you restore depends on where you saved the file, and what file type it is. But I highly recommend:
This will set you see the effect of restoring from this file made from Takeout, reassure you that the file you have really is a backup, and let you see what other items you need to back up.
Your backup will have these links, too, not the original pictures. And if you do back up the pictures separately and then restore them, they will not have the same URL, so the links in your blog posts may not work.
The only exception is gadgets that you have put inside posts: because these are inserted using HTML, they will be included.
How to put a gadget into a blog post
How to back up and then edit your Blogger template
Getting posts right in private, before publishing them
How to put a picture into a blog-post
A backup is a copy that you can use to restore from if something goes wrong. For your personal compter, you may have a backup copy of the files on your hard-drive, so that if you lose the machine, you can get the files back, usually with a little work.
In blogging terms, a backup of your blog is a copy that you can use if you accidentally delete a post, or lose control of your blog, or perhaps even a copy of a blog that you have deleted but still want some last-chance access to.
Unfortunately Blogger does not offer a complete solution for backing up our blogs. Instead, we need to take separate actions to back up our gadget settings, our template when it is being edited, and our post-contents.
You can back up the posts from one content from the Settings > Other > Blog Tools tab. If you choose the Export Blog link, Blogger makes an xml file containing a copy of your posts and pages, and puts it onto your computer (typically in your Downloads folder), without affecting your blog in any way
This approach is fine if you only have a few blogs. But if you have several blogs it can get tedious: for example, for each blog that I run, I also have another one or two private blogs for preparing posts and keeping documentation.
Luckily the Google Take-out service takes the pain away, by backing up all your blogs (and other Google product contents too, if your choose) at the same time.
How to back up using Google Takeout
Log in to your Google account, and go to the Takeout home-page at www.google.com/settings/takeoutIn the Select Data to Include section, make sure that Blogger stays ticked - but turn off the other types of content that you do not want.
- I usually leave Drive ticked, because a good number of the files on my Google Drive relate to my blog.
- You may also want to leave Google Photos ticked, if a lot of your pictures relate to your blog.
Click Next (bottom left of the screen - there's a long way to scroll down.)
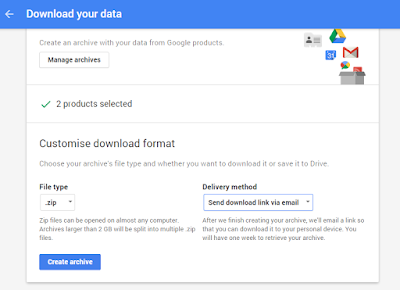
Choose the file type that you want your backup file to be saved in.
- Currently the options are zip, tbz and tgz. If you are not sure, and are using a Windows computer, then just leave it on .zip.
Choose how you want to manage the backup file which Takeout makes:
- If you choose Send download link via email then Google will send you an email message with a link to the file - click on this link, and save the file to your computer etc. You need to do this within one week of doing the backup, because after that Google delete it.
- If you choose Add to Drive, then Google will put the the file on your Google Drive, and send you an email to tell you that it's there. This approach works well, but the szie of the archive file counts towards your storage qoute, and of course it's only useful if you don't lose access to your account.
Click Create Archive.
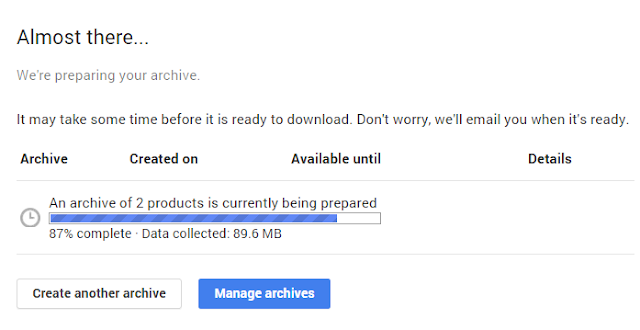
Google will make an archive file, using the settings you have provided. They show a progress monitor, and this can take some time. When the process is finished, they send your and email, and show a link to your archive file on the screen.
Job Done! You now have made a backup file, containing the posts from all of your blogs. When you look at this file, you will find that it contains one sub folder for each of your blogs (and possibly others too, if you included other services in your backup.
Restoring from your archive file
You may have noticed at the start of this article that I said that a backup is "a file you can use to recover from". This is important - a copy that you do not know you can use might make you feel secure, but really it may be a waste of space.How exactly you restore depends on where you saved the file, and what file type it is. But I highly recommend:
- Downloading the file to your computer
- Extracting it
- Checking that the extract has one file in its Blogger folder for each of your blogs
- Saving this file for one of your blogs
- Opening a private test blog, and using the Settings > Other > Blog Tools > Import blog function.
This will set you see the effect of restoring from this file made from Takeout, reassure you that the file you have really is a backup, and let you see what other items you need to back up.
Limits to backing up and restoring a blog from an archive file
Pictures and videos
Blogger does not actually store videos or pictures that you have put into your posts inside your blog. Instead it stores links to them in YouTube, Picasa web-albums / Google Photos, or whatever other stoage service you have used.Your backup will have these links, too, not the original pictures. And if you do back up the pictures separately and then restore them, they will not have the same URL, so the links in your blog posts may not work.
Pages
The export and import function does include the content of Pages, so these will be available in your restored blog. (Tested to check that this is working, 1 June 2015).Comments
Comments will be included in your backup and in blogs that are restored from it.Menus, templates, gadget, themes etc
None of these are included in your blog posts, so they are not included in your backup file, no matter whether you make it individually or through Takeout.The only exception is gadgets that you have put inside posts: because these are inserted using HTML, they will be included.
Draft and scheduled posts
Post status (Published, Draft, Scheduled) is not retained in your backup: if you choose to automatically restore all posts when you were importing to the recovery blog, then all the posts will be published. If not, then they will all be draft.Related Articles:
Backing up the settings for your gadgetsHow to put a gadget into a blog post
How to back up and then edit your Blogger template
Getting posts right in private, before publishing them
How to put a picture into a blog-post


