This article shows how to use a Google Drive form to put a survey questionnaire into your blog or website.
 Blogger's Poll gadget is a tool for putting a question onto your blog, which you visitors can answer. The gadget collects the answers for you, and shows the results.
This is very easy to do: you just add a gadget in the usual way, and set up the question and answer options, and the expiry date (ie the date after which you won't accept any more answers).
And with some template editing, you can arrange to put this gadget either above or below your blog-post gadget and only show it on certain posts or pages - so it's an easy way of running a very simple survey on your blog.
But it has a lot of limits: you can only ask one question, answers must be from a pre-defined list of possible answers, there is no other way for you to collate the results, etc.
.
Google Drive's Forms feature is another option. Being from Google, you can be fairly sure that it will always be compatible with Blogger. And it's set up so responses are put straight into a spreadsheet - you don't have to manually receive and do data-entry for each one, thus saving you time.
Forms lets you build a data-collection page which you can put into your blog as a survey (or as a feedback form, etc). It's better than using the Blogger Poll because it lets you:
The types of answers that you can choose from are:
You can break up the survey over multiple pages (by selecting Insert > Page Break in the form editor. And you can add section headers (text), pictures, videos the same way.
Log in to Google Drive, using the account that you want to own the form and the response data. Note that this does not have to be your blogger account.
Choose Create > Form
Give the form a title and choose a theme from the list that is displayed.
Create your first question:
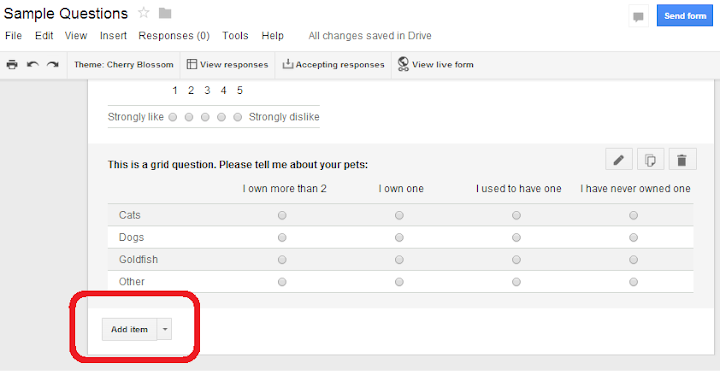
If you want to add another question, click the Add Item button - and keep doing this until all the questions you want are on the form.
(Hint: it's often easier to sketch out your questions on paper or a wordprocessor first - it's easier to think about how you should ask good questions when you're not worring about the mechanics of setting them them up in the system at the same time.)

Re-arrange the questions by clicking on the bar at the left and side, and drag them up or down to the right place.
When you have finished adding questions, click the Send Form button.
This opens a pop-up window where you can choose to send the form on Google+, Facebook or Twitter - and it gives a link to the form that you can put into emails etc.
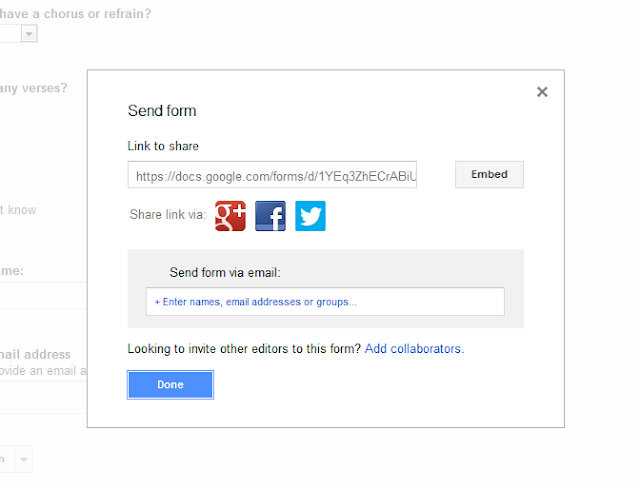
To put the form, instead of just a link to it, onto your blog or website, click the Embed button.

Set the height and width, then click into the code field. Press Ctrl/A to select the whole field, and then Ctrl/C to copy the HTML code that is provided.
You can then install this code into your blog etc the same way you would install any other 3rd party code.
I'm still discovering what email and RSS subscribers see - it may depend on what type of email software and feed-reader they are using. (I hope to update this sentence shortly after publishing this post.)
A sample questionnaire looks like the one below. This doesn't contain real questions. Rather I've just made one question of each type to show you what they look like: feel free to enter some answers and experiment with how the options work. It has a very strong pretty theme / colour-scheme: I chose this to make sure that it stuck out, but there are some more subtle / professional-looking themes available too.
Installing 3rd party HTML into Blogger
Adding a gadget to your blog
Showing a gadget only on a specific post or page
How to make simple questionnaire forms in Blogger

This is very easy to do: you just add a gadget in the usual way, and set up the question and answer options, and the expiry date (ie the date after which you won't accept any more answers).
And with some template editing, you can arrange to put this gadget either above or below your blog-post gadget and only show it on certain posts or pages - so it's an easy way of running a very simple survey on your blog.
But it has a lot of limits: you can only ask one question, answers must be from a pre-defined list of possible answers, there is no other way for you to collate the results, etc.
Google Drive Forms are a better way to build a poll or survey
There are lots of tools that let you build a survey which you can embed into your website. Some are paid services, while others (eg Survey-Monkey) are called "freemium services" - they give you a limited service for free (eg up to 100 responses) but have a charge for services above that..
Google Drive's Forms feature is another option. Being from Google, you can be fairly sure that it will always be compatible with Blogger. And it's set up so responses are put straight into a spreadsheet - you don't have to manually receive and do data-entry for each one, thus saving you time.
Forms lets you build a data-collection page which you can put into your blog as a survey (or as a feedback form, etc). It's better than using the Blogger Poll because it lets you:
- Ask more than one question (I think there is no limit on the maximum number that can be asked)
- Have different types of answers
- Choose a theme (ie a standard graphic / layout format for the form)
- Choose whether or not you are currently accepting survey responses (the "accepting answers" field is a toggle between accepting and not-accepting)
- Choose whether the answers are stored inside the form itself, or in a separate Google Drive Spreadsheet file - the latter lets you do analysis of the results, without affecting the form.
The types of answers that you can choose from are:
- Text - ie a short phrase, which includes numbers and other special characters.
- Paragraph text - ie a longer field
- Multiple choice (you set a list of valid values, a person can only choose one)
- Checkbox (you set a list of valid values, a person can select as many as they want)
- Choose from a list (you set a list of values which are shown as a drop-down list, a person must select one)
- Scale (eg "rate this between 1-5 where 1=outstanding, 5 = dreadful).
- Grid (a matrix of subquestions and possible answers - see the example form below)
- Date (a date value, with or without a time component)
- Time (a time value, measured in hours, minutes and seconds, am/pm)
You can break up the survey over multiple pages (by selecting Insert > Page Break in the form editor. And you can add section headers (text), pictures, videos the same way.
How to build a questionnaire for your survey using Google Forms
Log in to Google Drive, using the account that you want to own the form and the response data. Note that this does not have to be your blogger account.
Choose Create > Form
Give the form a title and choose a theme from the list that is displayed.
Create your first question:
- Enter the question and help text,
- Choose the question type and answer options,
- Set up any data validation rules,
- Click Done when finished.
If you want to add another question, click the Add Item button - and keep doing this until all the questions you want are on the form.
(Hint: it's often easier to sketch out your questions on paper or a wordprocessor first - it's easier to think about how you should ask good questions when you're not worring about the mechanics of setting them them up in the system at the same time.)
Re-arrange the questions by clicking on the bar at the left and side, and drag them up or down to the right place.
When you have finished adding questions, click the Send Form button.
This opens a pop-up window where you can choose to send the form on Google+, Facebook or Twitter - and it gives a link to the form that you can put into emails etc.
To put the form, instead of just a link to it, onto your blog or website, click the Embed button.

Set the height and width, then click into the code field. Press Ctrl/A to select the whole field, and then Ctrl/C to copy the HTML code that is provided.
You can then install this code into your blog etc the same way you would install any other 3rd party code.
Job done!
You now have a questionnaire form on your blog - and people who answer the it will do the data-entry for you.What do your readers see
People who visit your blog using a web-browser will see a survey-questionnaire, which has all the questions you set up, and had radio buttons, checkboxes etc if you use them.I'm still discovering what email and RSS subscribers see - it may depend on what type of email software and feed-reader they are using. (I hope to update this sentence shortly after publishing this post.)
A sample questionnaire looks like the one below. This doesn't contain real questions. Rather I've just made one question of each type to show you what they look like: feel free to enter some answers and experiment with how the options work. It has a very strong pretty theme / colour-scheme: I chose this to make sure that it stuck out, but there are some more subtle / professional-looking themes available too.
Troubleshooting the form creator
Changing the form size
The code for an embedded survey form looks like this:<iframe src="https://docs.google.com/forms/d/GEEKY-NUMBERS-REMOVED/viewform?embedded=true" width="500" height="500" frameborder="0" marginheight="0" marginwidth="0">Loading...</iframe>
You can change the values for width and height, margin width and height (all measured in pixels) without going into the Forms editor. You can also set the frame border - not yet sure what the unit of measure and options for this are.
Cannot add another question
If you enter a question and select Done, but the Add Item button is greyed out, then your internet connection may be slow: check it, or try again at a later time.What other trouble-shooting tips or questions do you have?
Related Articles:
Installing 3rd party HTML into Blogger
Adding a gadget to your blog
Showing a gadget only on a specific post or page


