Showing posts with label Pictures. Show all posts

Getting the HTML code to put a picture into your blog's sidebar, header or footer

You can use the Post Editor to get the HTML code that you need to put a picture into your sidebar (or header or footer, or anywhere else a gadget can go).


The Picture gadget is the normal tool for adding a picture to your blog's sidebar.

But sometimes you want more control over the picture size or behaviour.  Eg, you may want to have two pictures very close to each other and guarantee that they're the same size.

To do this, you need to get the HTML code for the picture, and then put it into your blog as an HTML-gadget.  Fortunately, Blogger's Post-editor make it very easy to do this without writing the code yourself.


Using the Post Editor to generate the HTML for a picture

1  Start a new Post  (NB   you're not ever going to publish this:  it's just a work-area)

2  Don't enter any text:   just use the Picture icon on the toolbar to add a picture.   Blogger will prompt you to upload the picture, or to choose it from a Google-album-archive or to enter its URL:  add the picture the way that you usually would.

3  Switch to the HTML tab   (top left of the editing window).

This show you the HTML code for displaying the picture, as it is set to display in the Post (depending on the picture-settings you've chosen, it may be centered or right/left aligned, and the size may vary).

Copy the HTML.

5  Switch back to Compose, so that you don't get confused the next time you edit a post.

Return to the list of posts:  you may be asked if you want to leave the page without saving - the answer is Yes.  Or you may have a new draft-status post, which you can delete.


Job Done!   You now have some HTML code in your memory which you can paste into an HTML/Javascript gadget, or anywhere else that you may need it - even into another post that you are editing in a separate window, or into a totally different tool.


Related Articles

Stopping pictures on your blog from being "clickable"

Inserting a Picture into a blog Post.

Putting 3rd party HTML into your blog

Center-align the gadgets on your blog

Hosting pictures outside of Google / Picasa

Inserting a picture into your blog as a gadget

How to put pictures into unusual shapes, using PowerPoint

This article explains how to put a picture that is one shape (a "square peg") inside an image of another shape (a "round hole" - or star, elipse, octagon, etc) - using Microsoft PowerPoint.

Original title:   How to put a square peg into a round hole - in pictures


Wooden clothes peg in a customized rectangle with rounded corners.
Recently, I've been using PowerPoint to make the thumbnail image for my posts. This means that I own the copyright of the pictures, so can share them without worrying about copyright issues.

One approach I've used is to find an interesting copyright-free picture that is related to the theme of the post, and then put it inside a shape that adds some visual interest or has some words along side it.  Another thing that I'm going to try is using multiple pictures in this way to make a more-interesting-than-usual collage.


How to put a picture inside a shape

NB PowerPoint commands are based on Office 2007 and 2010 - but the same principles most-likely apply in other versions where the commands may be slightly different.


1   Get your image file, and save it somewhere on your computer.

A wide range of picture-file formats are supported by PowerPoint:  in the 2007 version this includes as shown in this list:

2     In PowerPoint, make a blank side (Home > Layout > Blank)

3     Then add a shape (Insert > Shapes, click on the shape you want)


Intially, the shape with have the fill-colour and border that are the current default values. But you can change this, which is what we are going to do.


4    Right-click on the shape, and choose Format Shape from the pop-up menu


5    In the Fill tab, choose Picture or Texture Fill, then click the File button and navigate to the image file you got in step 1, and click OK.


6   Make sure that the portion of the picture that you want to show is in the picture:  to start with the shape is centered on the middle of the picture.

Change this using the Offsets to move the shape to the left or right over the image.   You can make the offsets positive or negative as shown.

You can monitor the results of different settings in PowerPoints slide thumbnails (on the left hand side, if you have it showing), or by dragging the pop-up menu to a different place in the screen so that you can see the shape itself.


Job Done - at this point, you have an image that is cropped to the shape that you chose - now you just have to put it into your blog.


Using the picture


There are (at least) three ways to get the shape-cropped-picture from PowerPoint into your blog.

I usually copy the item from PowerPoint, and then paste it into a picture editor (Paintbrush etc), manually.   This is an old-fashioned approacb - but it lets me adjust the size and position of the image, and save it (usually a .png) with a file-name that describes the image really well which is good for mating the blog come up in search results (SEO).   The this picture can be inserted into a post just like any other picture.

Another option is to choose File > Save As from Powerpoint, and choose to save the slides in an image format, eg JPEG which can also be inserted into a post in the usual way.  You are likely to be asked whether to put all the slides in one image, or to make one image per slide. Usually, it would be best to make one image per slide - but I don't use this method because the image that is created is the size of the whole slide, rather than just the pictures on it.

A third option is to display the PowerPoint file as a slideshow. This isn't something that I'd do for only one shaped image, but may be relevant in some situations.


Adjusting the size and quality of the picture


One thing that you don't have any control of inside PowerPoint is the zoom level of the inserted picture.

If you make the shape larger, it doesn't show a larger proportion of the picture. Instead, it just shows the existing picture in a larger size, as you can see in the slides shown here.

I suspect that if you want to zoom in to a particular area of the image file, the only approach is to edit the picture in another tool, crop out the bit that you do not want to show, and only keep the part that you want to include inside your shape.

However PowerPoint does have some limited control over the contrast and brightness of the picture, from the Picture tab of the Format Shape window.


Can you do this in other tools?  Why PowerPoint?


Yes, you can.

Photoshop, and similar commercial tools almost certainly have features like this, and I'm certain that GIMP (like a public-domain, less powerful version of Photoshop) and Inkscape (another public-domain image program which is more focussed on scalable-vector-graphics and objects than on pixels) also have these features.

So why use PowerPoint?   In short, its (relatively) cheap and many people have access to it already.   It's also very easy to learn, compared to the other packages, and what you learn is likely to apply to lots of tasks and not just in making pictures for your blog.


Related Articles:


Putting a picture into a blog-post

Post.thumbnail and post.summary - ways of describing blog posts

Showing a PowerPoint slideshow in Blogger

Copyright, blogs and Blogger/Google

How to find the URL for a picture in Google Photos

This article describes how to get the URL or internet address of a picture in Google Photos, and the difference between Google's shareable links and URLs.


Google Photos is a tool that help bloggers (and everyone else) to manage their picture collections. It replaces Google+ Photos, and works alongside Picasa-web-albums.   You can read more about it here.

In Google Photos, there are two different types of web-address for a photo.
  • One is the URL, and this can be used to refer to pictures from Blogger, or from other tools that want a link that just shows the photo, eg Twitter, Google Maps.  This is the traditional style of internet-address for a photo.
  • The other is the shareable link.   This is what Google Photos provides from the Share function.   Shareable links can be used in Facebook, and other places where the photo that is being shared is displayed within a web-display, rather than just as a picture.   (Ref:  How to make and manage shareable links in Google Photos.)

Unfortunately shareable links cannot be used in many applications.  This is because they don't just show the picture.   Instead they load a display showing the picture-date, the name and picture of the person who is logged in to Google at the time, and any other pictures that you have included in the same shareable link.

If you want to use an image from Google Photos in a tool which cannot use shareable links, you need to find it's URL, instead.   At the moment, Google Photos doesn't have a way to get this - but luckily it's easy enough to find.


How to get the URL or web-address of a photo in Google Photos, using your computer

Log in to Google Photos

Navigate to the picture that you want to get the link for.  

Click on the picture, so you see it in full screen mode.


Right click on the body of the photo and choose the "copy link" command from the menu that pops up where you clicked.  

The exact wording of this command varies between browsers on operating system.   For example in Chrome / Windows 8, it is simply "Copy Image URL"


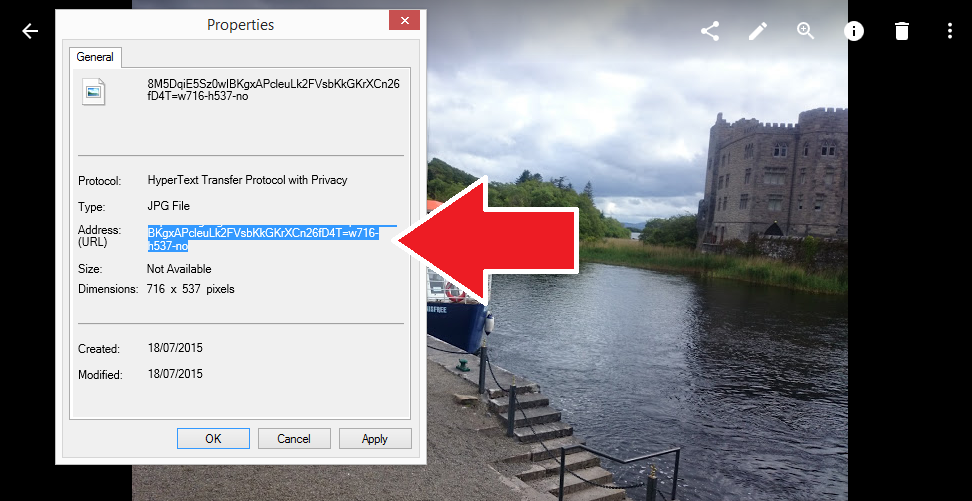
In Internet Explorer 11 / Windows 8, you need to choose Properties from the pop-up menu, and then copy the value from the URL-field in the window that opens


Job done! The URL for the photo which you were looking at is now in your computer's memory, and you can paste it (with ctrl/v or Edit > Paste) into any other place that wants it - for example Blogger's photo-insert wizard, or an email message or discussion forum or chat window.


The URL from your address bar doesn't work

You may be tempted to just copy and paste the URL from the address-bar in your browser. And this will work for you.

But if someone else (or you, when you are not logged in to the same Google account) tries to use it, they will get either:
  • A 404 error (if you are logged in to a different Google account), or
  • Invited to log in to your Google account - followed by a 404 error if the Google account you log in to is not the one that owns the picture.


How to get the URL or web-address of a photo in Google Photos, using your phone (Android or iOS)

Unfortunately I have not managed to find a way to get photogrpah URL (rather than the shareable link) from my smartphone as yet.

If you can suggest any ways to do this, please leave a comment below.


Where to find more information

Introducing Google Photos:  how does it compare to Google Plus Photos and Picasa-web-albums

How to change the date of a picture in Google Photos

How to get the shareable link for one or more pictures in Google Photos

Putting pictures and text side-by-side in blog-posts

How to share pictures from Google Photos, using shareable-links

This article describes how to get a link to one ore more photos from your Google Photos collection, using the Shareable Link controls.   It also explains how to delete shareable links that you have made in the past


Google Photos is a tool for managing picture collections. It replaces Google+ Photos, and works alongside Picasa-web-albums.   You can read more about it here.

Shareable Links are a new type of linking introduced in Google Photos, which let you easily share one or more pictures at the same time.   You can email them, or use them in tools like Facebook.

When someone opens a shareable link, they see a display with the date, the name and picture of the person who is logged in to Google at the time, and all the pictures that are included in the same shareable link.

If you want to use an image from Google Photos in a tool which cannot use shareable links, you need to find the URL for the photo, instead.


How to get the shareable link for one photo in Google Photos


Log in to Google Photos

Navigate to the picture that you want to get the link for.  

Click on the picture, so you see it in full screen mode.

Hover your mouse towards the top-right of the screen, and you will see some control show up: these are quite small, and are white (so may be harder to see against some backgrounds).

One of the controls is the Share icon:  it looks like a side-ways triangle with one bar missing.     Click it.


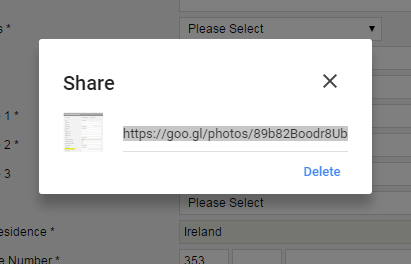
In the Share pop-up that opens, click "Get shareable link"


Wait while Photos generates a link.

When it is finished, copy the link text.  
(Ctrl/c on the keyboard is the easiest way to do this, since the text is automatically selected).


Job done! The display address for the photo which you were looking at is in your computer's memory, and you can paste it (with ctrl/v or Edit > Paste) into any other place that wants it (eg Facebook, in an email message, or something that will accept an address which displays the photo inside a "wrapper" of some sort.  s photo-insert wizard, or an email message or discussion forum or chat window).


How to get the shareable link for more than one picture


You can share several (or lots) of photos with someone by just giving them one web-address, which opens up a screen with all the photos.

 To do this:

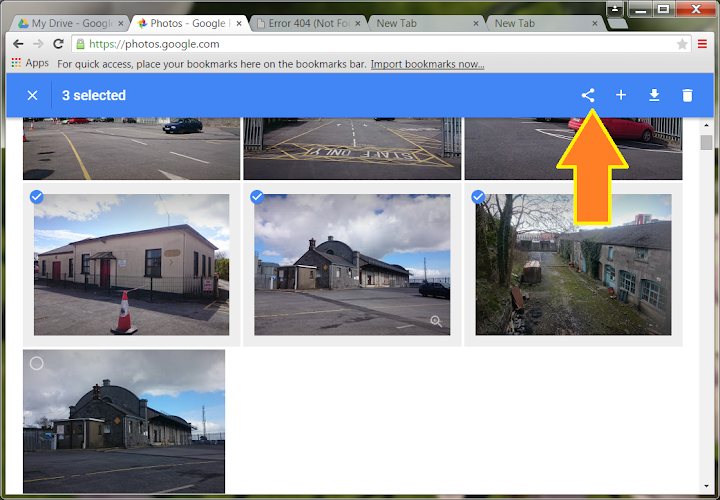
Click the small selection icon (tick) at the top left hand side of each picture that you want to include.
(Once a photo is selected, the icon shows as blue, and there is a border around the picture).


Hover your mouse towards the top-right of the screen, and you will see some control show up: these are quite small, and are white (so may be harder to see against some backgrounds).


Click the Share control icon:  it is the one that the arrow is pointing to in the picture just above this.

Continue in the same way as for getting a shareable link to an individual photo (ie the section above)


What does the Delete link do

You may have noticed that there is a delete function on the Shareable link screen.


If you click it, then you are given the chance to delete any existing links to the currently selected group of photos.


This doesn't seem to make any sense at the time when you are first making the link.

But it also works later on:  if you have the same photos selected and choose to get the shareable link again, you will get the same link - and you may delete it instead.

This does not delete the photos themselves, just the previous link to the currently-selected group of photos.   If anyone (or anything, eg Facebook) tries to use that link again, they will get an error message instead.

Another way to delete links is from the left-side menu in Photos:  Choosing  More > Shared links shows you al list of all shareable links you have ever made, and then for each one you can either copy the link or delete it.


Where to find more information

Introduction to Google Photos

How to put a picture into a post in Blogger

How to change the date of a photograph in Google Photos

This article shows how to change the date associated with a picture in Google Photos.


Update- August 2015

There is now a feature to change the date of individual pictures or videos in Google Photos.

To use it:

  • Navigate to the picture / video you want to set a new date for
  • Click the "information" icon (small "i" currently near the top-right of the photo viewer screen)
  • In the right hand panel, hover your mouse over the item in Details which has a picture of a calendar beside it.
  • Click on the pen icon which appears while you are hovering
  • Enter the new year, month, date and/or time (in 24-hour clock) for your photo or video.
  • Click Save.
Job Done!   You have now changed the date stored with your image or video.


There are still some photos that you cannot see through Google Photos (eg ones uploaded directly through Blogger with some settings, or shared in Google Hangouts).   For these you need to use the date-editing features in Picasa-web-albums, which are described below.


Original Article

When you open Google Photos by default you see the All Photos tab, which shows every picture in your Google account, sorted by the date on which the picture was taken, with the newest at the top.

This works well for recent photos that were taken with smartphones, and so most likely have the correct date-time attached to them.

But for older photos, that were added to Google in bulk when you finally uploaded them from your camera's memory card, the attached date may not be right.

It's even possible to have some photos with no date attached to them - and it looks like Google Photos, very confusingly, shows a nominal date figure in 2075 for these.

One way to avoid the confusion caused by these wrong dates is just to use the Collections tab to view your pictures, and to put photos with the wrong dates into appropriate collections (aka albums) yourself.

But if you want to keep using the All Photos view, you may want to alter the date for some of your  individual photographs, so they show up in the right order.


How to change the date for a picture in Google Photos

Unfortunately Google Photos doesn't have a feature for doign this (yet).   But you can adjust the date assocaited with with a picture by using Picasa Web Albums - provided you have at least some aspects of a Google+ profile (eg a Google+ Page) associated with your Google account.

Follow these steps:

Go to Picasa Web Albums, using the no-re-direct link: https://picasaweb.google.com/lh/myphotos?noredirect=1

Find the album that the photo(s) you want to change are in

Click on the album - this will open the album, and display each picture in it.

Click on the photo you whose date you want to change.

From the menu bar, choose Actions > Edit on Google+.   This opens the photo in Google+'s photo viewer mode.


Click on the drop-down beside Photo Details in the right hand information bar.


Use the options in the pop-up window to choose the correct date, time and even time-zone.


Click Save


Job Done! If you now look at the picture in Google Photos, you will see if with your newly changed date associated with it.


What if you don't have Google+

If Edit in Google+ is greyed out and cannot be selected, then this means you do not have Google+ associated with your Google account.

 The only work-around for this currently is to share the photo (from Google Photos) with another Google account that does have Google+, and use that to change the date.


Where to get more information


Introducing Google Photos - another tool for managing your photo collection.

Understanding Picasa desktop vs Picasa-web-albums

All about Google accounts

Blogger and Google Photos - what's changed, and what hasn't (yet)

This article gives a brief introduction to Google Photos, and how it relates to both Blogger and Google+ Photos.


Google's recent announcement of Google Photos opens the door for Blogger to make some improvements to how it works with pictures.

Why? Well Google+Photos simply wasn't a way forward.   Too many Blogger users chose not to "upgrade" their Google accounts to Google+ accounts, so it wasn't possible for Blogger to force Google+ features on everyone. And that was even after they removed the rule about one G+ account per person, and allowed Google+ Pages to be turned into stand alone accounts with their own passwords.

However Google Photos is basically Google+ Photos, without the need to have a "plus" account, and with some other nice features, like

  • Free picture and video storage (any number of pictures, provided they aren't "too big"), 
  • Image recognition and search
  • Sorting pictures by date, but giving options for you to group them into albums

Read more about these Google Photos options here.  

This means it will be possible for Google to replace Picasa-web-albums features with Google Photos features at some time in the future, even if they're not ready to do this yet.


What's changed - and what hasn't (yet)?

So far, I haven't noticed any changes to the photo-upload or image-choice features in Blogger.

There's still an upload option, there's still a tab to choose photos from Picasa and one for your phone - and I don't know what the criteria for showing photos in the latter tab is, but it's certainly not listing all the photos I've taken from my phone.


I am expecting they will change to become more Google-Photos-esque, sooner or later.

But for now, though, not that much has changed.

Your Google account still only has one collection of pictures.

Your pictures may be photographs you have taken or other image files that you have created and uploaded (eg like the thumbnail picture that I constructed for this post).

As well as the various mobile phone applications (official ones for iOS and Android, unofficial ones from various other companies), there is now one more (to make six) pieces of desktop software or websites from Google that you can use to manage (aspects of) your picture collection:

Note:   Even though you only have one photo collection, each tool may need to build it's own "index" (or whatever it calls it) to work with your photos.  Making all your photos (especially the historic ones) available in each tool might take a while to do: For example, not all my photos are visible on Drive yet: when I scroll to the bottom of the display I get a message saying "Stay tuned, your older photos are coming soon" - and looking at what is displayed, it's only photos that I have posted from my current smartphone (not the old one) to one particular blog.


And the tools don't all do the same things. In particular, there are features like albums and slideshows are still best done from Picasa (more info here: http://picasageeks.com/2015/05/google-photos-announcementthis-is-big/) - and  Picasa Desktop's photo editing tools are still vastly better.


edits you can do in Picasa dessktop but not on-line
Example of a photo editing effect which is possible in Picasa Desktop, but not in Google Photos


Where to find more information