How to get a valid URL for a picture in Google Photos

This article explains the problems with getting valid, SEO-friendly links to images that are in Google Photos - and shows a way of doing this using Google products.  


Previously I've explained how to get a URL for a picture stored in Google Photos - and the difference between Photo's "shareable links" and real photo URLs.

The sort of link you get with this procedure looks like this:
https://blogger.googleusercontent.com/img/b/R29vZ2xl/AVvXsEicBjWubDi8QRpBFQMwz_faua-kdrtXUga4x4NCQoWMD7OY1kYEG8IwpN3M-N7_EAku3ihH_h6OGeuiCwr1pPH9eZMC161W40Tp73c8Z_Bm0exgtkyzFVzrXfH_apWVU1Hc0qObZNgg6dVN/w1006-h566-no/

There are some issues with using URLs (aka web-addresses) obtained like this:
  • They aren't recognised as valid image file links by many online tools which ask for the URL for an image (eg phpBB, Blogger - and many others)
  • Sometimes they stop working
    (I've not been able to track down exactly when, but there are reports around the internet from people who say that links like this work for a while and then stop).
  • They don't include the SEO-targeted keywords which you carefully used to name the photograph file before uploading it to Google Photos.  
    (Not everyone does this, and it's a lot harder for photos that were taken on your phone.   But some people do it, and to them not having the keywords in the photo URL is a big deal.)

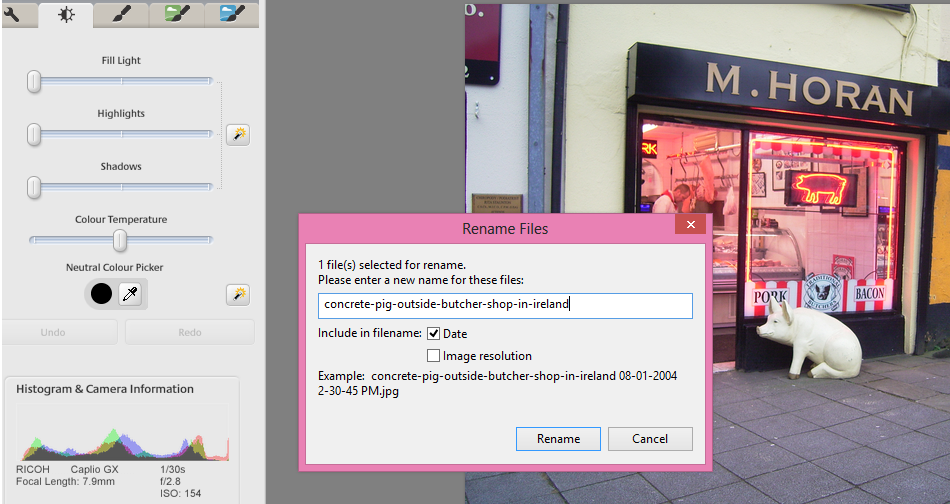
Luckily, there is a way around these problems, which gives you a web-address for a picture stored in Google Photos that ends with the same file extension which you uploaded to Photos  (eg .jpg, .png  .bmp), and which includes the keywords which you used in the file name.


How to get a valid URL / web-address for a picture in Google Photos, using Blogger


1    If you haven't done so already, then upload the photo to Google Photos, in whatever way you usually would  (if you have your smartphone synched with your Google account, you may not even notice uploading it).

2    In Google Photos, find the photo and put it into an album.  
(It doesn't matter which album you use - and  you can delete the album again later, you just need the photo to be in an album for now, and you need to remember which album this is).

3    Using a desktop or laptop computer (ie not your phone), go to Blogger
  • If you've never used Blogger before, you may be asked to accept the terms and conditions.   Just say "yes" to this   (you are't actually going to use Blogger to publish anything).
  • If you don't already have a blog, the click the Create a blog link, and follow the steps to create one.
    (You won't be publishing this blog, so it doesn't really matter what name you give it or what template you use - just pick anything that's available.   )
  • Or if you do have one or more blogs, just pick one (any one is OK: you're not actually going to publish to it) and go into the Blogger Dashboard.

4    Click New Post
This opens up the post editor.  

5   In the tool-bar at the top of the post editor window, click the Insert image icon.


It's the rectangle that looks like a picture


6   Choose the From the Google Album Archive tab.
(Google have changed the name for this a couple of times since they introduced the feature - right now it says exactly what I've listed here - the name may vary, but you get the idea:   choose your Google Albums).

7   Navigate to the album that you put the picture into, in step two.   Open it, and find the picture, and select it.

8    Choose Ok.  

9     Wait a moment while the image is placed into your blog-post, and automatically resized.   

10    Click on the Edit HTML tab (currently at the top left side of the post-editor) to go into Edit HTML mode.     You will see HTML code like this.
<div class="separator" style="clear: both; text-align: center;">
<a href="https://blogger.googleusercontent.com/img/b/R29vZ2xl/AVvXsEh0qBL3bXRzV_5-2shyPXkaFRAMDURwm2P7cLCzZuiZ74n_SeZ7c_I3ZKa0OoidYW4FqlD40V0TkI5tA9oxO-dfQu-N9NyKcnLRH1RacFgqkzHbN-Y6qGDl6jOs_Q-peiOxNRzVI2M9CnQ/s1600/tarmacadam-promenade-sunny-september-day.PNG" imageanchor="1" style="margin-left: 1em; margin-right: 1em;"><img border="0" height="180" src="https://blogger.googleusercontent.com/img/b/R29vZ2xl/AVvXsEh0qBL3bXRzV_5-2shyPXkaFRAMDURwm2P7cLCzZuiZ74n_SeZ7c_I3ZKa0OoidYW4FqlD40V0TkI5tA9oxO-dfQu-N9NyKcnLRH1RacFgqkzHbN-Y6qGDl6jOs_Q-peiOxNRzVI2M9CnQ/s320/tarmacadam-promenade-sunny-september-day.PNG" width="320" /></a></div>

Or like this, if you didn't give the image a better filename before uploading it:
<div class="separator" style="clear: both; text-align: center;">
<a href="https://blogger.googleusercontent.com/img/b/R29vZ2xl/AVvXsEjeO0PMVmDc6bRt6mBZNLckM3SrO1Asyn5MlgjUVjrAi4HTsM6TuYeWa_Gv60vArBWNHgk2VFd1Q4Ter7jRVW6lSU183_Ygeb6JAb3emhJv5YowBK7vaPegZgs7x5YdN61jWWR-HxialGw/s1600/DSC_3573.JPG" imageanchor="1" style="margin-left: 1em; margin-right: 1em;"><img border="0" height="180" src="https://blogger.googleusercontent.com/img/b/R29vZ2xl/AVvXsEjeO0PMVmDc6bRt6mBZNLckM3SrO1Asyn5MlgjUVjrAi4HTsM6TuYeWa_Gv60vArBWNHgk2VFd1Q4Ter7jRVW6lSU183_Ygeb6JAb3emhJv5YowBK7vaPegZgs7x5YdN61jWWR-HxialGw/s320/disc0137.JPG" width="320" /></a></div>

11   Find the part which starts   src="     and ends with a closing quote-mark.      This is the URL for the picture you chose.   In the example above, it's the part in bold-red

12    Select and copy the text between the two quote marks after src=    ie   the equivalent to the piece of code shown in red.


Job done!     A general-purpose, valid, well-formed, web-address for the picture you want is now in your computer's memory, and can be pasted into anyplace where you want to use it.

To get out of Blogger, click Close (near the top right of the screen), and agree to leave the page anyway even though it means you will lose your work.


Troubleshooting / Extra for experts

Finding the image code in your post

If there is other material in the post that you are using, then you may want to put some marker text before and after the photo while you are still in Compose mode, to make it easier to find the right  part when you are in Edit HTML mode.


Getting a valid link to someone else's photo

You may want to find a valid URL for a photo that someone else has shared with you - but of course you cannot add this to one of your own albums.   In this case, the solution is to download a copy of the photo which was shared, then upload it to your own Google Photos.


Using the blog you've made for other things

Maybe using Blogger like this has given you ideas about other things you can use it for:   that's great, Blogger is an excellent tool for publishing material on the internet with a minimum of fuss - while also having enough features to let you do some sophisitcated things.   And even just the post editor can be a handy HTML generator at times.   You might like to read Getting Started with Blogger, for some tips about how to set up your Google account and very first blog.


Other challenges?

Do you have any questions around this approach, and how to solve problems with it?   Please a message in the Comments box at the bottom of the page, and I'll see if I can find a solution.


Related Articles

How to get an URL for a picture stored in Google Photos - version 1

Using marker text to find things in your post's HTML code

Things to consider before starting to use Blogger

Using Blogger's post-editor as an HTML generator


Saving a post if Blogger's Publish button doesn't work

Saving a post if Blogger's Publish button doesn't work

This article is about how you can save a  post even if Blogger's Publish button won't let you save your work.


Imagine you've been working on a Blogger post for several hours.    It's finally ready: you've got the wording exactly right, everything is formatted with bold, italics and bullet-points, your pictures and links are all correct, etc.   

But then your internet connection stops working.   Or you click the Publish button - and get a message like  "Post cannot be saved due to HTML errors".   You can't work out how fix the problem, and you need to stop working on it now!

This may seem like a disaster - hours of work wasted.

But luckily there's a very easy way to save your work, and tools to help you diagnose problems.

Saving your work and recovering it later

How to save the post that you have written

  • Switch to Edit HTML mode (this is a tab at the top left corner of the editing window. 
  • Select all the text in the window (Ctrl / A does this in most browsers)
  • Copy it.
  • Go to somewhere outside of Blogger that you can save text:
    Perhaps a text-editor like Notepad, or a plain-text formatted email message.   Even a word processor like MS Word can work, provided you remember to save your file as text.  Or you may want to use a source code editor - see the section below about fixing code errors.
  • Paste in the contents that you copied earlier.
  • Save the file.
  • Switch to Compost mode (this is optional - I usually recommend it so that you don't get confused the next time you come back to Blogger and see the "funny codes")
  • Exit the Blogger post-editor by closing the window - say "ok" if the system asks if you really want to leave the page without saving. 

Recovering your work later on

This is the reverse of what you did to save the work:   open the text file, copy the contents, go to Edit HTML mode in Blogger and paste them in.

You should then be able to go in to Compose mode, and see the post as it was when you stopped working on it.

At this point, if the HTML is ok and you have fixed the issues with your internet connection, you can Publish your post.


Fixing problems with your HTML

If there are problems with the HTML, then you need to find them, and fix them.    Usually, fixing them is easy, once you've found them - but the finding can be  hard if you have a large and complicated post.

Sometimes Blogger will tell you what the problem with your HTML is, and show where it's happening by putting the "wrong" code into reverse text when you try to Publish it:  this makes it easy to see if you scan through the HTML for the post.

However sometimes Blogger doesn't show you where the problem is - I've noticed this more often recently when using IE 9.0 on complex posts.   Instead you get an error message like
Your HTML cannot be accepted: Closing tag has no matching opening tag: SPAN
or whatever the specific problem is, but none of your code is highlighted. This can make it hard to track down and fix the problem.

A low-tech way to find the problem is to paste the code from the saved file into Blogger's Edit HTML window in smaller sections, and Publish to work out if the problem is in the code that you just pasted:  if everything in the first section of code can be published, but there is an error message for the next part, then you know what section the error is in.

A major disadvantage of this approach is that you need to publish the post many times, and the first time it will definitely not be "finished".   this is OK if you use a pre-publication blog to prepare your posts, but if you don't do that, it can cause your RSS subscribers to form a bad impression of the quality of your posts.

A better option is to use a source-code editor like Notepad++ (free, Windows only) or XMLSpy (30 day free trial, far more complex code editor), which has tools to help you find and fix problems with your code.


Related Articles

Get your posts right before you publish them for all to see

What is RSS and why it matters for your blog

Getting the HTML to put a picture into your blog

Putting text and pictures alongside each other

Putting a badge for a Facebook Page into your Blog

This article describes making a Facebook badge to promote your page, and putting it onto your blog.

What is a Facebook page

This article is about how to make a badge to promote a Facebook Page.

This is an example of the "follow me" approach to linking your blog and the social networks, although for Facebook pages your reader becomes a Fan rather than a Friend.

Many people are confused about when they should use each of the types of "thing" in Facebook, ie
  • Profiles - accounts for flesh-and-blood, living, breathing, individual people
  • Pages - for websites, brands, and organisations that don't want to approve all their Facebook members
  • Groups -  for organisations that want to approve individual members who join (and in return, group-owners can send private messages to individual members.
The most common "thing" for blogs to have is a Page - and a Badge is the tool which Facebook provides to help you to promote a Page on your blog or other website.


How to make a badge to promote a Facebook Page

View all your Pages using the arrow drop-down at the very top right of Facebook's toobar.
(Facebook chance the place for actions like this from time to time - you may need to look around to find your pages.)

Copy the URL for the Page you want to promote
(One way is to right click on its name, and choose copy-link-location- or whatever phrase your browser uses.   Another is to to go the page, and copy the URLfrom your address bar.)

Come back to this article and click  here --- Facebook Social Plugins, to reach Facebook's tools.
(I used to have instructions to launch this from Facebook - but I cannot find any link to it from my Pages page any more.)

Choose Page Plugin  / Web.  

Scroll down the page, and set the options for your badge.  The first one is critical - the others optional:
  • Facebook Page URL - this needs to be changed to the URL of your page (which you copied earlier)
    If you have less than 25 Fans already, then your page's URL will be something like http://www.facebook.com/pages/Are-You-Blogger/144194435594821 and you can get it by copying the link from the list of Pages for your account.
    Once you have more than 25 fans, you can choose a  page-url on the Edit Info > Username screen.
  • Tab - the tab on your page that is shown
  • Width - choose a value that suits the space on your template where you want to put the box.
  • Show faces, show header:  choose options that suit your purpose and blog template
  • Show stream:  this controls whether you show posting from the Page inside your blog
As you choose options, the preview at the bottom updates to show what the button will look like:


When you are happy with the selections, choose Get Code.
  • Currently, there are options for an iframe or Javascript SDK:   I recommend using the iframe, unless you are comfortable with the two-part installation needed for the Javascripit, and you are sure that the visitors you want to target will have Javascripti enabled. 


Copy the code provided

Install the code into your blog - there several options for installing the HTML, depending on where you want to put the badge or button.


Job Done!   Your blog will now display a gadget that promotes the selected Facebook page - people can view and like your Page from within your blog.


What your visitors will see

People who visit your blog through a web-browser will see a Facebook area, including a Like button and whatever other options you have chosen.

This can be quite a powerful tool:  you can easily use two or three different combinations on different parts of your blog:  one that has no border, no faces and no header but does show a Stream can effectively look like a "live" feed from your Facebook page to your blog, while another one with different options can show off the size of your fan-base.

Be aware that the Like button shown in this button gives people the option to Like your Page in facebook  - not your blog directly, and not the current post that they are reading.   If you want them to be able to Like your blog or blog-posts, you need to provide this option separately (and many of your visitors are likely to be confused by the different).

As always, people who read your blog via a feed reader (Bloglines, Google Reader, etc), or by email subscription (eg having used follow-by-email) may not see the Facebook item, depending on where is places and what options their email program has.


Customizing the code

You can change the characteristics of the box without having to generate the code from Facebook again.   For example you can later the width and/or height - just remember to do it in both of the places required if you are using the iframe option:
<iframe src="http://www.facebook.com/plugins/likebox.php?href=http%3A%2F%2Fwww.facebook.com%2Fpages%2FBlogger-Hints-and-Tips%2F144194435594821&amp;width=160&amp;colorscheme=light&amp;show_faces=false&amp;border_color=purple&amp;stream=true&amp;header=false&amp;height=395" scrolling="no" frameborder="0" style="border:none; overflow:hidden; width:160px; height:395px;" allowTransparency="true"></iframe>

fyi, I could have just quoted this code, and said to use it on your blog.  But I don't usually do this when I'm describing how to link Blogger and any third party product, because it's likely that Facebook (or whoever) will change their code in the future:  it's always safest to get the most up-to-date copy of the code from the source-site when you need it.

The facebook page where you get the code from also has more information about controls you can set in the code, too.   Check it out for more information.


Do you need to own the page you want to promote?

No - not any more.

At one stage, the first step in these instructions was to
"Log into Facebook with a profile (ie personal account) that has administrator rights for the page you want to promote."

But that's no longer necessary.   You can promote any Facebook page that you want to, on your blog.

But be aware that if you show the page-feed on your blog, and you don't own the page, then you have no control over what is shown.   It's possible that a feed from someone else's Page will show material which breaks Blogger's terms and conditions - or which you simply don't want on your blog.    For this reason along, I'd recommend only promoting your own, or closely trusted, pages on your blog.


Related Articles

Putting HTML from a third-party into your blog

How the data in Blogger blogs is organised

Linking Blogs and Websites

Tools for linking Blogger and the Social Networking sites

Putting a Facebook "share this" button on your blog

Copyright, Blogs and Bloggers

Why RSS / Subscribe to Posts is important for bloggers

How to rename picture files in Picasa-desktop

This article is about re-naming files from within Picasa-desktop, to provide SEO benefits for your blog.


Picasa's desktop software is a good tool for organizing and editing photos on your local computer.   And it is still available for you to use, even though Picasa-web-albums has been replaced by Google Albums + Google Album Archive.

For pictures that are important in your blog, I still recommend preparing them in a tool like Picasa-desktop and then uploading the finished versions to Google Photos before putting them into a post, because:
  • The desktop tool has better editing tools (cropping, zooming, auto adjustment, adding watermarks) and Picasa-web-albums does.
  • It lets you control the size of the uploaded file
  • It's easier to ensure sure that you still have full-size files on my local machine for printing etc, as well as smaller, more optimized, copies to use on web-pages.

Picasa-desktop folders have a very nice relationship with files and directories with the Windows file system:
Each Picasa folder = one directory on your computer
Each Picasa photo = one file on your computer.

And this means that you can set various properties (eg file name) from either inside Picasa or from Windows.


Ways to associate keywords with photos in Picasa-desktop

Picasa-desktop has two tools for adding keywords to photographs:
  • You can enter a caption for each photo. This is basically some text, which is stored "inside" the photo, in a hidden-field that is only visible when you are using a software tool that displays the captions. (In technical terms, the caption is stored inside the  IPTC/XMP Description field inside the JPEG etc file that you have.)
  • You can enter one or more tags for each photo - again, text (individual words or phrases) that is stored in the  IPTC/XMP Keyword field.

Unfortunately captions and tags aren't shown when you put a photo in your blog.

This means that the captions and tags are possibly not used by Google in understanding what the photo is about: I've never heard any SEO experts recommending that the  IPTC/XMP fields should be keyword optimized.   For some bloggers this won't be an issue - but it is if SEO is important for you blog.

Another approach is to put the keyword(s) into the file-name, because file-name is one of the factors that Google looks at when it is indexing images.   And this has a nice spin-off for you as well - it means that they keywords are available to any file-search tools that you use on your computer, not just to specialised ones that work with images.

For a long time, I believed that to change the name of a file, I had to go out to my Windows files (using Windows Explorer or similar, and rename them there) - and then wait for Picasa to catch up with the change that I'd made in the file system.   But one day I accidentally hit the F2 key, and found that it opens up a very useful dialog box indeed.


How to Change the name of a file in Picasa desktop

Navigate to the picture that you want to change the file-name for, using the Picasa-desktop software.

Press the F2 key. This opens a Rename Files window.

Type in a new name for the file, for example    concrete-pig-outside-butcher-shop-in-ireland

Click the option buttons if you want to include today's date or the file-resolution in the name  (I don't usually do this, because I organise my photos into folders according to the date they were taken)


Click Rename to save the change


Job done!    The file has a new name in your computer's file system, and is still loaded in your Picasa database.


How to change the name of a file in Google Album Archive or Google Photos

Currently there is no way to change the name of a file after it is uploaded it to either Google Album Archive or Google Photos:  .

One option is to download the photo, rename the file on your desktop, and re-upload it.   But if you change the name in this way, you also need to change the link to the file in every place that it has already been used.   That said, if you only use your photos in one place each, then making a new copy with a different name, uploading it and changing all the existing links can be a good way to deal with copyright theives who have hot-linked directly to your photos.


How to choose "good" names for your picture files

Early SEO advice was to use:
  • Lowercase letters only (some computers don't like uppercase)
  • Only hyphens between words (not spaces, underscores, etc)
  • Regular characters only (no á é etc)

Today, I'm not sure if it matters so much. In most cases, it's probably more important to use rich, descriptive key words  that describe all the aspects of the photo, than to worry about how they're laid out.   But I do tend to follow the advice anyway - just in case.


Related Articles

How to show your photos in a slideshow from Picasa

Does SEO matter for your blog?

How to put a picture into your blog.

Understanding Picasa-desktop vs Picasa-web-albums

Taking action when someone has copied your blog without permission

Learn to trade Forex In Richards bay


Forex trading has become one of the most profitable careers in the world which one could use to make money online without having to work hard but your mind will do the work, we are offering investors an opportunity to make money the smart way like banks and investors do, Ajaxsurf with Valutrades broker are giving you an opportunity to invest in the Financial markets.

Book a class with Ajaxsurf and learn to trade the Forex Market with professional bank traders.
We also do surrounding areas such as Empangeni.


Centering gadgets in Blogger

This article is about centering gadgets from 3rd parties that you install onto your blog.


Previously, I've described how to put HTML code from a 3rd party into your blog.

When code like this is put into a gadget, one common question is "how do I center it?"

There are (at least) three options for doing this, ie for putting a gadget into the middle (horizontally) of the area it is located in.   These are described below.


Option 1: Centre all the gadgets in your blog

To center-align every single gadget in your blog, just, add a CSS rule to your blog.  The rule to add is:
.widget {
  text-align: center;

This will centre the contents and title of every gadget on your blog.


Option 2: Only center-align the specific gadget

To only centre-align one gadget, which is made from HTML/Javascript code, you can just put the gadget-code from the 3rd party (eg PayPal, Amazon, etc) inside a centering statement, like this:

<div style="text-align: center;">

PUT THE CODE FROM THE 3RD PARTY HERE

</div>
Install the code into your blog the way you would usually install this 3rd party code.

This will centre-align the contents (not title) of the specific gadget that you add.

Note the American spelling of the word "center" - and don't forget to put the closing </div> statement at the end.

There may be some gadgets where it would be possible to add the centring statement to the gadget code itself, rather than putting it outside.    I don't recommend this (unless you're so comfortable with HTML and CSS that you don't need to be reading this article), because it introduces a risk that you will interfere with some other aspect, or that you will lose the centering if you ever need to refresh the code.


Option 3 - Make a new style rule just for the gadget

If you only want to centre one (or several) gadgets - not all of them - then it's best to define a new style that is to be used on specific gadgets:  put this new style into your template, and then apply it to the gadgets like this.
<div class="YourNewSytle">

PUT THE CODE FROM THE 3RD PARTY HERE

</div>

This approach will only centre the gadget contents - not any header that you give to it.

There are lots of options that you could put into the new style rule, but at a minimum it needs to have
.YourNewStyle
{
  text-align: center;
}
Notice that there is a "." (ie a full-stop) before the name of your new style.

Also, it's best not to use a number as the style-name (eg "2nd-gadgetStyle"), because this doesn't work with some browsers.


Related Articles

Putting HTML code from a 3rd party into your blog

Adding a new CSS style into your template

Centering the header in your blog

Putting a gadget above your blog's header

Removing the attribution gadget from Designer-template blogs