Showing posts with label Article. Show all posts

Making someone an author on your blog

This article shows you how to set up another person (ie another Google account) as an author for your blog.

Google, Blog-Authors and Blogger

Setting someone up as an "author" in Blogger is one way that you can let other people post to your blog.

It's easy to do: you tell blogger to create an invitation, which sends the person an email saying you would like to be an author, they click a link in the email and then sign in with a Google account to accept the invitation. And once it is done, the person can write and edit their own posts.
All you need to know is the person's email address: it doesn't matter if it's a gmail address or not.  You can send invitations to people with hotmail, yahoo, and indeed any email address where your invitee can read their email.

 However the other person will need to use a Google account (which doesn't necessarily include Gmail) to accept the invitation: don't waste time inviting people who are allergic to Google and not willing to sign up for an account.


How to make someone an author on your blog

Send them an invitation:
  • Go to Settings > Basic > Permissions
  • Beside Blog Authors, click + Add Authors
  • Enter the email address of the person you want to invite
  • Click Ok


A few minutes later, the email address that you sent to receives an email invitation, like this, from no-reply@google.com:
-------- Original Message --------
Subject: You have been invited to contribute to AnotherTestBlog
Date: Tue, 06 Dec 2011 20:47:45 +0000
From:   THE NAME OF FROM YOUR BLOGGER PROFILE 
To: maryc@act.nz

The Blogger user Mary has invited you to contribute to the blog: AnotherTestBlog.

To contribute to this blog, visit:
http://www.blogger.com/i.g?inviteID=468-GEEKY-LOOKING-CODE-973&blogID=31-GEEKY-LOOKING-CODE-83

You'll need to sign in with a Google Account to confirm the invitation and start posting to this blog. If you don't have a Google Account yet, we'll show you how to get one in minutes.

To learn more about Blogger and starting your own free blog visit http://www.blogger.com.


When the person who gets the email clicks on the link, they are taken to Blogger, and asked to sign in

Once they have clicked the link and sign in, the Google account that they log in with has "author rights" to your blog (just the one you invited them to, not any others you've made).

The person does not need to have a gmail or Google account for you to invite them to be an author - but they will need to sign in using a Google account (new or existing) to accept the invitation.


What you will see

Once the person has accepted the invitation, the Google account name (which looks like an email address) that they use to accept it is shown as an author on the permissions tab (the one that you went to to invite them to be an author):


If they accept the invitation by signing to Google in with a different email address than the one you invited, you will get a message telling you about this. It says
-------- Original Message --------
Subject: Your invitation was accepted using a different email address
Date: Tue, 06 Dec 2011 22:51:33 +0000
From: Blogger
To: YOUR-EMAIL-ADDRESS

Your invitation for THE-EMAIL-ADDRESS-YOU-INVITED for your private blog "AnotherTestBlog" has been accepted, but using a different email address. It has been accepted by THE-ACCEPTING-EMAIL ADDRESS.

If your invitation has been accepted by someone you do not know or did not intend to invite, please visit the Permissions tab of your blog where you can choose to revoke access.

Thanks,
 The Blogger Team


What your new author will see

When your new author logs in to Blogger.com - using the Google account they accepted your invitation with - they see a regular Blogger dashboard, except that they only have access to a limited range of functions:
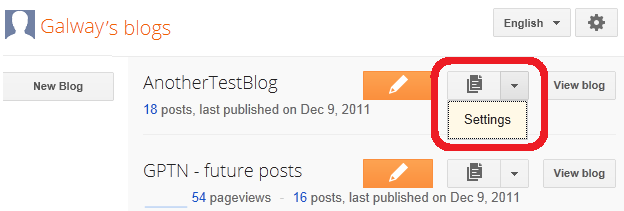

An author can:

  • Create a post,
  • Edit the date for posts they have made
  • Turn comments of for posts they can edit (provided the default setting is On)
  • Edit a post that they made
  • Add a mobile device so they can post using SMS/MMS - (this may only work in certain countries)
  • Set themselves up to post using email (the mail2Post feature) - note that their "secret words" address is different to yours - and that an author could use this feature to let anyone else post from their account.
  • Remove themselves as an author


An author cannot:

  • Edit posts made by other authors or administrators
  • Change the template, layout or gadgets
  • Change the blog's URL, title or description
  • Set up for any email address to receive comment-moderation alert messages
  • Moderate comments (even about their own posts), or change the global comments settings
  • Edit any of the blog's Pages
  • See the blog's statistics
  • Install AdSense into the blog (although they can put ad-units of their own inside their own posts)
  • Give other people permission to write on the blog - except by sharing their own mail2Post "secret words" address.
  • Change the default language and date/time settings for the blog
  • Alter the RSS feed settings in any way
  • Set up Google Analytics for the blog
  • Edit the Adult-content warning setting, or the blog's Open-ID URL.


Troubleshooting

Be sure your transfer works

If you are accepting the invitation yourself (eg you are transferring the blog to another Google account that you control), then make sure that you either
  • [Recommended]: use a different browser for each Google account, or
  • Each time you need to change Google accounts, log out of the present account, clear your cache and re-start your browser.

Make sure the emails arrive

We sometimes see questions in Blogger Help Forum from people who say that they sent invitations, but the email message was never received.

The most common solution is that the author-to-be needs to check their spam folder - very often that's where the messages have gone.  If that doesn't work:
  • Try sending the person an email address from your regular email account - so you know if there's a  problem with their email.
  • Cancel the invitation (there's a link in the Invitation screen), wait a few minutes and try again.
  • Try sending an invitation to a different email address that you control, and forwarding that message (without clicking the accept link) to the person.yourself.

If none of this helps, post a question in Blogger Help Forum: tell us your blog's URL, and exactly what options you have tried.


More things to think about

As well as giving the person rights, you may also need to work with them to make sure they understand how you use certain features in Blogger:
  • What policies do you have for responding to comments - Who is notified about comments left about their posts?  What guidelines are followed about complaints?  How do you deal with spam and abuse - and what do you regard as abuse?
  • How do you organise pictures, and other external files that your blog uses?
    I always upload pictures to Picasa-web-albums outside of Blogger, LINK so I can control the picture size/resolution. If you do this, you need to make sure that your new author knows where to file their pictures.
  • Have you got a place where you keep policies, documetation, ideas for new posts, etc (eg I use a separate documentation blog for this) - does your new author need access to this?


What next?

Giving someone administrator access to your blog.


Related Articles

Understanding Google accounts

Putting AdSense ads into your posts

How to put posts into your blog's pages

Why RSS / Subscribe to Posts matters for your blog

Your blog and the so-called-social networks:  Facebook, Twitter, eg al

Putting pictures onto your blog

Advertising and your blog, some things to consider

Turning the RSS feed off or on again

By default, public Blogger sites offer an RSS feed.  But there may be times when you need to turn it off, either for good or temporarily.

RSS and Blogger

Previously I've explained what RSS is and why it's important for bloggers.

But there may be times when you want to turn off your RSS feed, either because you don't want to offer one at all, or because you want to make some posts, or changes to existing posts that are not notified to  your RSS subscribers.

Or you may need to turn it back on again - for example, if you want to use a dynamic template, to offer a subscribe-by-email option, or to enable automatic posting to Google +.


How turn off a blog's RSS feed:]

In post-Sept 2011 Blogger (aka the new interface):
  • Go to the Settings > Other tab.
  • Under "Site Feed", use the drop-down to change Allow Blog Feed to "None".  
    (This is the only option that totally turns your feed off:  the others, including Custom, leave some aspects of the feed on.)


How turn on your RSS feed

This is just the same as turning the feed off (see above), except that your need to choose one of these options instead:
  • Full - the whole post is shown in your feed
  • Until Jump Break  - only the part of the post before the jump break is sent to your feed
  • Short - only the first 120 (ish) letters, or less if the jump break comes first, are sent to your feed.

Also, the new interface has a Custom option, and the old interface has an Advanced Mode.   If you use these , you can individually set the value for post feed, comments feed (all comments), and comments-feed-per-post.


Private blogs and RSS
Blogs that are not public do not offer RSS feeds, because they cannot be secured.   So if your blog is private, then it does not matter what setting you choose, your blog will not offer an RSS feed.


Related Articles

Understanding RSS - why it's imporant for bloggers who want to grow an audience

What are dynamic templates

Linking your blog and the social networks

Follow-by-email gadget:  an easy way to offer email subscriptions

Private blogs aren't as secure as you might think

Putting files into Blogger's root directory

This article explains the issues, and options, for putting a file into the "root directory" of your Blogger blog.


Turnips (Brassica rapa) 
from Wikimedia commons
Originally posted to Flickr 
by thebittenword.com.  
Licensed under the terms of 
the cc-by-2.0.
If you are using certain non-Google products to enhance your Blog, they will sometimes tell you to put a file into your root-directory.   They may even tell you to use an FTP  tool to do this.

Sometimes this happens when a product also gives you code to install into your blog , This approach is used when the code is written for websites in general rather than specifically to work with Blogger: putting useful files into a place relative to the root directory makes it a lot easier to move a website from a test-address to the live one, so is a common approach outside of Blogger.
Or maybe the other tool has been designed to verify that you do own the website in this way, rather than asking you to change the website code itself.


How to add a file to your blog's root directory

The short answer for Blogger users is "sorry, you cannot do this".

 The long answer is still no:  "there is no way to do this, but see the rest of this article for an explanation of why, and some suggested work-arounds."


Why not? Every other website tool lets me do this.

Home - cpg1.5.x demo 1287551599033
Posts:  Blogger's tool for managing
the content on our blogs
If you're clever, and have lots of time, you can make a website just using a text-editor like notpad, a graphics programme, and ftp software that lets you put the files into the right places on computer that's connected to the internet.

Tools like Dreamweaver take away a lot of the time-consuming work, and some of the need for cleverness.  But you still need to know a lot about the internet to do things in a way that makes a good website.

Content management systems make this easier still: they let a technically-minded person do the nuts-and-bolts work to make the website, and give authors / artists / editors / content-creators simpler-to-use tools that let them put "stuff" (ie content) into the website, without needing to worry about the details of how it works.

Blogger is a (very simple) website content-management system, it creates our web-pages for us based on data that we put into certain places. Administrators can set up and change templates, other people, eg authors simply make posts.

When we use Blogger, the main way that we change the data in our web-pages is using the Blogger software. 

Some items inside posts or gadgets can be changed using other software, eg Google Docs, provided they were were set up using that other software in the first place. But - key point - there is nothing in the way that Blogger is put together that means we need to access the base directory. So they don't let us do so.    And I doubt that this this will change anytime soon.


What to do instead

The options for getting around this restriction depend on how the file that you need to put into your root directory is intended to be used.


Installing code

If you have code to install into your blog, and a file to go with it, then you just need to
  1. Host the file somewhere else (maybe in your Picasa-web-album for the blog, if it's a picture)
  2. Change the code to point to the full path of where you have hosted the file, instead of the relative path used in the code
For example, here is the code for a button linking to my blog, with the picture in the root directory:
<div class="separator" style="clear: both; text-align: center;"> <a href="http://www.areyoublogger.blogspot.com" imageanchor="1" style="margin-left: 1em; margin-right: 1em;"> <img border="0" src="//Logo.png" width="100" /></a></div>
To change this to use a specific location, I just add a file-path and the file-name of the picture wherever it is hosted.
<div class="separator" style="clear: both; text-align: center;"> <a href="http://www.areyoublogger.blogspot.com" imageanchor="1" style="margin-left: 1em; margin-right: 1em;"> <img border="0" src="https://blogger.googleusercontent.com/img/b/R29vZ2xl/AVvXsEh86rlBmDlB-Z4rZ3eWjsFzrfLPhtqSTJUBFplqXP-MFlM0_xYiunzCUGyaoqUmAiLqEEXnZ2NX6oxlcoa__9_Qw-bWci3qbQpjGlLzZB_pKxzd2km8ev_0DFjgS8FebcjzejwwmxxPUy2v/s320/Logo.png" width="100" /></a></div>

TIP: blogger's editor sometimes gets links mixed up, so it's important to start the filepath with "http://"


Verifying ownership

If someone wants to use a file's position to check that you control a website, then they will have code on their own website that looks for the file in your root directory.

You cannot change this code. And you cannot place the fie.

So you need to ask them for an alternative way to verify, that is suitable for people without root directory access.

 If they don't have any alternatives, try lobbying for this on their product support forum:  by not having alterantives, they are ensuring that Blogger users, among others, cannot use their service.

If the official answer is still "no", then you could also ask in other on-line forums if anyone has found any other work-arounds.


What other reasons have you found for installing files to your root directory?   
What work-arounds have worked for you?


An afterthought: what isn't recommended

Transclusion-iconI've recently seen someone suggest in a help forum that people with custom domains can put files into their blog's root directory by FTP'ing the files into place.

 This may be true, if the service that you are purchasing from your domain registrar includes file-hosting. But file hosting(*)
  1. Isn't necessary for a custom domain used in Blogger (since Google hosts our files for us), and
  2. Isn't available as part of the services when you buy a custom-domain through Blogger.

So it's not a general solution for most Blogger users, though it may work for some.

Initially I was a little sceptical of the idea: Blogger doesn't expect to see any files in our root directory, so I was concerned that it might do strange things if it found them there. But on reflection, I think there is probably a low risk of this happening, since the file-location is outside Blogger's control.

(*) To avoid any confusion, file hosting and DNS hosting are not the same thing. If you buy a custom domain for your blog from a registrar without going through Google/Blogger, then you do need to pay for DNS hosting, but do not need to buy file-hosting.


Related Articles

File hosts - places to store files used in your blog.

Picasa-web-albums: a quick introduction

How Blogger data is organised

Setting up a new administrator for your blog

Options for letting other people write in your blog

How to remove the numbers in blogger post URL's

This article looks at the numbers that are in web-page addresses created by Blogger, what they mean and how you can influence them.


no symbol over digits section of blog-post website address
When you first publish a post, Blogger assigns a permanent web-address (aka an URL or a permalink) to the post.  I've previously explained how you can control the words used in this hyperlink.

A common question from people who are researching SEO for their blog is "how do I get rid of the numbers in the post-URL?".

Unfortunately the answer is not as straighforward as most people hope for.


Numbers near the start of Blogger URLS

As described in setting the content of your post's permalink, the URL given to posts published in Blogger shows the year and month of the original publication date for the post. I think this is because Blogger was originally set up as an on-line diary, with a lot of the features organised around the post-date.


numbers in the website address of a blog post, as show in Internet Explorer


Today, there are ways of giving your blog a home page, showing your posts in pages, and changing the order of the posts, which let your blog be a lot more than a date-ordered web-log.

Some blogging software (eg Wordpress) lets you choose the structure of the URLs which are used, eg leaving the date out totally, or puting it after the words.

However Blogger does not currently have any way to remove the date-part of the post URLs. And I could be wrong, but my best guess is that this will not change anytime soon.

So what options are available to remove the year and month numbers?

If you just don't want people to know the correct month and year of the post, then you can change the date before you publish the post for the the first time. Maybe make it something non-sensical (eg 1/1/1990). (However do remember that your RSS feed will show the actual date of publication, not the assigned date).

If you have some content where any month-and-year are particularly irrelevant, put it into a Page instead of a Post - because Page URLs don't contain a date.  But remember that you need to give users a way to get to these Pages, and that remember that they are not sent out in your RSS feed, so subscribers won't see the content.

The third - and least attractive - option: is to accept that this is how Blogger works and that you need to live with it or switch to another blogging tool.


Numbers near the end of Blogger URLS

Blogger puts digits at the end of post-URLs in order to make sure that each post ever published has a unique address.

Notice that I said "ever published": if you publish a post, then delete it, and then publish a second post with the same year, month and either title or customized-URL-words, then the second post's URL will have some digits put on the end, to stop it being the same as the first one.

Once a post is published, you cannot remove the digits and keep the same words and month/year.  The only way to avoid them is to make sure that your post-URLs are unique. So if you publish a post and notice that it has digits on the end of the URL, one option is to delete that post, and replace it with one which has a different publication date or customized-URL-words(don't forget to copy the post contents before you delete it!)   Or you could just set it back to draft status, and then publish it again with different and this time unique customized-URL-words.

For example, if you publish and find that you get
www.all-about-cats.com/2012-07/vegetarian-cat-food-recipes01.html
you may want to delete the post, and republish the content in a post with a different date like
www.all-about-cats.com/2012-06/vegetarian-cat-food-recipes.html


Does it really matter?

Crystal 128 karmPersonally I'm not convinced that having numbers in Blogger URL's is a problem.

If the content is so weak, and poorly linked to by other sites and social media that the presence of numbers in the URL is affecting visitor numbers, then it seems to me that there are more important things for you to be worrying about.

On the other hand, if your blog is already popular and well-optimized, and you're looking to get the last possible bit of SEO benefit - you'd be better off using your time to write even more good quanlity, unique, content so that your exisiting subscribers visit more often, instead of fussing over something that you cannot control.

Or am I mistaken?


Related Articles

Setting the custom-URL for a blog post

Giving your blog a home page

Putting Blogger posts into pages

How to set the date for a post

The difference between Posts and Pages

What is RSS and why it matters for bloggers

Removing a post from your blog

Copy the contents between blog posts - and keep all the formatting.

Using Labels to categorize your Blogger Posts

This article explains how to use Labels to categorise the Posts in your Blog, and how you can get around some of the limitations in Blogger's categorising tools.

Why categorise your Posts

watermelon salad recipe can be labelled / tagged as  fruit, salad, dessert and pink
Grouping your blog's contents makes it easier for people who have reached your blog via Search to find other posts that they may be interested in - provided you add tools to your blog that let them navigate using labels.

It's essential if you want to make it look like you have put your Posts into Pages.

And it helps you to find posts yourself.


Blogger's tools for working with categories

The only tool that Blogger provides for categorising or grouping Posts is Labels.

In short, Labels are tags that you apply to posts.

Each post can have as many Labels as you want (there is an upper limit of 5000 labels-per-blog, but most people don't get near it).

And you can use labels for different purposes.  For example, a post titled "Photographing Long-haired Black Cats" could have three different labels
  • Cats - the the animal it's about
  • Photography - for the functional category
  • Jane Smith - for the author
The Labels gadget lets readers choose which groups of posts to see:  when a visitor clicks an item on the labels gadget, they are shown a list of posts that have the selected label applied to them.

You can add the Labels gadget as many times as you like, selecting which specific label values to show each time.   In the example above, you might add it three times, once for ainmals (showing Cats, Dogs and Rabbits), once for function (showing feeding, grooming and photography), and once for author (showing Jane Smith and Joe Bloggs).

There are three steps that you need to follow to make effective use of Labels in Blogger.


How to add Labels to your blog

Step 1:    Label your Posts

For each post, add one or more labels.  You can add labels either:
  • In the post-editor, in the Labels section at the right side of the post-editor o
  • From the Posts tab, tick the posts you want to put the labels on, and then use the drop down arrow from the top icon that looks like a small luggage-tag:   choose the label or "New label ...").

Step 2:    Add the labels gadget

Add the Labels gadget to your blog - the same way you would add any other gadget .   You can add it as many times as you need, choosing which labels to show each time.
 
Warning:  If you choose to show only a certain selection of Labels in a gadget, then this is all that it will show even if you add new labels to your posts later on.  However if you don't restrict which labels are shown, then new ones are automatically shown in the gadget if they are associated with published posts.

Drag-and-drop the labels gadget to wherever you want it:  some people put it just underneath their header, to make readers think they've looking at a more traditional web-page.

Step 3:   Add Labels navigation

Another way for your readers access labels is from the display in the post header or footer of the list of labels assigned to each post.

This is turned on by default in most themes:  you can change the setting and move it around using post-templete settings found under  Layout > Blog Posts (edit).


What your visitors see


A List of Posts:

If a visitor to your blog clicks on an item in the labels gadget or in the labels-list that is show for apost, then the "labels-view screen" is used to show them the posts that have the selected label.

This screen is like the main screen: is only shows a certain number of posts and visitors need to use the newer-posts and older-posts links to move back through the list.

Like the main screen, if you have used jump-breaks in your posts, then the list only shows the first part of each post.  If you haven't used jump-breaks, then the whole posts are shown.


A summary message:

Unlike the main screen, in most themes there is a message at the top of the page saying:
"Showing newest posts with label WHAT-EVER-YOU-CHOSE. Show older posts"

Or if there are no published posts with the selected Label, the message is slightly different.  Some people change their theme to customise or remove this message:  Chuck in The Real Blogger Status has written an excellent description of  how to do this.


What Labels aren't - but appear to be

Many people think that Labels are a way of actually putting Posts into pages.  However the Posts aren't actually moved around.  The labels-screen is just a way of viewing a smaller-than-usual group of Posts, and can make it look like you have put your posts into sub-pages.


Making multi-level categories

Currently, Blogger only supports one level of grouping.  The only way you can make sub-groups of Labels is to add two categories to each post - one for the "major" category, and one for the "minor" category

For example you might use labels like these
Major category:  Minor categories:
Recipes: Sweet, Savory, Wheat-free
Party-games: ice-breaker, run-around, silent, outdoor
Music: lively, soft & gentle, traditional, instrumental
Each post would need to have at least one label from the major category, and one from the minor categories.

If you do this, you need to be clever about adding two levels of gadget, with only a selected group of labels shown in each gadget.   You might even need to edit your theme, to only show certain gadgets in certain situations.


Related Articles

Posts, Pages and Navigation

Setting what goes on the Home Page

Editing your blog's theme:  advantages and disadvantages

Making it look like you have put your posts into pages.

Copying all the posts from one blog to another

This article is about how to copy all the posts from one blog to another, using Blogger.  There is a separate article about copying individual posts, or pages, from one blog to another.

To copy all the Posts from one blog to another, you need to export them from the first blog, and import the file that was created into the second file.

Any Pages (see The Difference between Posts and Pages) in the first blog, need to be moved individually, because pages aren't currently included in the export file.
If you want to totally replace the contents of the destination blog with the contents of the source blog, then you should delete the existing posts from the destination blog before you import the file.  (NB   Delete posts by going to the Posting / Edit Posts screen, and pressing the Delete button that is beside the post.   Don't delete the entire blog, or you will lose access to the URL).


Follow these steps to copy all posts from one blog to another

1  Log in to Blogger.

2  Go to the export tab from the  Settings / Other tab.

3  Click on Export Blog.

Export-blog window on the old Blogger interface:
the new interface looks a little different, but has the same links

3a  If you are using the new interface, click Download Blog on the confirmation message window:


4  Your computer will download a file.   For Windows users, it will probably be put in the My Documents / Downloads file.  Or you system may use another place, or it may ask you where to put it.   Whatever happens, you will need to know where this file is saved to.

5  Open the blog that you want to move the posts to
(You may need to log out and in again, or perhaps just switch to different browser or tab)

Delete (using Posting / Edit Posts) any Posts that are already there, but which you don't want in the refreshed blog.

6  Go to Settings > Other and click Import Blog.  When the box opens, choose the exported file that you made earlier, and enter the security-text.
Import file selection screen in the new interface:
the old version of Blogger is very similar.

7  Choose whether or not to automatically publish all imported posts.  
Only tick the box if you DO want the posts automatically imported.   If you don't tick it, the posts will be loaded, but with have status of Draft, so won't be visible by readers until you publish them.

8  Click Import Blog.

Check that the import worked successfully, by looking at the blog, and also at the list of posts under Edit Posts:  are the right number of posts there, do they have the right labels etc.


Results

IMG redCowRoadworks4586All the posts from the source blog will be copied to the destination blog.

Many of the post characteristics will be the same as in the original blog.  This includes:
  • title
  • post contents
  • published-date and time
  • label(s)
  • post-author.


Any comments from the source blog will also be copied over - sometimes it takes a few hours for the links for them to be re-establshed properly.

The URL for each post will be based on the URL of the blog you have imported them into and the publication-date that the posts had in the source blog - for example:
www.YourNewBlogName.blogspot.com /2009/05/name-based-on-post-title.html

Any internal links in the blog will still point to the post in the old blog
For example this link points to a popular article in Blogger-HAT.  
If I export-and-imported this post into a new blog, the link would still point to the same place, ie the post in Blogger-HAT - not to the post in the new blog.

Any pictures, videos etc in the old blog will still be in the same place that they were in (Picasa-web-albums, YouTube, Google Videos etc).

If you have imported more than the number of posts that Blogger allows per day (currently 50 I think) then to make any more posts today you will need to complete the captcha-test (ie entering the letters in the funny-shaped word).   This will go away approximately 24 hours after you last enter more that the maximum-posts-per-day.


Importing to the same blog

If you try to import posts into the same blog that you exported them from, Blogger will not import any posts, and give you an error message.

If you do want to do this (eg to create a duplicate set of posts), then do the export, change some small detail of the original posts title or date/time, and then do the import.


Related Articles

The Difference between Posts and Pages

Moving individual posts, or pages, from one blog to another

Converting Posts into Pages

Moving some posts form one blog to another 

Deleting blogs and blog-posts