Showing posts with label Labels. Show all posts

Using Labels to categorize your Blogger Posts

This article explains how to use Labels to categorise the Posts in your Blog, and how you can get around some of the limitations in Blogger's categorising tools.

Why categorise your Posts

watermelon salad recipe can be labelled / tagged as  fruit, salad, dessert and pink
Grouping your blog's contents makes it easier for people who have reached your blog via Search to find other posts that they may be interested in - provided you add tools to your blog that let them navigate using labels.

It's essential if you want to make it look like you have put your Posts into Pages.

And it helps you to find posts yourself.


Blogger's tools for working with categories

The only tool that Blogger provides for categorising or grouping Posts is Labels.

In short, Labels are tags that you apply to posts.

Each post can have as many Labels as you want (there is an upper limit of 5000 labels-per-blog, but most people don't get near it).

And you can use labels for different purposes.  For example, a post titled "Photographing Long-haired Black Cats" could have three different labels
  • Cats - the the animal it's about
  • Photography - for the functional category
  • Jane Smith - for the author
The Labels gadget lets readers choose which groups of posts to see:  when a visitor clicks an item on the labels gadget, they are shown a list of posts that have the selected label applied to them.

You can add the Labels gadget as many times as you like, selecting which specific label values to show each time.   In the example above, you might add it three times, once for ainmals (showing Cats, Dogs and Rabbits), once for function (showing feeding, grooming and photography), and once for author (showing Jane Smith and Joe Bloggs).

There are three steps that you need to follow to make effective use of Labels in Blogger.


How to add Labels to your blog

Step 1:    Label your Posts

For each post, add one or more labels.  You can add labels either:
  • In the post-editor, in the Labels section at the right side of the post-editor o
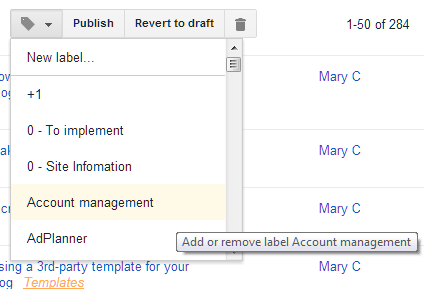
  • From the Posts tab, tick the posts you want to put the labels on, and then use the drop down arrow from the top icon that looks like a small luggage-tag:   choose the label or "New label ...").

Step 2:    Add the labels gadget

Add the Labels gadget to your blog - the same way you would add any other gadget .   You can add it as many times as you need, choosing which labels to show each time.
 
Warning:  If you choose to show only a certain selection of Labels in a gadget, then this is all that it will show even if you add new labels to your posts later on.  However if you don't restrict which labels are shown, then new ones are automatically shown in the gadget if they are associated with published posts.

Drag-and-drop the labels gadget to wherever you want it:  some people put it just underneath their header, to make readers think they've looking at a more traditional web-page.

Step 3:   Add Labels navigation

Another way for your readers access labels is from the display in the post header or footer of the list of labels assigned to each post.

This is turned on by default in most themes:  you can change the setting and move it around using post-templete settings found under  Layout > Blog Posts (edit).


What your visitors see


A List of Posts:

If a visitor to your blog clicks on an item in the labels gadget or in the labels-list that is show for apost, then the "labels-view screen" is used to show them the posts that have the selected label.

This screen is like the main screen: is only shows a certain number of posts and visitors need to use the newer-posts and older-posts links to move back through the list.

Like the main screen, if you have used jump-breaks in your posts, then the list only shows the first part of each post.  If you haven't used jump-breaks, then the whole posts are shown.


A summary message:

Unlike the main screen, in most themes there is a message at the top of the page saying:
"Showing newest posts with label WHAT-EVER-YOU-CHOSE. Show older posts"

Or if there are no published posts with the selected Label, the message is slightly different.  Some people change their theme to customise or remove this message:  Chuck in The Real Blogger Status has written an excellent description of  how to do this.


What Labels aren't - but appear to be

Many people think that Labels are a way of actually putting Posts into pages.  However the Posts aren't actually moved around.  The labels-screen is just a way of viewing a smaller-than-usual group of Posts, and can make it look like you have put your posts into sub-pages.


Making multi-level categories

Currently, Blogger only supports one level of grouping.  The only way you can make sub-groups of Labels is to add two categories to each post - one for the "major" category, and one for the "minor" category

For example you might use labels like these
Major category:  Minor categories:
Recipes: Sweet, Savory, Wheat-free
Party-games: ice-breaker, run-around, silent, outdoor
Music: lively, soft & gentle, traditional, instrumental
Each post would need to have at least one label from the major category, and one from the minor categories.

If you do this, you need to be clever about adding two levels of gadget, with only a selected group of labels shown in each gadget.   You might even need to edit your theme, to only show certain gadgets in certain situations.


Related Articles

Posts, Pages and Navigation

Setting what goes on the Home Page

Editing your blog's theme:  advantages and disadvantages

Making it look like you have put your posts into pages.

How to change Labels on more than one post at a time

This article shows how to edit the name of an existing Label value in blogger, without editing each individual post that it's applied to.

Blogger and Labels


Previously, I've explained that labels are tags you can use to categorize your blog posts, and that the are the raw material of putting your posts into pages.

But what happens if you want to change the value of a label? For example, if you have a lot of posts that are labelled "Colour", but you find that most of your visitors are from the US and think you have poor spelling!

It would be nice if Blogger had a feature that said "change all X labels to Y labels" - but it doesn't (at moment, anyway).

One option is to edit each post individually, removing the old label and adding a new one. This works, but can be time consuming.

A better option is to use the bulk-labelling tools. This is a lot easier, though not quite as easy as you might think.


Blogger's Post-Dashboard labelling tools

This picture shows the tools that you can use to work with labels (outside of the post-editor).  They are all found on the Dashboard when you are looking at the Posts tab.


The Group tick box either selects or un-selects all the posts you can currently see on the Dashboard > Posts tab (depending on whether they're selected or not at the moment - it works like a toggle-switch).


The Label action button applies an action to all the posts that are currently selected.   You can:
  • Make a new label and add it to the selected posts
  • Add an existing label to posts that don't currently have that label  (by just choosing the label) and are currently selected
  • Delete an existing label from posts that do currently have that label  (by just choosing the label) and are currently selected
Example Label Action Button values


The Label value selector lets you see a list of just posts with a label.


The Posts-per-page selector is where you select how many of your posts are listed in the Dashboard > Posts tab.


The Paging buttons let you move through the list of displayed posts.


How to change a label name

1   Close Blogger, and re-open it again.    (see below for an explanation of this step).


2   On the Dashboard > Posts screen, make sure that you are viewing 50 posts per screen  (or less if you don't have many posts)
Do this with the Posts-per-page selector near the top-right corner. You need to do it because Blogger's bulk-label tools will only let you work with 50 or less posts at a time.


3   Select the label that you want to rename from the Label value selector drop-down list.
This restricts the list to only posts with that label.
If you have more than 50 posts with the label, then there will be more than one screen-full of posts. You can see this in the Paging-buttons at the top right of the screen.


4   For each screen-full of posts that is shown:
  • Use the group-tick box at the top of the list of posts to select all posts that are currently on your screen.
  • Either choose the new value from the  Label action button drop-down menu - or use the New Label ... option in the first screenful of posts.   This will attach the new label name to the posts you have selected.
  • Choose the label value from the Label action button drop-down menu to Remove the old label from the posts you have selected.
  • Use the group-tick box at the top of the list of posts again, this time to unselect all posts that are currently on your screen.

After you have done this for all the screens of posts that currently have the old label value:
  • You should be left on the Dashboard > Posts screen, with a message saying that there are no posts with your old label. 
  • The old label will not be attached to any posts, and will not be visible in the Label-value-selector. 
  • If you displaying labels with your posts, then visitors to your blog who use a web-browser will not be able to see the old label value any more, and it will not be listed in any Label gadgets you have used.


What was the catch?

The approach described here deals with two "twitches" with how Blogger works.

Firstly, closing and re-starting Blogger before you start makes sure that absolutely none of your posts are selected initially: I've found that sometimes if a post is selected, and then you page up or down, that post is still selected. And sometimes a post is selected immediately after you have edited it. It can be quite hard to find these (because there is currently no feature to list "selected posts only"), so the re-start is the safest approach.

Secondly, there is a maximum of 50 posts per label action. This is a pain: it means that if you want to re-name the label on 300 posts, you need to do it in 6 groups of 50 each times. I can sympathise with Blogger about making sure that actions like this don't take "too long" - but the 50 posts limit does seem very low.


Is the old label gone for good?

This is an interesting question.  Blogger has set a limit of a maximum of 5000 labels per blog. Once you have replace a label value is the way described above, I'm not sure if it will be removed totally, or if it still counts towards the 5000 even though it's no longer in use. (And I'm not about to manually give a blog 5000 labels just to test it to find out!)


Related Articles:

Putting your posts into pages

Using Labels to categorize posts

How to edit a post that you have already published

Using Feedburner to Tweet your posts lets you include labels as hashtags

How to put put Posts into Pages in Blogger

This article shows how to set up your blog, using Blogger, so that it looks like your posts are on separate web-pages.


Can you put Posts onto Pages in Blogger?

Ever since Google introduced "pages" into Blogger, people have complained that their posts all go onto the "home page", and asked how to put posts onto different pages in their blog.


The standard, but unsatisfactory, answer is
"Sorry, that's not how Blogger works.   So called "static" pages in Blogger are meant to be used for reference information that doesn't change often, which you don't want to be part of your regular post-feed, but which you do want users to have easy access to."

Basically, this is part of the difference between post and pages.

Luckily it's easy to set up your blog so that it looks like your posts are on different pages [tweet this]    (even though you and I know that this isn't how Blogger works) by following three simple steps.


Follow these steps to put your posts into pages

1   Add Categories

Categorise your posts by adding Labels to them.

It's your choice whether to add Labels to all posts, or just the ones that you want to show up on specific "pages".


2 Make a "pages look alike" menu bar

There are (at least) are three ways of doing this - described below.

When Blogger first implemented static pages that could link to websites, I suggested choosing which ever option suited your blog best.  

However now, due to the increasing importance of mobile themes, I recommend Option c), because the pages-gadget is the only one mentioned that automatically shows upon mobile-themes.

a)   With a Labels Gadget    

Use the usual add-a-gadget approach to put a Labels gadget into the spot where you would put the Pages gadget if you wanted to make a horizontal menu bar with it.

If your blog has some Labels that you don't want to have "pages" for, then set it to show only some of your Labels:

b)  With a Linked-list gadget

Use the usual add-a-gadget approach to put a Link-list gadget where you would put the Pages gadget if you wanted to make a horizontal menu bar with it.
Add a link to the list for each Label that you want a "page" for.   The HTML to use for each Label value is

http://YOUR-BLOG-URL/search/label/THE-LABEL-NAME

You can also add other items (eg individual Posts, or even Bllogger's static "pages" if you really must have them - see why I don't like them!) - see the menu bar at the top of this site for an example of this. 

c)   With a Pages gadget   <===   RECOMMENDED APPROACH

Use the usual add-a-gadget approach to put a Pages gadget into the menu bar area.   (You can do this even if you have not created any Pages of content).

While you are editing the Pages gadget, there is an  + Add external link option.  

Click on this, and add an entry in like the ones described above in he Linked-list gadget option, putting
  •  the text you want in your menu bar into the Page title field 
  • The label search command into the Web address field.


3   Optional:  Deal with the home-page

If you don't want your posts to appear on the "home page" was well as the topic pages, then there are two possibilities:

OR

  • Give your blog a "home page" using the custom-redirect option discussed in this post.

However I generally see this as unnecessary, because in most cases, very blog visitors ever see the home page.


Job Done

It really is that simple.  Your readers can now click on the "pages" in your blog from a "menu" at the top, and see a list of posts for the Page that they chose.

Even better, if some posts relate to more than one topic, they show up on both of the relevant pages.    And if you have used the Pages gadget, your blog is well set-up to work with a mobile-theme - which is something that is getting more important every month.

Don't forget to test your blog, to make sure that the menu bar is working how you expect it to and that it looks OK, in all the browsers that your readers are actually using.


Related Articles

Using Labels to group your Blogger Posts

Adding external and internal URLs to your pages-gadget / menu bar

Giving your blog a home page

The difference between posts and pages

Showing a Gadget only on the Home Page

Making your blog work for people using smartphones and tablets

Delete, change or re-format the "Showing posts with label" message.

This article explains options for deleting, or changing the content or formatting of Blogger's "Showing posts with  LABEL.  Show all posts" message and it's ugly grey box.

If your blog has a Layout or Designer template, then when a person who is reading it chooses a label value, Blogger displays a page with (a summary of) your most recent posts with that label.

If there are more posts that Blogger is willing to show on one page, then there will also be "older posts" and "newer posts" links at the bottom of the page.

And - unless you have removed it - there will also be a message at the top of the page saying "Showing posts with label yourLabel. Show all posts"


Reader actions that cause a visitor to see this message include:
  • Clicking a label value that is displayed in your post header or footer
    (unless you have turned them off in the Layout > Blog Posts edit option).
  • Clicking a link that you have manually set up to show posts with a specific label (eg if you have used a Pages gadget to make a menu bar, and one of the options in it has a value like http://www.yourBlog.com/search/label/yourLabel?max-results=999

Unfortunately Blogger does not provide any way to customize or configure this message.
.
But it is easy enough to totally delete it, or to change the formatting, or to change the text..


How to delete the "Showing posts with LABEL" message

There are two ways that you can remove the "Showing posts with Label.   Show all posts" message.

Option 1:   Remove the code totally.   

To do this,

1  Edit your template in the usual way

2  Find the following text
<b:includable id='status-message'>
<b:if cond='data:navMessage'>
<div class='status-msg-wrap'>
<div class='status-msg-body'>
<data:navMessage/>
</div>
<div class='status-msg-border'>
<div class='status-msg-bg'>
<div class='status-msg-hidden'><data:navMessage/></div>
</div>
</div>
</div>
<div style='clear: both;'/>
</b:if>
</b:includable>

3   Delete that text and replace it with
<b:includable id='status-message'>
<b:if cond='data:navMessage'>
<div>
</div>
<div style='clear: both;'/>
</b:if>
</b:includable>

(If you just delete the text and do not put the replacement in, then it is possible that Blogger will add that section back in again later.)


Option 2:  Hiding the message using CSS

To do this, add  this CSS rule to your template in the usual way:
.status-msg-wrap,
.status-msg-body {
display: none;
}
(This approach is less risky because you do not need to edit your template, and because it's easier to change later.   But some people have reported that on their template, it has not worked.)


How to change the format of the "Showing posts with LABEL" message

Some people don't mind the actual  "Showing posts with Label.   Show all posts" message.   But they want to format it in a way that suits their blog's layout and colour scheme.

This is easily done, by adding some extra CSS rules to your template in the usual way.

To change the format of the message text, use rules like this:
.status-msg-body {
text-align: left;
line-height: 1.4;   
font-weight: bold;
color: red;
padding: 0.5em 0.3em;
width: 100%;
}

To change the grey-shaded background or the box:
.status-msg-wrap {
width: 100%;
margin: 0 auto;   /*  keep the auto statement if the width is less than 100%, so the box is centered */
position: relative;
}

There are a wide range of options - check with CSS reference guides for the options.   You may need to carry out some experiments with your template and how it looks with various options to decide on the best combination for your blog.


How to change the "Showing posts with LABEL" message

There are several ways that you can change the text in the "Showing posts with Label.   Show all posts" message.

Option 1:   Just replace it with some text

To show a sentence of your own instead of Blogger's standard message, 

1  Edit your template in the usual way

2  Find the following text
<b:includable id='status-message'>
<b:if cond='data:navMessage'>
<div class='status-msg-wrap'>
<div class='status-msg-body'>
<data:navMessage/>
</div>
<div class='status-msg-border'>
<div class='status-msg-bg'>
<div class='status-msg-hidden'><data:navMessage/></div>
</div>
</div>
</div>
<div style='clear: both;'/>
</b:if>
</b:includable>

3   Replace the line in bold (ie <data:navMessage/> ) with your own words.

For example, you might say
<b:includable id='status-message'>
<b:if cond='data:navMessage'>
<div class='status-msg-wrap'>
<div class='status-msg-body'>
Posts in this category include (use the Older Posts link to see previous posts):
</div>
<div class='status-msg-border'>
<div class='status-msg-bg'>
<div class='status-msg-hidden'><data:navMessage/></div>
</div>
</div>
</div>
<div style='clear: both;'/>
</b:if>
</b:includable>

To show the searched-for label value in your message, you need to use the   <data:blog.searchLabel/>   tag. For example, you might say
<b:includable id='status-message'>
<b:if cond='data:navMessage'>
<div class='status-msg-wrap'>
<div class='status-msg-body'>
Posts about <data:blog.searchLabel/>  include (use the Older Posts link to see previous posts):
</div>
<div class='status-msg-border'>
<div class='status-msg-bg'>
<div class='status-msg-hidden'><data:navMessage/></div>
</div>
</div>
</div>
<div style='clear: both;'/>
</b:if>
</b:includable>

Note:  if you are going to use this tag, then you need to choose your label values very carefully, so that they all make sense.   For example, in one blog I have some posts labelled "For quiz organizers" and others labelled "Finance", "Organisation" etc.    There is no way that I can write a sentence including the labels that makes sense for both of these.


Related Articles:


Removing the label values from the blog-post header or footer

This article explains how to stop label values from showing in the header or footer lines for each post in a blog that is made with Google's Blogger.


If you have used the Labels / Page-gadget approach to putting your blogposts into separate pages, then each of your posts will have one or more Labels attached to them.

Most Blogger templates are set up so that these label values are shown with the posts, too, in either just underneath the post-title or in the post-footer. And when a reader clicks one of these post-specific label values, they are shown a "post-listing format" blog page, which includes (the first part of) all posts which have that label.

However some people want to stop their blogs from displaying this these label values perhaps because:
  • They want their blog to look more like a real website
  • They are using some labels which are meaningful to them as administrators but not to readers (eg at the moment, I'm using a label "ZZZ - needs 2013 review" to identify posts that I need to check to make sure they're up to date.
  • They just don't like having the label list shown for each post.

Note that you can select which Label values are shown in the Label gadget, but there is no way to do this in the label list shown for each post.


How to turn off the list of labels shown with each blog-post


Log in to the Blogger dashboard with an account that has administrative rights to the blog


Choose Layout from the options for the blog


Locate the Blog Post gadget in layout screen, and click the Edit link for it.


In the list of options that is shown, un-tick the Labels option


Save the changes, using the Save button (currently in the bottom left corner)


Click the Save Arrangement button for the layout (currently in the top right corner of the layout editor).


Job done! The next time anyone looks at your blog, the list of labels for each post should not be visible.


Troubleshooting

Sometimes, changes that are made in the Blog Post gadget don't appear to have been applied when people look at your blog. For example, the labels may still be shown for each post, even though the Labels check-box is turned off.

If this happens, the most likely cause is that your post template (ref: parts of a blogger blog) has become corrupt. The only ways I know to fix this are to either
  • Change to a different template:
    This needs to be a total change, eg Simple to Picture Window, not just changing from one to another option within the same template.
  • Resetting the blog-post gadget - described in detail here.

The disadvantage of of either of these approaches is that customizations you have made to your blog are lost - this can be easy to forget when your customizations include important-but-more-subtle things like ensuring your Analytics profile gets Adsense data or installing Facebook Open-Graph tags - or just plain annoying if you have put sharing buttons into individual posts, and have to re-instate these


Related Articles:

What are the components of a Blogger blog

How to put posts into pages in blogger

Labels: a way to categorize Blogger posts

Posts and Pages - navigating while you are reading a blog

Making a blog look like a real website