Showing posts with label Picasa. Show all posts

How to rename picture files in Picasa-desktop

This article is about re-naming files from within Picasa-desktop, to provide SEO benefits for your blog.


Picasa's desktop software is a good tool for organizing and editing photos on your local computer.   And it is still available for you to use, even though Picasa-web-albums has been replaced by Google Albums + Google Album Archive.

For pictures that are important in your blog, I still recommend preparing them in a tool like Picasa-desktop and then uploading the finished versions to Google Photos before putting them into a post, because:
  • The desktop tool has better editing tools (cropping, zooming, auto adjustment, adding watermarks) and Picasa-web-albums does.
  • It lets you control the size of the uploaded file
  • It's easier to ensure sure that you still have full-size files on my local machine for printing etc, as well as smaller, more optimized, copies to use on web-pages.

Picasa-desktop folders have a very nice relationship with files and directories with the Windows file system:
Each Picasa folder = one directory on your computer
Each Picasa photo = one file on your computer.

And this means that you can set various properties (eg file name) from either inside Picasa or from Windows.


Ways to associate keywords with photos in Picasa-desktop

Picasa-desktop has two tools for adding keywords to photographs:
  • You can enter a caption for each photo. This is basically some text, which is stored "inside" the photo, in a hidden-field that is only visible when you are using a software tool that displays the captions. (In technical terms, the caption is stored inside the  IPTC/XMP Description field inside the JPEG etc file that you have.)
  • You can enter one or more tags for each photo - again, text (individual words or phrases) that is stored in the  IPTC/XMP Keyword field.

Unfortunately captions and tags aren't shown when you put a photo in your blog.

This means that the captions and tags are possibly not used by Google in understanding what the photo is about: I've never heard any SEO experts recommending that the  IPTC/XMP fields should be keyword optimized.   For some bloggers this won't be an issue - but it is if SEO is important for you blog.

Another approach is to put the keyword(s) into the file-name, because file-name is one of the factors that Google looks at when it is indexing images.   And this has a nice spin-off for you as well - it means that they keywords are available to any file-search tools that you use on your computer, not just to specialised ones that work with images.

For a long time, I believed that to change the name of a file, I had to go out to my Windows files (using Windows Explorer or similar, and rename them there) - and then wait for Picasa to catch up with the change that I'd made in the file system.   But one day I accidentally hit the F2 key, and found that it opens up a very useful dialog box indeed.


How to Change the name of a file in Picasa desktop

Navigate to the picture that you want to change the file-name for, using the Picasa-desktop software.

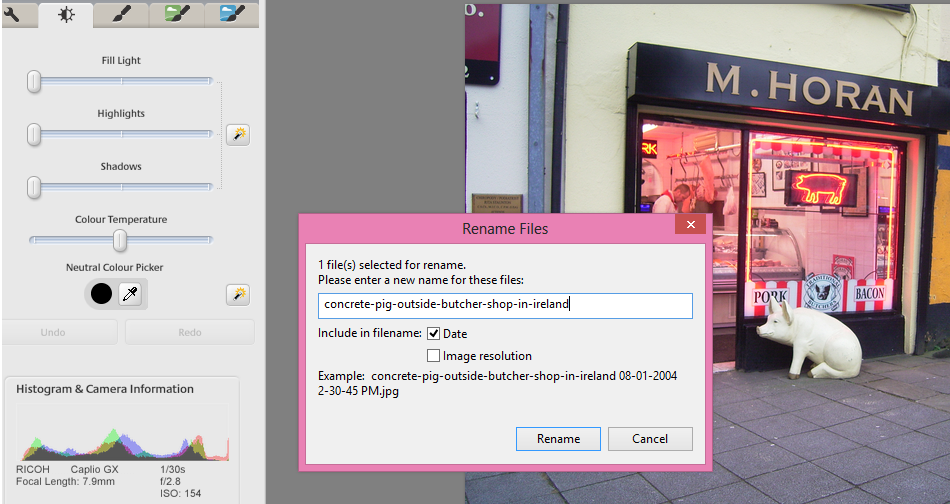
Press the F2 key. This opens a Rename Files window.

Type in a new name for the file, for example    concrete-pig-outside-butcher-shop-in-ireland

Click the option buttons if you want to include today's date or the file-resolution in the name  (I don't usually do this, because I organise my photos into folders according to the date they were taken)


Click Rename to save the change


Job done!    The file has a new name in your computer's file system, and is still loaded in your Picasa database.


How to change the name of a file in Google Album Archive or Google Photos

Currently there is no way to change the name of a file after it is uploaded it to either Google Album Archive or Google Photos:  .

One option is to download the photo, rename the file on your desktop, and re-upload it.   But if you change the name in this way, you also need to change the link to the file in every place that it has already been used.   That said, if you only use your photos in one place each, then making a new copy with a different name, uploading it and changing all the existing links can be a good way to deal with copyright theives who have hot-linked directly to your photos.


How to choose "good" names for your picture files

Early SEO advice was to use:
  • Lowercase letters only (some computers don't like uppercase)
  • Only hyphens between words (not spaces, underscores, etc)
  • Regular characters only (no á é etc)

Today, I'm not sure if it matters so much. In most cases, it's probably more important to use rich, descriptive key words  that describe all the aspects of the photo, than to worry about how they're laid out.   But I do tend to follow the advice anyway - just in case.


Related Articles

How to show your photos in a slideshow from Picasa

Does SEO matter for your blog?

How to put a picture into your blog.

Understanding Picasa-desktop vs Picasa-web-albums

Taking action when someone has copied your blog without permission

How to use Picasa-web-albums without being re-directed - August 2016 update

This article explains what has happened to Picasa-web-albums, why it is now re-directing to Google Album Archive, and what you can do about it.


picasa web-albums logo behind a closing theatrical curtain
Back in July 2013, I described how many people who started Picasa-web-albums were being immediately re-directed to Google+ photos and what they could to to return to using PWA again without being re-directed.

Quite a few things have changed in the last three years - and especially in the last six months or so.   In particular, Google have:
  • Changed their strategy around Google+
  • Released Google Photos and retired Google+ Photos
  • Changed the Picasa-web-albums re-direct to go to Google Photos instead of Google+ Photos
  • Stopped supporting Picasa (announcement)
  • Stopped supporting Picasa-web-albums (announcement)
  • Released a new tool called Google Album Archive, which gives you access to photos, photo-albums and data about photos that you created in Blogger (and other Google tools) - which isn't available in Google Photos.
  • Changed the re-direct on Picasa-web-albums, so that it goes to Google Album Archive instead of to  Google Photos.

That is why you see this:


Instead of this:


when you go to www.picasaweb.google.com.


How to stop Picasa-web-albums from re-directing to Google Album Archive

Bad news:    As Google's Album Archive product is turned on around the world, and specifically once it is turned on for your, there is no way to to use Picasa-web-albums, without being sent to Google Album Archive.

Our only option is to use to Google Photos directly, or to work with pictures only through Blogger's post-editor.


Is there a problem with using Google Album Archive and Google Photos instead of Picasa-web-albums?

There are posts on help-forums etc from people who are unhappy about this change:   Picasa-web-albums and Picasa-desktop had a number of features which Google have simply decided not to provide in Google Photos.   These features include:
  • Making slideshows and putting them into blog-posts or websites.
  • Embedding Picasa Web albums and photos in blog-posts or websites.
  • Linking to photos, albums, and Public Galleries which an URL that contains your usename 
  • Photo tags, tagging people, likes, +1's, and Picasa Web comments. 
  • Making slideshows.
  • Following people based soley on their photo collection
  • Viewing public galleries.

People who used those features didn't want to lose them, and they certainly see a problem with the changes.  Personally, I think that things are a little more nuanced.  

  • There is one particular missing feature (not listed above that I'm annoyed to have lost - but I've found a work around, and will be writing a post showing how to use it as soon as I've finished this one.
  • There is a lot of detail behind what you can and cannot do in Album Archive - and why certain actions are and aren't available.   This isn't always consistent with the documentation - eg the documentation says that we can delete photos in Album Archive, but I've got at least one album / photo with no delete icon showing.   Other people have reported that they had albums which aren't showing up in their Album Archive.     Some are unhappy because they cannot create new albums, only work with ones that they've already made.    

But for all that, I haven't yet found a total show-stopper issue that stops me from using the Google tools to work with images for my blogs.    Have you?


Related Articles

Using Picasa-web-albums without being re-directed to Google Photos.

What was Picasa vs Picasa-web-albums - a basic introduction

Options for showing photos in Blogger

Finding a picture's location (URL) in Google+ Photos or Picasa-web-albums

This article is about how to find the URL (web-address) of a picture that is stored in Picasa web albums.  It is written for Blogger users, but the same technique can be used by anyone who uses Picasa-web-albums.


Google+ Photos, Picasa-web-albums and your PC

finding the http www location for image files in picasa or google photos
An introduction to Picasa. describes the relationship between Picasa and Picasa-web-albums.  A key difference between is that :
  • Picasa is a program, written by Google, which runs on your PC even when it's not connected to the internet, and 
  • Picasa-web-albums is a Google program that you use through your web-browser and some accompanying space on the internet where your pictures can be stored.
  • Google+ Photos is another Google program that you use through a web-browser (Chrome, FireFox, Internnet Explorer, Safari, etc), and a space on the space on the internet where you can keep pictures.   
Both Picasa-web-albums and Google+ Photos use the same space on the internet to store photos for each person.    This means that if there are features (eg finding the URL of an individual photo) that are not  available in one program, then you can just use the other program instead.

This means that each and every picture in your Piscasa-web-albums has a unique URL, ie web-address, where it can be found.


How to find the URL of a picture in Google+ Photos or Picasa-web-albums

  • If you are re-directed to Google+ Photos, either follow the Return link - or use the approach described here to return to Picasa-web-albums.
  • Find the album which contains the picture you want to find the web-address for.

  • Click on the album to open it. 
    Note:  each album has one picture, usually the first one loaded, set as the cover.   Be careful to actually open the album, and not just work with the album cover, because the URL for it is not the same as the URL for the picture.

  • Click on the picture you want:  it will open in a large "photo" view

    EITHER:

  • Click on "Full details page" in the right-hand bar.
    This opens the picture in a new browser window or tab.
    Copy the contents of the address bar in this new window - this is the URL of the photo..

    OR

  • Right-click on the picture once you're in "photo" view, and choose the appropriate option for your browser.   In the current versions, this is:

    Chrome: Copy image URL
    Safari: Copy image address
    Internet Explorer: Properties > Copy the URL address shown
    Firefox: Copy image location


Job done!   
The web-address of the photo is now in your computer's clipboard, and can be pasted into other places where you might need to use the photo's URL, eg in adding a photo to a post, or as a gadget.


Related Articles

Showing a picture as a gadget in Blogger

How to put a photo into a blog-post

Understanding Google accounts

An introduction to Picasa

How to use Picasa-web-albums with your Google+ Page's photos

This article shows how to manage your Google+ Page's photo collection using Picasa-web-albums.


Recently I described how to always use Picasa-web-albums, rather than Google+ photos, to work with the images that are stored in your Google account.

One issue was that there was no way to use PWA to work with the photo's uploaded to a Google+ Page, rather than an individual Google+ profile.

And this was highlighted when Google introduced an auto-enhancement feature which could be disabled using Picasa-web-albums, but not using Google+ Photos.

However a new feature introduced to Google+ Pages means that you can work around this.


How to access Google+ Page photo albums using Picasa-web-albums

Set up a separate password for your Google+ Page..

Log out of Google / Blogger / Picasa-web-albums (if you log out of one, you are generally removed from the others too).

Log back in again, but this time using your newly created Google+ Page account.

Point your web-browser to Picasa-web-albums, using the do-not-re-direct address:   https://picasaweb.google.com/lh/myphotos?noredirect=1


Job Done!    

You can now use Picasa-web-albums  like normal, including access to features like:

And of course you still have access to the Google+ Photos features, like editing pictures without changing their URL.


Disadvantages / Issues

There's always one!

In this case, it's that you need to be logged into Google using a different account from the one that's the underlying Page owner.   You can use any of the other Google tools   (Maps, Blogger, probably even AdSense) - but it will be with the Google account that was created for your page, rather than with your personal account.

And if you manage multiple pages, you will need to think carefully about exactly how each one is set up, and what account you need to use to work with it.


Related Articles

Understanding Picasa and Picasa-web-albums

Editing photos on-line using Google+ Photos

How to set up a separate password for your Google+ Page

Stop Google from auto-enhancing your images

Sharing photos from your Google+ Photos albums outside of Google+

Putting a picture on your blog as a Gadget

You can put a picture anywhere in your Blogger blog that you can insert a gadget - and you can make it link to a post in your blog or to any other website.

The Image gadget

Dry dock in Claddagh Basin
A very simple way to put a picture into your blog is to use an Image gadget (previously called a Picture gadget).

This is a tool that Blogger provides to make is easy to add a picture that shows up on all screen and is linked to somewhere.

Often gadgets (sometimes called widgets or page elements) are put on the sidebar - but in many blogger templates they can go in other places too (header, footer, etc).

Follow these steps to add a picture gadget in Blogger

1  Make sure you know where the original picture is and that you have copyright permission to use it.

2  Copy the location (URL or file system full path-name) of the picture - and remember whether it's on your computer, or on the internet.
(This article tells you how to find the URL of a picture that's already stored in Google Album Archive. )

3  In Blogger, follow the usual Add a Gadget procedure, and choose the Image gadget from the list of options (you may have to scroll down to find it in the list).

4  In the Configure-Image box, enter the options you want for your picture.   These include:
  • The title for the Gadget,
  • The caption for the picture
    (the small words that go underneath it, usually explaining it, or where it came from),
  • What should happen when a reader clicks the picture - put this into the Link field
  • Where to find the picture
    (ie the file-location that you copied in step 2)
  • Whether to re-size (ie shrink) the picture to fix the space in the sidebar in your current template.

5 Press Save.

6  If necessary, drag-and-drop the new gadget to the place where you want the picture to go, and press Save.


What your visitors see

People who visit your blog in a web-browser, will see the picture, in the place where you put the gadget.  However pictures are not supported gadgets for dynamic view templates, so it won't be see if you use one of these.

Also, people who see your blog through an RSS reader, or by receiving emailed updates don't see any gadgets, so they will not see the picture.  

If you entered a value for Link, your visitor's browser leaves your blog and goes to the Link location:  with the Picture gadget, then there is no way to make this open a new window.   If you want to do so, then use an HTML gadget instead, get the code for the picture, and put target = "_blank"   into it:, so the code looks something like: 
<a href="YOUR LINK" imageanchor="1" style="margin-left: 1em; margin-right: 1em;" target = "_blank"><img border="0" src="YOUR PICTURE LOCATION" /></a>


Related Articles

Options for putting pictures into your blog

Copyright, blogs and bloggers

Picasa and Blogger - an overview

Getting the HTML to add a picture to your blog

Finding a picture's URL in Google Album Archive

Finding the URL of a picture stored in Flickr

Showing a PowerPoint presentation in your blog

Why RSS / Subscribe to Posts is important for bloggers

Following a blog by email

How to let another person load pictures to your Picasa-web-album

This article shows how to let another person (Google account) upload pictures to your Picasa-web-albums:   this is one possible way to work around the issues with Google's photo auto-enhance feature.

Picasa-web-albums and your Google account

Previously I've described Picasa desktop vs Picasa-web-albums, and noted that you can upload pictures to your PWA folders using either of the two pieces of software.

Each album and folder in Picasa-web-albums belongs to one Google account (which may or may not have an associated Google+ account).

Google now provide a tool to transfer Picasa-web albums from one account to another - but only once ever in the life-time of the album.   You cannot transfer ownership to one person now, and to another person in  a year's time (which is quite different to the way you can easily transfer other aspects of your blog to a new owners).

And Google also provide a way for an account owner to let another Google account add photos to the owners albums.


How to let another Google account add photos to one of your  Picasa-web-albums.

Log in to Picasa-web-albums using the Google account that owns the photo-albums and other related things (eg blogger administration rights), and which you want to be the main owner/administrator of your photos.
(See Stop being automatically redirected from PWA to Google+ Photos if you have difficulty staying in Picasa-web-albums.)

View the  individual album that you want to allow someone else to add photos to.

Click the Share button in the right-hand panel.

If your account does not have a Google+ Profile, then clicking the Share button opens the basic Picasa-web-sharing invitation.   In it:
  • Enter the email address of the Google account that you want to give upload permissions to, and any message that you want to send them., 
  • Tick "Let people I share with contribute photos".   
  • Then click Share Via Email.

Standard Picasa-web-albums album sharing settings screen


If your account has a Google+ Profile, then clicking the share button open a "Share on Google+" window.  To use this to give someone permission to upload to the album:
  • Remove any suggested circles
  • Enter the Google account name(s) that you want go give upload permissions to.
  • Click Share
  • When you return to the standard Picasa-web-screen, in the right-hand-panel, click the "allow uploads" icon to the right of the name that you entered.

Google+ Profile photo-album sharing request screen


Allow shared-with users to upload pictures to your album


What the people you have invited will see

The people who you have invited to contribute pictures to your Picasa-web-albums will get either an email message or a Google+ notification telling them about the permission you have given them.

When they go into Picasa-web-albums, they will see the album that you have shared listed as an album that they can see - and they will have an Add Photos link where they can upload pictures in the same way they would add photos to their own albums.


Sharing several or all your albums at once

Picasa does not seem to provide any options for this at the moment.


Related Articles:

Understanding Picasa vs Picasa-web-albums

How to set up a Google+ Profile for an existing Blogger account - and why you might not want to

How to edit a picture in Picasa Web Albums or Google+ Photos

This article is about how to edit pictures in Picasa web albums, and how to use Picasa-destop to edit pictures in your Google+ Photos.


Picasa-web-albums vs Google+ Photos

Picasa-web-albums is a on-line photo storage and management tool, now owned by Google.   It is the on-line version of Picasa, a desktop-tool.   (Learn more about PWA and Picasa here.).

Google would ideally  like everyone to use Google+ Photos.

But there are many people who store pictures in albums that are not associated with their personal Google+ accounts:  these may be for businesses, schools, clubs, etc.

So it is likely PWA will continue to exist for a good while yet.   And I am sure that Google appreciate this:  they have made a number of changes to Picasa-web-albums to make it work better both with Google+ and without it.


Options for editing pictures that are are uploaded to Google

  • If you have a Google+ account, then there are two ways of editing photos that you have loaded to Google (it doesn't matter whether you loaded them using Picasa-web or Google+Photos).  

    Both of these options are described below.   Using the Google+ editor (option 1) doesn't need any software installed on your PC.   But it's very slow to load, offers you less control, and is currently missing some key features - and it only works if you are using Chrome as your web-browser, not Firefox or Internet Explorer.
  • If you don't have a Google+ account, then Google / Blogger only provides only one way to edit photos that you have loaded to it (apart from downloading the photo, editing it on your PC and re-uploading it - which changes the URL you need to use to link to the photo).   This is Option 2 below.

Option 1: Using Google + edit a picture in Picasa-web-albums

Log in to Picasa-web-albums, using your Google+ account.  
(See here for what do to if you are automatically re-directed from PWA to Google + Photos)


Navigate to the photo that you want to edit.  
(Make sure you're looking just at that photo, not at the album it is in - this can be confusing in cases when the photo is also the album cover.)

Choose Edit in Google+ from the Actions drop-down menu.

This opens a new window or tab.

If you are not signed in with your Google + account, you will be invited to join.

If necessary, sign-up for Google+, or sign in with the correct account, and start again.

Now, you will be looking at the photo in the Google+ Photos picture view.   From here you can do simple edits:
  • Crop the photo
  • Tag people
  • Rotate the photo
as well as using the other Google+ Photos features (share, slideshow, delete, zoom)

To do more changes, choose Edit (yes, you need to choose it a 2nd time) from the top menu.

If you are not using Google Chrome, then you will get a message saying that the Google+ photo editor only works with Chrome, and giving you a link to download it.    If necessary, switch to Chrome and start again.

Wait while the photo editing tools are loaded  (this does take a while, perhaps even a minute or two).

Once loading is finished, the current Google + Photo editor functions are available from the right-hand bar, like this:


At the moment these are:
  • Tune (brightness, contrast, saturation, shadows, warmth)
  • Selective Adjustment (lets you specific areas for other options to be applied to)
  • Details (sharpness and structure)
  • Crop and Rotate
  • Black and white
  • Centre focus (adjust brightness and blur around the centre)
  • Drama
  • Frames
  • Tilt-shift
  • Vintage
  • Retrolux.

When you  are happy with your photo, click the Finished Editing tick box at the bottom of the right-hand bar, and the changes will be saved (this may take a few moments).

You are left in the open Google+ Photos tab or window, not returned to Picasa-web-albums.   When you go back to Picasa-web-albums and refresh the page (F5), the changes that you made in Google+ photos will be shown.


Option 2:   How to use Picasa-desktop edit a picture in Picasa-web-albums

This option only works if you have Picasa desktop software installed on your computer.

Log in to Picasa-web-albums, using your Google account.

Navigate to the photo that you want to edit.   (Make sure you're looking just at that photo, not at the album it is in - this can be confusing in cases when the photo is also the album cover.)

Choose Edit in Picasa from the Actions drop-down menu.

A pop-up window will tell you that your web browser wants to open another program (ie Picasa-desktop) to do the editing.

(The exact text is something like:   "External Protocol Request:  [your web browser] needs to launch an external application to handle picasa: links.   The link requested is ... The following application will be launched if you accept this request   c:\Program Files\Google\Picasa\Picasa3.exe ... If you did not initiate this request, it may represent an attempted attack on your system.   Unless you took an explicit action to initiate this request, you should press Do Nothing.")

Choose Launch Application.

Picasa will load on your computer, and you will be asked to confirm that you do want to edit the selected picture.   Choose Edit Image.

A copy of the picture that you want to edit is opened in the desktop-Picasa editing tools window.

From here you have access to all Picasa's standard photo editing tools (including the text tool for adding watermarks).

The photo you are working in is a copy taken from your Picasa-web-albums, it is not the same as the copy of the picture which may already be on your computer.   It is stored in a directory of your Picasa-installation called "Online Edits", not in your main My Pictures directory.   So if you choose a function like "Back to Library" you are taken to the Online Edits folder inside Picasa-desktop.

From here you can use all of Picasa-desktop's editing features, including straightening, red-eye reduction, text-editing, re-setting the neutral colour.    The only exception is the Edit in Creative Kit option:  this is still one of the options in Picasa-desktop, but if you use it, it takes a long time to load and then eventually says "Error connecting to Creative Kit... error 500" - and explains that Creative Kit has now been discontinued.

When you are finished editing, to put the edited photo back into the same Picasa-web-album that it came from, with the same file name and URL:
  • Make sure that you are logged in from Picasa-desktop to the same Google account that you were using initially.  
    (Picasa-desktop remembers your sign-in details from the last time you used it - if it's different from what you need, just choose sign-out from the top-right corner, and then sign in to the correct account when asked.)    
  • EITHER:
  • Choose Share on Google+    (if you are using a Google + account)
  • In the sharing-details window that opens, change the Album-name from Online Edits to  the album that the photo came from originally and choose Upload

    OR
  • Return to the Online Edits folder / library
  • Save the changes using the Save icon
  • Choose Enable Synch from the Sharing drop down.
  • Wait for the changed photo to upload.

    (I think Google have some work to do here - you can only control synching for the whole album, not for individual photos.   I expect this to be improved in the future.)


Job Done:  your Picasa-desktop-edited photo appears back in your online Picasa-web-albums with the changes that you just made, and any existing links to it (eg from your blog posts) will show the changed version of the picture.   And you can put the edited picture into your blog posts or other websites in the usual way.


Related Articles

Introducing Picasa and Picasa-web-albums:   an overview

Stop automatic redirection to Google+ Photos

How to put a picture into a blog-post

Tools for applying copyright protection to your blog

What is Creative-Kit, and how to use it

This article describes Creative Kit, which was a photo-editing tool for enhancing pictures in your Picasa-web and Google+ albums.


A little history: Picasa, Picnik and Creative Kit

In 2002, a company called Lifescape created a program called Picasa, which people could use to manage photos on their PC.

Google purchased this in 2004 and then integrated it with web-storage, linked to a person's Google account, to make Picasa-web-albums: see Understanding Picasa and Picasa-web-albums for more information about how they work together with Blogger.

Picasa has some photo-editing functions (cropping, red-eye removal, sharpening, lightening, making collages, etc).  Useful, far easier to use than Photoshop - but without features that some people wanted. So in 2010, Google integrated a photo-editing tool from Picnik, a small company that was offering a subscription-based photo hosting and editing service.

Picnik's editor did some cooler things than Picasa, (applying visual effects, watermarks, etc).   The tool  had some serious fans, and a quirky culture which saw them show messages like "packing the lunch" "watching the flowers", "chasing butterflys" while Picnik was loading.  The type of messages that are funny the first few times, but quickly get tedious. And people using Picnik via Piscasa-web-albums often found that it was very slow.

In 2012:
  • Picnik announced that they were closing down their separate photo hosting service, and moving the product to Google+.
  • Google's announced that they were were closing Picnik, and using Picnik's engineers to “continue creating photo-editing magic across Google products."   (ref:  closure announcement).

Today, the original Picnik photo-hosting-and-editing service is most definitely closed.

The Picnik photo editor has been either replaced with or re-badged as "Creative Kit", and is available through Google+.  They may have intended to make it available through Picasa-web-albums too - but as I noted in previously, this feature isn't working. Possibly this is about selling additional storage space:   Picasa-web-albums are available to any Google account, while Google+ Photos is only available to named individuals.   So each person can have lots of Google / Picasa accounts (with free storage on each one), but only one account Google+ account.


How to access Creative Kit

To start creative Kit, so you can edit a photo with it:
  • Go to Google+, and log in to your Google account that has Google-Plus enabled.
  • Go to your Photos page (which may be on the left-sidebar, or under the More tab on the left sidebar if your screen is small)
  • Go into an album, and open the photo you want to edit.
  • On the menu at the top of the screen, click the Edit button.


This opens the photo inside a window with photo-editing tools. The screen just looks like another set of options within Google-Plus, but actually you are now inside Creative Kit, and you can use it to edit your photo.


When you are finished editing, choose the Save button from the top-left hand side. This give you an option to apply your changes to the current file, or to save a new copy of the file.
  • If you choose Replace then any places (eg blog-posts) that link to the existing photo will now link to the edited photo.
  • If you choose Save a new copy then your existing file is not changed and a new copy of the file will be made in the same folder as the existing one but with a slightly different name.

If you upload pictures into your blog-posts inside Blogger, then the picture files are stored in Picasa-web-albums LINK. If you have Google+ enabled for your account, then you can access these photos directly through either Picasa-web-albums or through Google+, even if you have not linked your blog and your Google+ profile. So you can use the Creative-kit method of editing these pictures, even if you didn't load them via Google+.


What features are available in Creative Kit

At one point Picnik used a "fremium" approach: Basic features were free for everyone to use for free, while people needed to sign up and pay a subscription to use the Premium ones. This has changed, though,and now features are are all free.

At the time of writing, the features include:

Basics

  • Black and White
  • Bocal B&W
  • Boost
  • Soften

Camera

  • Lomo-ish
  • Holga-ish
  • HRD-ish
  • CinemaScope
  • Orton-ish
  • 1960s

Colours

  • Tint
  • Vibrance
  • Duo-Tone
  • Heat Map 2.0
  • Cross-Process

Touchup

  • Blemish Fix
  • Shine-be-Gone
  • Airbrush
  • Sunless Tan

Google Plus Exclusives

  • Daguerreotype
  • Reala 400
  • Green Fade
  • Magenta Fade
  • Polaroid* Plus
  • Sun Aged


Troubleshooting / Where to get help

Creative Kit uses Adobe Flash Player. If Creative Kit doesn't work inside Google+, try installing a newer version of Flash Player.

If that doesn't help, try:
  • Clearing your cache
  • Clearing Flash shared objects
    These are data files are created by the Creative Kit on your computer, like cookies.  To clear them, go to Abobe's Flash Player help web site.
    The Settings Manager that you see is not just an image; it's the actual Flash Player Settings Manager. Scroll through the list of sites and select www.picnik.com and www.gstatic.com.

    Click the Delete Website button for each, and confirm the deletion.

    Open the Global Storage Settings Panel. Check both of the following boxes:
    - Allow third-party Flash content to store data on your computer.
    - Store common Flash components to reduce download times.

    Once you've cleared your local shared objects, clear your browser cache again.
  • Using a different browser, eg Chrome or Firefox.
  • Disabling ad-blocker or flash-blocking extensions

For more assistance, there is a Creative Kit help-centre in Google:
https://plus.google.com/100432630524345907101#100432630524345907101/posts


Is Creative Kit just Picnik with a new name?

Most probably: the controls and features are very similar, and the press-releases seem to tie up. There is one screen that names both while the photo-editor is loading in Google+>Pictures.

But on the other hand there's no official confirmation either, and there are some product differences. It's possible that Google's engineers were simply inspired by the former Picnik colleagues to create similar controls, and that the underlying photo-editing tool is different. Who knows.

What we do know is that many of the much-loved Picnik features are available in Creative-Kit, provided you're willing to load your photos to a Google+ account.


TL;DR

You can edit a photo in Creative Kit by uploading it to your Google+ account, then choosing the Edit button when you are viewing it.

This may be the same Picnik photo editor that was available in Picasa-web-albums until 2012. Or it may not. Either way it lets you crop, re-colour, apply lots of filters etc for free.

Don't want to put your photos into Google+? Bad luck, there's no other way to use Creative Kit / Picnik on them at the moment. Find another on-line editor instead.


Update

In mid 2013, Google Plus replaced CreateKit with a new photo editor (which only works on computers running the Chrome web-browser).    Therefore it is no longer possible to use Creative Kit. 

Picasa-web-albums still has  a link to Creative Kit.   But this does not work, and PWA now has other options for editing pictures that have been uploaded to it via Blogger or otherwise.


Related Articles

Creative-kit works with pictures accessed through Google+, but not Picasa-web-albums

Adding a picture to a blog post

Introducing Picasa vs Picasa-web-albums

How to show pictures from Google Plus in any website

This article shows how you can make a slideshow of all the photos from an album in your own Google Plus Photo collection, which can be shown on a website or blog.


Sharing a photo album from Google+ Photos

Google's help-pages note that you can share a Google Photos album using a link - and is a good option for showing your photos to people who are outside of Google+.

But what are the options if you want to show a Google Photos album, not just an individual picture, in your blog or website?
  • Put the link in your website. But that just gives bland, boring text, like click here to see my photos.
  • Put one picture in your website, labelled "click this photo to see the rest", and link it to your Google Photos album. But that just shows one photo - and it takes people away from your website when they go to view your photos.
  • Load each photo from the album individually to your website. That's fine for 2-3 or even 10 photos. But what if you've got dozens or even hundreds - it could take hours!

A better option is to use an embedded slideshow.

To do this, you need to get a small piece of HTML code from Google, and put it into your site. Then when someone looks at your site, the code runs and they the see a slideshow made of the photos your album at the current time.   This means that the pictures on the other website are automatically updated when you change the album in Google Photos (eg when you add, change or remove pictures).

Unfortunately there is no tool to make this type of slideshow code in Google Plus Photos at the moment.

But there is was a very simple work-around which gives you get the code that you need, using existing Google tools.

Using Picasa-web-albums to get the slideshow code

If you have loaded pictures into Google Photos, then you can manage them using either Picasa-web-albums (ref: What is Picasa vs PWA?) or Google Photos.

So, to get the embeddable slideshow display code for a photo album:
  • Navigate to the album that you want to make a slideshow for.
    NB  you need to be viewing the album, not the page of all albums, to get the correct code.
  • Make sure that the security for this album is set to at least "anyone with the link".
  • Choose Link to this Slideshow and then Embed album from the right side bar
  • Copy the HTML code that is provided

What your readers see

Readers using a regular web-browser with Flash enabled should see a slideshow of your pictures.

Readers whose device (eg cellphone, tablet) isn't able to show Flash graphics will most likely just see a black square instead of the album - possibly with a message telling them why this is happening.


Related Articles

What are Picsasa and Picasa-web-albums

How to put 3rd party HTML or Javascript into your blog

Understanding Google accounts

Putting a Picasa-web-albums slideshow into a blog post or website

How to use Picasa-web-albums, without being re-directed to Google+ Photos

This article is about how to you can start Picasa-web-albums in way that stops you being immediately re-directed to Google+ Photos.

Update - August 2016

The article below was written in 2013, and has remained correct until very recently.   But changes which Google started rolling out from 1 August 2016 mean that it is now obsolete.    See the article Picasa-web redirects, August 2016 update for more information.

The following article is kept here for historic purposes only.


What happens when you start Picasa-web-albums?

If you have a Google+ account, either because you only signed up for Google recently, or you had a Blogger account first and then linked your blog to Google+, then you will know that if you go to Picasa-web-albums), you are immediately re-directed to Google+ photos.
When this happens, at the top of the screen, for a few seconds, there is a message saying:
 "Click here to go back to Picasa Web Albums."

But if you do something in Google+ photos, this top banner message disappears, and the only way to get it back again is to close and re-open Picasa-web.   This is tedious - it's a waste of time opening one website just so you can re-direct back to another one.


How to skip the re-direction message

To use Picasa-web-albums, without being sent to Google+ photos, you just need to start it using this link:    https://picasaweb.google.com/lh/myphotos?noredirect=1

I'm going to put it into the sidebar of my blog very soon, so I have easy access to it.


Is there a problem with using Picasa-web instead of Google+ Photos?

You might wonder if there is a problem with using the old Picasa-web-albums instead of Google+ Photos.

In short, the answer (for now anyway) is no, there is no problem - and I don't expect there to be one anytime soon.

Why?

You still only keep one set of photos in your Google account.   It just happens that Google now have two pieces of software that can access these photos.   One is Google+ Photos, and the other is Picasa-web-albums.    And they both work on the same underlying pictures and photo-albums.   So it won't cause you to run out of space, or to have duplicate copies of your photos.

And Google still need to maintain Picasa-web-albums because there are a substantial number of Blogger users who choose to be anonymous:   Google+ photos simply will not work for them, because it absolutely depends on having the photos associated with an individual, named persons profile.   (And I'm pretty sure that there are no easy ways to transfer ownership of photos from one Google+ profile to another, either, in the event that you want to transfer ownership of your blog.)

Of course we don't know if this will last forever - but my best guess is that you can safely keep using Picasa-web-albums for a good while yet.


Related Articles

Transferring your blog to another Google account's ownership

What is Picasa vs Picasa-web-albums - a basic introduction

Creative-Kit photo editor works from Google+, if not from Picasa-web-albums

Options for showing photos in Blogger

Creative Kit photo editor works in Google+, if not in Picasa

This Quick-Tip is about using the Creative Kit, which has been giving me grief recently when I tried to use it from Picasa-web-albums.


Sept 2013 update:   Creative Kit has now been totally discontinued.   Use either Picasa-web-albums or the Google+ photo editor instead.


For ages, I've occasionally used the photo-editor in Picasa-web-albums (the online version of Picasa) to edit photos that I've already uploaded, and want to change without changing the URL.   This editor was originally Picnik - until Google sold that product and replaced it with Creative Kit a while ago.

This has sometimes been slow, which was annoying, but I put up with it because it was just so useful.

But recently it stopped working totally:  it would load, the progress-bar would get about half-way along the screen, and then hang, with a message:
We noticed Picnik is loading slowly. It’s possible waiting
may solve this issue. If you’re still having trouble:
[t1]   Click for Assistance»

Waiting never solved the problem for me (trust me, I tried), so eventually I tried the help-link, which went to this Picnik help page.

After following lots of the instructions, I finally found this helpful line in the Adope Flash Player re-installation instructions:
If you are using the Google Chrome browser, Adobe® Flash® Player is built-in but has been disabled. To enable Flash Player, follow the steps in this TechNote

Which sounded hopeful - it's only recently that I've switched to use Chrome all the time, so maybe this was the problem.   But it didn't help - despite what they said, Flash was enabled in my setup.

Eventually, it occurred to me that since I have a Google Plus profile, my albums are now accessible via the Plus interface too.   So I went there, chose Photos, found the album, opened a photo, chose creative kit ... held my breath for a few seconds ... and the editor opened up and worked nicely.

I'd still like to get this working from Picasa, because it just looks so much nicer from the small screen that I use a lot of the time.   Suggestions are very welcome!


PS   Thanks to Hardeep of Widget Craft who used the picture that I'd made as the thumbnail picture for How to Edit Your Blogger Template in one of his articles, and thus inspired me to start putting my own name onto the image files I make.