Showing posts with label Article. Show all posts

How to set the URL for Blogger posts

This article shows how to use the Permalink options to control the URL used for a post in your blog.

URLs and Blog Posts

When you first publish a post in blogger, an URL (called a permalink in blogger) is automatically generated for that post. It looks like:

www.yourDomain/yyyy/mm/WORDS-ABOUT-MY-POST

In this URL:

  • yourDomain is either your custom domain (eg fred-fish.com) or your blogspot domain if you aren't using a custom domain at the time (eg www.areyoublogger.blogspot.com)
  • yyyy/mm is the year and month of the post's original publication date.

Years ago, Blogger chose the WORDS-ABOUT-YOUR-MY based on the title, or the first words in the post if the title was blank. They used some rules eg leaving out "the" and other common words, and putting numbers on the end so that every post has a unique URL (called a "permalink" in Blogger).

However Blogger have now provided a tool that lets you choose the WORDS-ABOUT-YOUR-POST separately from the post-title.


How to change the customisable part of the URL for a post

1  Edit the post in the usual way.

2  In the Post Settings area (currently at the right hand side of the editor), there is a section called Permalink.

3   Click on Links to show the options in it.

4   Click the custom URL radio button

5   Type the words that you want to use in WORDS-ABOUT-YOUR-POST into the Custom URL box

6   Click Done.

7   Finish the post, and Publish it.

Restrictions

The only characters you can use are:
  • lowercase letters (ie a, b, c ... z)
  • uppercase letters (ie A, B, C ... Z)
  • digits (ie 0, 1, 2 ... 9)
  • underscore (ie _)
  • dash (ie - )
  • full-stop, also known as a period (ie .)
It looks like there is no restriction on the number of characters you can put into the URL.  For example, I was just able to make a post in my test blog, with this URL:  
http://bhat-draftarticlestore.blogspot.ie/2012/07/123456789-123456789-123456789-123456789-123456789-123456789-123456789-123456789-123456789-123456789-123456789-123456789-123456789-123456789-123456789-123456789-123456789-123456789-123456789-123456789-123456789-123456789-123456789-123456789-123456789-123456789-123456789-123456789-123456789-123456789-.html
(you cannot see the post, because that particular blog isn't open for public reading.)


If the combinaton of yyyy-mm from post-date (which you can change - see Setting the Post Date) and WORDS-ABOUT-YOUR-BLOG is not unique, Blogger will leave out the last character(s), and put in numbers to make it unique.

It only applies to Posts, not Pages:  the only way to influence the URL / permalink for a Page on your blog is to choose the initial words in the page-title very carefully.   (Ref:  the difference between Posts and Pages)


Why should you bother? What words should you use?

Firstly, it's only worth changing the custom words in your post-URL  if SEO matters for your blog.

If you think the change is worth it, then you need to think about what specific words
1) accurately reflect the content of your blog, and
2) are likely to be the words that people search for.

Unless you're a spammer, there is no point in making your post url www.myBlog/2012-07/hot-and-sexy-topic if your post doesn't have any content about hot-and-sexy-topic. (And if you are a spammer, you may as well leave Blogger now, before you get kicked off anyway.)

Leave out smaller filler words like "the" "a" "and" - unless they are relevant to the post-contents. For example include "the Who" if your post is about the band called The Who, but leave it out if your post is about the cats who can fly.

Lastly, many SEO experts (self-proclaimed and otherwise) say that dashes are better than dots or underscores. Only Google and Bing know if they'are correct or not. But it's probably a good idea to use xxx-yy-aaaa instead of xxx_yy_aaaa or xxx.yy.aaaa, just in case they are.


Changing the post-title after publication

Google's help-article about the custom-permalink feature says:
"because Blogger automatically creates the URL from information from your post title, your URL would change should you decide to edit the title. This would result in broken links, and fewer visitors to your blog"

This isn't the way Blogger worked before: until now, I often published a post with one title using the words I wanted in the URL, and then very quickly edit it and change the title to the words I wanted in the title. For example, for a recent post
  • the URL is  http://areyoublogger.blogspot.com/2012/07/html-code-for-popular-gadgets-in.html
  • the post-title is now:  Where to get the HTML code for popular gadgets in Blogger

I just tried this again in my test-blog, and found that it's still true: even if you change the title, the post URL doesn't change.


Changing the custom-URL words after publication

Originally, after you hit the Publish button for the first time, there was no way change the permalink:  if you click on the Permalink option in Post Settings, you are shown the custom value that you chose, but you cannot change it.


However you can now:

  • Edit the post.
  • Click the Revert to draft button.
  • Edit the post URL in the same way

and the URL of your post will be changed.  Note that if you do this, the post characteristics (view count, comments) are kept.   This means that Blogger must be associating them with the unchanged internal post-identifier, not the URL.

How to change or remove the Newer Post and Older Posts links

This article explains how to hide or change the format of the "Older Posts" and "Newer Post" and "Home" links that are shown at the bottom of Blogger blogs with Layout or Designer templates.


Why are the older and newer posts links used

Most designer and layout templates have links at the bottom of your page of blog posts which let readers navigate back and forward among the list of posts.

This is basic to how a blog is intended to work:  you post regularly, and give people a way to get back to previous posts.

The pager-links are particularly important on pages that are reached using the Label or Archive gadgets, which may show more posts than you normally have on your home page, or displaying in your blog.

But some people want to remove them - and this is fine provided readers have other ways of navigating around the blog.


How to remove "Newer Posts" and "Older Posts" from your blog

To totally remove these items, you just add some new CSS rules to your template in the usual way.

To remove "Older Posts" add:
#blog-pager-older-link {
float: right;
}

To remove "Newer Posts" add:
#blog-pager-older-link {
float: right;
}

Or to remove both of them and the "Home" link that appears in between them, add:
#blog-pager {
display: none;
}

How to format the "Newer Posts" and "Older Posts"

Changing the way that these links look is very similar, you just add the same codes, except instead of 
display: none;
you need to use the CSS element for the effect you want.   For example, to make the text bigger and bold, you might use rules like
font-size: 150%;
font-weight: bold;

You need to put these commands inside the curly brackets, where the display: none; is now - make sure that each component has a semi-colon at the end of it.   It makes the code easier to read if each component is on a new line, but this isn't necessary.

Another option is to swap the "float" commands around to put "older posts" on the left and "newer posts" on the right (I've never quite understood why they were the other way around).


You can also use background images and colours, with elements like:
background-image:url('URL OF YOUR IMAGE');
background-color:#cccccc;

How to change the "Newer Posts" and "Older Posts" text


If you want to change the text values - either to different words, or by replacing them totally with pictures, you need to accept the disadvantages of editing your template.   If this is ok, and you you want to proceed then:

1  Edit your template in the usual way

2  Replace the existing links:
  • To replace the "newer posts" link, find <data:newerPageTitle/>  in your template, and replace it with whatever text you want.
  • To replace the "older posts" link, find <data:olderPageTitle/>  in your template, and replace it with whatever text you want.  
  • To replace the "home" link, find <data:homeMsg/>  in your template, and replace it with whatever text you want.   


In each case, the code you are replacing will be inside some other code, like this:
  <span id='blog-pager-newer-link'>
      <a class='blog-pager-newer-link' expr:href='data:newerPageUrl' expr:id='data:widget.instanceId + &quot;_blog-pager-newer-link&quot;' expr:title='data:newerPageTitle'><data:newerPageTitle/></a>
      </span>
Make sure that you only replace exactly the code listed above, including the < and >'s.   The other code around sets up the links to the actual older or newer posts, and you don't want to change this.

Also, if you want to use a picture instead, replace it with <img alt='...' border='0' src='THE URL OF YOUR PICTURE'/> - of course with the right picture URL put in.

Do make sure that the meaning of your pictures is obvious though - what may look like a cute "newer posts" symbol to you might be totally meaningless to someone else.


Related Articles

How to add a CSS rule to your template

How to edit your blogger template

Understand the advantages and disadvantages of template editing

Finding the URL of a picture in Picasa-web-albums

Understanding designer and layout templates

How to put pictures into unusual shapes, using PowerPoint

This article explains how to put a picture that is one shape (a "square peg") inside an image of another shape (a "round hole" - or star, elipse, octagon, etc) - using Microsoft PowerPoint.

Original title:   How to put a square peg into a round hole - in pictures


Wooden clothes peg in a customized rectangle with rounded corners.
Recently, I've been using PowerPoint to make the thumbnail image for my posts. This means that I own the copyright of the pictures, so can share them without worrying about copyright issues.

One approach I've used is to find an interesting copyright-free picture that is related to the theme of the post, and then put it inside a shape that adds some visual interest or has some words along side it.  Another thing that I'm going to try is using multiple pictures in this way to make a more-interesting-than-usual collage.


How to put a picture inside a shape

NB PowerPoint commands are based on Office 2007 and 2010 - but the same principles most-likely apply in other versions where the commands may be slightly different.


1   Get your image file, and save it somewhere on your computer.

A wide range of picture-file formats are supported by PowerPoint:  in the 2007 version this includes as shown in this list:

2     In PowerPoint, make a blank side (Home > Layout > Blank)

3     Then add a shape (Insert > Shapes, click on the shape you want)


Intially, the shape with have the fill-colour and border that are the current default values. But you can change this, which is what we are going to do.


4    Right-click on the shape, and choose Format Shape from the pop-up menu


5    In the Fill tab, choose Picture or Texture Fill, then click the File button and navigate to the image file you got in step 1, and click OK.


6   Make sure that the portion of the picture that you want to show is in the picture:  to start with the shape is centered on the middle of the picture.

Change this using the Offsets to move the shape to the left or right over the image.   You can make the offsets positive or negative as shown.

You can monitor the results of different settings in PowerPoints slide thumbnails (on the left hand side, if you have it showing), or by dragging the pop-up menu to a different place in the screen so that you can see the shape itself.


Job Done - at this point, you have an image that is cropped to the shape that you chose - now you just have to put it into your blog.


Using the picture


There are (at least) three ways to get the shape-cropped-picture from PowerPoint into your blog.

I usually copy the item from PowerPoint, and then paste it into a picture editor (Paintbrush etc), manually.   This is an old-fashioned approacb - but it lets me adjust the size and position of the image, and save it (usually a .png) with a file-name that describes the image really well which is good for mating the blog come up in search results (SEO).   The this picture can be inserted into a post just like any other picture.

Another option is to choose File > Save As from Powerpoint, and choose to save the slides in an image format, eg JPEG which can also be inserted into a post in the usual way.  You are likely to be asked whether to put all the slides in one image, or to make one image per slide. Usually, it would be best to make one image per slide - but I don't use this method because the image that is created is the size of the whole slide, rather than just the pictures on it.

A third option is to display the PowerPoint file as a slideshow. This isn't something that I'd do for only one shaped image, but may be relevant in some situations.


Adjusting the size and quality of the picture


One thing that you don't have any control of inside PowerPoint is the zoom level of the inserted picture.

If you make the shape larger, it doesn't show a larger proportion of the picture. Instead, it just shows the existing picture in a larger size, as you can see in the slides shown here.

I suspect that if you want to zoom in to a particular area of the image file, the only approach is to edit the picture in another tool, crop out the bit that you do not want to show, and only keep the part that you want to include inside your shape.

However PowerPoint does have some limited control over the contrast and brightness of the picture, from the Picture tab of the Format Shape window.


Can you do this in other tools?  Why PowerPoint?


Yes, you can.

Photoshop, and similar commercial tools almost certainly have features like this, and I'm certain that GIMP (like a public-domain, less powerful version of Photoshop) and Inkscape (another public-domain image program which is more focussed on scalable-vector-graphics and objects than on pixels) also have these features.

So why use PowerPoint?   In short, its (relatively) cheap and many people have access to it already.   It's also very easy to learn, compared to the other packages, and what you learn is likely to apply to lots of tasks and not just in making pictures for your blog.


Related Articles:


Putting a picture into a blog-post

Post.thumbnail and post.summary - ways of describing blog posts

Showing a PowerPoint slideshow in Blogger

Copyright, blogs and Blogger/Google

How to find the URL for a picture in Google Photos

This article describes how to get the URL or internet address of a picture in Google Photos, and the difference between Google's shareable links and URLs.


Google Photos is a tool that help bloggers (and everyone else) to manage their picture collections. It replaces Google+ Photos, and works alongside Picasa-web-albums.   You can read more about it here.

In Google Photos, there are two different types of web-address for a photo.
  • One is the URL, and this can be used to refer to pictures from Blogger, or from other tools that want a link that just shows the photo, eg Twitter, Google Maps.  This is the traditional style of internet-address for a photo.
  • The other is the shareable link.   This is what Google Photos provides from the Share function.   Shareable links can be used in Facebook, and other places where the photo that is being shared is displayed within a web-display, rather than just as a picture.   (Ref:  How to make and manage shareable links in Google Photos.)

Unfortunately shareable links cannot be used in many applications.  This is because they don't just show the picture.   Instead they load a display showing the picture-date, the name and picture of the person who is logged in to Google at the time, and any other pictures that you have included in the same shareable link.

If you want to use an image from Google Photos in a tool which cannot use shareable links, you need to find it's URL, instead.   At the moment, Google Photos doesn't have a way to get this - but luckily it's easy enough to find.


How to get the URL or web-address of a photo in Google Photos, using your computer

Log in to Google Photos

Navigate to the picture that you want to get the link for.  

Click on the picture, so you see it in full screen mode.


Right click on the body of the photo and choose the "copy link" command from the menu that pops up where you clicked.  

The exact wording of this command varies between browsers on operating system.   For example in Chrome / Windows 8, it is simply "Copy Image URL"


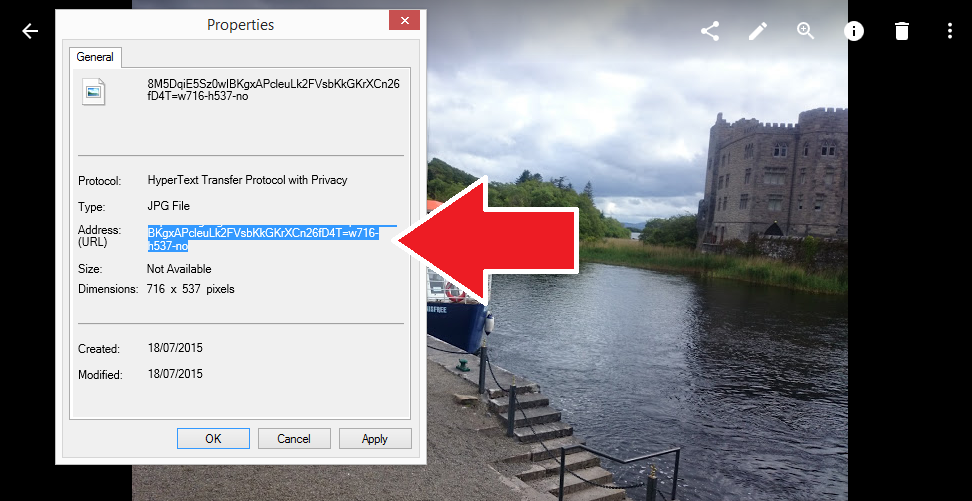
In Internet Explorer 11 / Windows 8, you need to choose Properties from the pop-up menu, and then copy the value from the URL-field in the window that opens


Job done! The URL for the photo which you were looking at is now in your computer's memory, and you can paste it (with ctrl/v or Edit > Paste) into any other place that wants it - for example Blogger's photo-insert wizard, or an email message or discussion forum or chat window.


The URL from your address bar doesn't work

You may be tempted to just copy and paste the URL from the address-bar in your browser. And this will work for you.

But if someone else (or you, when you are not logged in to the same Google account) tries to use it, they will get either:
  • A 404 error (if you are logged in to a different Google account), or
  • Invited to log in to your Google account - followed by a 404 error if the Google account you log in to is not the one that owns the picture.


How to get the URL or web-address of a photo in Google Photos, using your phone (Android or iOS)

Unfortunately I have not managed to find a way to get photogrpah URL (rather than the shareable link) from my smartphone as yet.

If you can suggest any ways to do this, please leave a comment below.


Where to find more information

Introducing Google Photos:  how does it compare to Google Plus Photos and Picasa-web-albums

How to change the date of a picture in Google Photos

How to get the shareable link for one or more pictures in Google Photos

Putting pictures and text side-by-side in blog-posts

How to share pictures from Google Photos, using shareable-links

This article describes how to get a link to one ore more photos from your Google Photos collection, using the Shareable Link controls.   It also explains how to delete shareable links that you have made in the past


Google Photos is a tool for managing picture collections. It replaces Google+ Photos, and works alongside Picasa-web-albums.   You can read more about it here.

Shareable Links are a new type of linking introduced in Google Photos, which let you easily share one or more pictures at the same time.   You can email them, or use them in tools like Facebook.

When someone opens a shareable link, they see a display with the date, the name and picture of the person who is logged in to Google at the time, and all the pictures that are included in the same shareable link.

If you want to use an image from Google Photos in a tool which cannot use shareable links, you need to find the URL for the photo, instead.


How to get the shareable link for one photo in Google Photos


Log in to Google Photos

Navigate to the picture that you want to get the link for.  

Click on the picture, so you see it in full screen mode.

Hover your mouse towards the top-right of the screen, and you will see some control show up: these are quite small, and are white (so may be harder to see against some backgrounds).

One of the controls is the Share icon:  it looks like a side-ways triangle with one bar missing.     Click it.


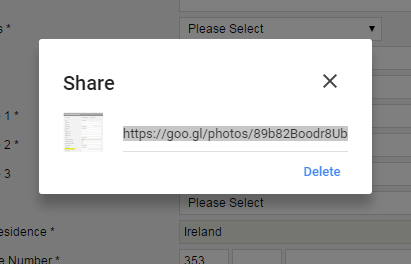
In the Share pop-up that opens, click "Get shareable link"


Wait while Photos generates a link.

When it is finished, copy the link text.  
(Ctrl/c on the keyboard is the easiest way to do this, since the text is automatically selected).


Job done! The display address for the photo which you were looking at is in your computer's memory, and you can paste it (with ctrl/v or Edit > Paste) into any other place that wants it (eg Facebook, in an email message, or something that will accept an address which displays the photo inside a "wrapper" of some sort.  s photo-insert wizard, or an email message or discussion forum or chat window).


How to get the shareable link for more than one picture


You can share several (or lots) of photos with someone by just giving them one web-address, which opens up a screen with all the photos.

 To do this:

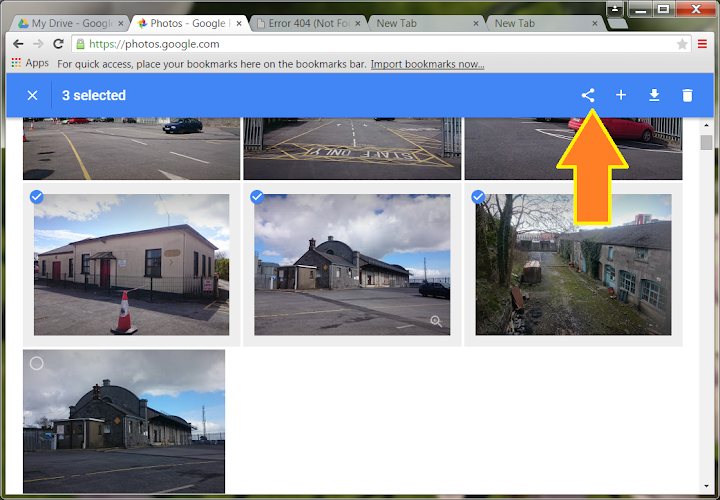
Click the small selection icon (tick) at the top left hand side of each picture that you want to include.
(Once a photo is selected, the icon shows as blue, and there is a border around the picture).


Hover your mouse towards the top-right of the screen, and you will see some control show up: these are quite small, and are white (so may be harder to see against some backgrounds).


Click the Share control icon:  it is the one that the arrow is pointing to in the picture just above this.

Continue in the same way as for getting a shareable link to an individual photo (ie the section above)


What does the Delete link do

You may have noticed that there is a delete function on the Shareable link screen.


If you click it, then you are given the chance to delete any existing links to the currently selected group of photos.


This doesn't seem to make any sense at the time when you are first making the link.

But it also works later on:  if you have the same photos selected and choose to get the shareable link again, you will get the same link - and you may delete it instead.

This does not delete the photos themselves, just the previous link to the currently-selected group of photos.   If anyone (or anything, eg Facebook) tries to use that link again, they will get an error message instead.

Another way to delete links is from the left-side menu in Photos:  Choosing  More > Shared links shows you al list of all shareable links you have ever made, and then for each one you can either copy the link or delete it.


Where to find more information

Introduction to Google Photos

How to put a picture into a post in Blogger

How to tell Google about problems with activity on your AdSense account

This article describes a way to tell Google about problems with activity on your AdSense account.


I noticed a link to an Invalid Clicks Contact form in a recent blog-post from Google.

You can find the form here.

Basically, this is a way to tell Google if you think that something has gone wrong with your AdSense account, for example if you are being click-bombed or similarly targeted by malicious people or activity.

This caught my attention because exactly that happened recently here on Blogger-hints-and-tops: from reading the AdSense help forums, it seems that bots (or something) were attacking Link Units, and suddenly lots of people were getting huge increases in both click-through rates and revenue-per-click. At the time, I followed the advice given there:

But it still felt wrong not to take a more active step to tell Google about the specific problem with my account..


What does the form do

The Invalid Clicks report form has fields that let you give
  • Your name, email address and AdSense publisher ID
  • The URL where ad code appears
  • Topic (select one of: reporting unusual activity, or predicting a significant change in account activity)
  • A paragraph describing what led you to believe that the click activity was invalid
"Data from your site, mobile app and/or YouTube channel traffic logs or reports that indicate suspicious IP addresses, referrers or requests which could explain invalid activity." 
 Note that you only have 1000 characters for the description - but I'm sure that links to documents in your Google Drive (set to be avaialble to anyone with the link, of course) would be very acceptable.

They do say "Please note that we may not respond to your message unless we find a significant issue with your account." - and I would not be in the least surprised to not hear anything back.


Mention expected traffic increases, too

Sometimes, you may know that your blog is likely to get a a large traffic increase. For example, you may publish a controversial post, or release a resource which is extensively publicised via social media or your email list.

You can also use this form to tell Google AdSense about this, and that you expect a sudden increase in page impressions and revenue.

There are no guarantees, of course, but this may help them to distinguish between genuine and invalid sudden changesincreases, in cases where these are manually reviewed.


When not to use the form

Google know that even the most careful publisher will occasionally click on an ad themselves, especially on sites which are about personal hobbies or interests.

My guess is that we should not waste time reporting these invidiual clicks. They are very easy for Google to identify and disqualify - and doing to would make it a lot harder form them to identify real problems vs noise from issues reported via the form.


Where to get more information

How to approve a site to show AdSense ads from your account

AdSense help forum

Stop your AdSense from showing types of ads that aren't allowed on Blogger