Showing posts with label Quick-tips. Show all posts

RSS feed reader options - the saga continues

When Google Reader was retired, I posted about my search for a replacement.

Eventually I settled on TheOldReader.   This had a few headaches - too many other people made the same choice, so they had performance problems.  Then they were going to shut down.   They they got help and weren't shutting any more.   Now they've siaid that only the first 100 subscriptions are free, and that people need to pay to have more than this.   The design still looks a bit clunky.

I may yet end up paying them $30/year - it's not unreasonable for the service.   But OTOH, I don't see paying a small amount for any service as a guarantee that it will actually survive.

But in the meantime, I'm hunting for options again.    Here's some info about what I've tried.


InoReader

The first tool that has caught my eye is InoReader.   It is
... a Cloud based RSS Reader aimed to fully replace Google Reader and even provide additional tools and functionalities for power users.
Initially it came to life as a proof of concept project, but the author quickly realized that such system cannot be managed and handled by single person for a long time, so the development and support was handled to a company ...

You can register separately, or log in using Facebook or Google accounts. It will import subscription files from the reader part of Google's Takeout file, or other OPML format files.

Google use Google-Sites, so we should too!

This QuickTip explains why I now feel happier about using elements from Google Sites in my blogs.


What is Google Sites, and why would a Blogger use it

Long ago (back in the late 2000's) there was a product called Google Pages, which people could use to make their own simple websites. It wasn't the greatest product that Google ever made (or purchased), and eventually it was retired, with websites made with Pages transferred over to the newer Google Sites.

Sites always seemed a bit clunky. It doesn't seem to have a huge number of users.   And there are vastly better products for building more-complex websites, and for building simple ones (eg using Blogger to make a "real" website).

Now, I did use a Sites filing cabinet as the document-store for one of my sites that makes lyrics of certain public domain songs available in PowerPoint format. I chose it before Google Drive had been released, and when Docs was not nearly as good as it is now. And SEO does matter for this blog, so I came to appreciate that the link to a file in sites includes the file-name.

But I've always had a nagging sense that one day Sites would be retired too, and I'd have to move my files and edit all my posts to re-set the links.


Why won't Google retire Google Sites

Despite my previous misgivings, I'm now feeling a lot more relaxed about Google Sites.  

Why?   Well I don't have a crystal ball.   But this recent post from the Google Testing blog talks about how they are into "dogfooding" and that Sites is one of the tools they do this with, to " host team pages, engineering docs and more"

Just to explain, "dogfooding" is corporate-jargon for using your own products. As in "eating your own dogfood".  It's sometimes called "drinking your own chapmpagne" in companies that see themselves as a bit more refined, or "eating your own cooking".

Google's post is telling us that they are using Sites for building tools that they use in their own work. Most likely, they have a website built in Sites, which manages their plans for future Blogger development, and available only to people inside the company and working on the Blogger project.

So that makes me feel reassured that most likely:
  1. Sites won't be canned any time soon, or
  2. If Sites is turned off, Google will have a replacement tool which will provide the same (and better) features, and they will convert items now built in Sites to this better tool.

Phew!

Maybe it's time to review my file-hosting approach again, or to re-visit Sites and look at their FAQs, home-page and support-community, to see what other Sites tools I might find useful.

How have you used Sites in conjunction with your blog?


Related Articles:

File-hosting options: places to store files that you share from your blog

Why SEO doesn't matter for lots of bloggers

New Google+ badges and follow buttons can be used in Blogger

This Quick-tip introduces the new Google+ plugins that Google released in late June 2013


quick-tips logo
Recently, Google+ Developers blog announced a vastly improved set of Google+ plugins for use with websites.

Most (all?) of them are not yet available as Blogger gadgets, so you have to get the code from the Google+ resources site, and add it to your blog like you would add any 3rd party code.

The new options include a more "industry-standard" follow on Google+ button, and new badges for Pages, Communities and Hangouts, as seen here. (I've previously explained why you might like to have a G+ community alongside your blog.)

They are configurable (size, dark/light, style, etc) - but  you need to work out how to apply the configuration settings to the code.   That said, I've added them to this site without any configuration (see the top of the sidebar), and the default options appear to work well. And it's not actually as hard as it looks: in general you just follow the pattern of:

  • Changing   https://plus.google.com/{pageId}     to link to the "thing" (Page, Community, Profile) that you are displaying in the badge.
  • Using the "<div class="g-page" data-href="https://plus.google.com/{pageId}"></div>" form of the code, ie the one that's completely inside a "div" statement.
  • Adding extra information to it using "data-"   for example,   "<div class="g-page" data-href="https://plus.google.com/{pageId}" data-layout="landscape" data-width="200">


There is one interesting sentence in the announcement:
"Existing badges will stick around for up to 90 days, giving you time to configure the new version for your website. After 90 days, we'll automatically upgrade any Google+ badges to the new design."
I wonder how that will relate to the Google + gadgets that are available in Blogger's Add-a-gadget function now - maybe they will be automatically be changed too.   (In 90 days ... yeah, right ...)

Why enabling a mobile template just became more important to some bloggers

This QuickTip explains some recent announcements from Google  about SEO and mobile devices, and what they mean for Blogger users.


quick-tips logo

If SEO matters for your blog, and your blog is relevant for users with moble devices, then you pretty much need to enable a mobile template.

Why?   In short, because this recent post from Webmaster Central says that for Google the ranking of search results on mobile devices is now impacted by how well sites are optimized for mobile devices.

This means that if you haven't set up your blog for mobile, then it won't come up so highly in the search results seen by mobile users.

As well as the template, there are a range of other factors that affect how well your site works for mobile. Blogger users cannot control a lot of them, though we can think about:

Also, remember that if you make a home-page using a custom re-direct, this will only work in your desktop version. The re-direct isn't applied for mobile viewers, they just see your most recent posts in mobile-friendly tiles.

Tell Google more about the posts in your blog with Webmaster Central's Data Highlighter - now supporting more data types

This QuickTip is about the new types of "things" which the Data Highlighter tool knows about.


quick-tips logo
In December 2012, Google introduced the Data Highlighter (DH) - this is a tool that lets you point to items in your blog posts LINK and use them to teach Google how you write about certain things.

Now they have announced that this tool has been extended to cover schema.org definitions of seven new types of things:
  • Products
  • Local businesses
  • Articles
  • Software applications
  • Movies
  • Restaurants
  • TV episodes

The basic instructions for using the DH tool have not changed: visit Webmaster Tools, select your site, click the "Optimization" link in the left sidebar, and click "Data Highlighter".

Google now advise that "The tagging process takes about 5 minutes for a single page, or about 15 minutes for a pattern of consistently formatted pages."

After you have done some tagging, you can verify Google's understanding of your structured data. If Google has understood your work correctly, and you "publish" it to Google, then, when your site is displayed in search results, Google will use enhanced displays of information "like prices, reviews, and ratings".

It will take time for this to happen: Google needs to re-index your blog-posts before it takes effect.

Note:  schema.org is a markup language that this tool is based on.    However not all item types are covered by the tool at the moment.   So, for example, we can only use the Data Highlighter tool to show Google how articles, products, TV-show episodes etc are represented on our blogs.    It doesn't go into more detail for things like blog-posts which schema.org does have definitions for.

How to access your Google Custom Maps after migrating to the new Google Maps

This QuickTip is about how to access your existing Google Custom Maps, once you have started using the new Google Maps interface being introduced in mid 2013.


quick-tips logo
Google is now offering the opportunity to migrate to new Google maps.  (ref: http://googlesystem.blogspot.com/2013/05/the-new-google-maps-now-available.html)

However one disadvantage is that "My Places", which includes Google Custom Maps, is not part of the new Google Maps interface.

At the moment, you can temporarily switch to the old interface by clicking the "options" icon in the black navigation bar and
  • Selecting "My Places" OR
  • Clicking the "classic maps" link.

Or you can get to them by navigating to https://www.google.com/maps/myplaces

From here you can see and edit your existing Google Custom Maps, but you cannot create new ones. To do that, you need to use Google Maps Engine Lite - which was announced recently.

How to keep your Blogger password safe

This QuickTip introduces a useful post about password management from Google.


quick-tips logo

Giving computer or password-management advice to people who don't have lot of experience with IT has always been challenging: there is a lot of background information that you need to know before it all starts to make sense.

And eaching colleagues to use a mouse back in the 1990s was a lot easier than explaining on-line services and security is in the twenty-teens!  I know that I'm not the only person who struggled to explain the difference between email and gmail to someone who just didn't understand "gmail is one type of software for doing emails" - he just kept asking "so what does fmail do?"

To help with this challenge, Google have released a very carefully written article with advice about managing passwords. My guess is that lots of research went into working out exactly how much someone who uses a few on-line services needs to know, and how to explain it simply.

They key points they cover are:
  1. Use a different password for each important service
  2. Make your password hard to guess
  3. Keep a copy of your password somewhere safe (and yes, it's ok to write it down, provided you write it somewhere safe)
  4. Set a recovery option.

And of course the article has plenty of useful links to show you how to do these things for your Google account.

There are a couple of things that I would like to say a little more about.


How to identify your important on-line services

This is a very personal process, and may vary over time.

Google, of course, think that your Google account is important. But that may not be true for everyone. For most people, the important services are:
  • Ones to do with money (on-line banking, AdSense, AdWords, other affiliate accounts, Amazon and others that you have your credit card listed with)
  • Their primary email account - the one that you set as the password-recovery email for other online services.

After that, it's very individual. For some people, Facebook is important, while other people don't use it at all. Ditto Twitter, LinkedIn, YouTube etc. Job-hunting websites may be very important at certain times in your life, and of no importance at all in-between times.

Personally, I started deciding if passwords were "important" or not years ago: ones that are vital always get a unique passphrase, while lower-priority ones usually get an obvious variation on one password that I use in lots of places.


Keeping your passwords somewhere safe

The issues you need to consider here are probably wider than you think.

Most people plan to deter hackers and other malicious people. Keeping passwords in a paper notebook in your bedside table, not beside your computer, is probably enough to keep things safe from them. (Unless of course you are so famous that hackers might break into your house looking for your password - and if that's the case, you probably don't need to read this post!)

But it might not keep them safe from obsolescence - for example from becoming out-of-date when you change a password or set up a new account on your computer but don't immediately walk upstairs to update your notebook.

And it most certainly won't work if there's a fire in your house: your passwords will be safe, but totally inaccessible too.  And while it's easy to say that if your house burns down you've got more important things to worry about, for people who make their living on-line, losing access to their accounts could make things a lot worse.

Personally, I haven't worked out a good solution for this yet: it seems to me that it's some kind of balance between keeping password in safe on-line services (as much as any electronic "vault" is every really secure), and using a range of off-line options.


What worries you about managing your passwords?

Google Buzz's last-gasp addition to your Google Drive

This QuickTip is about a file that Google Buzz is going to put into your Google Drive, as part of it's final turn-off routine, for all Buzz accounts that haven't yet been deleted.


quick-tips logo

Google Buzz was one of Google's early-and-short-lived social networking attempts, but was used by some bloggers looking to promote their blogs.

It was closed down in October 2011

I haven't seen it published in any of the Google blogs that I follow, but recently I was sent an email saying that the last step in the close-down will happen on or after 17 July 2013, when Google will save a copy of the Buzz posts from any remaining active Buzz accounts to the account-holders Google Drive

There will be two types of file, and the files won't count against your storage limits.   They say:
  1. The first will be private, only accessible to you, and have a snapshot of the Google Buzz public and private posts that you wrote.
  2. The second will have a copy of your Google Buzz public posts. It will be visible to anyone with the link, unless you change it later, and may appear in search results and on your Google Profile (if you've linked to your Buzz posts).   Any existing links to your Google Buzz content will redirect to this file.

Something to be aware of, if you used Buzz to make controversial comments:   Comments that you made on other users' posts will be saved to those users' files. After the file-download described here id done, the other user can change the sharing settings of those files, if they choose to do so. And if they do, and if you have commented on another person's private post, that person could choose to make that post and its comments public.   To remove the chance of that happening, you could delete all your Buzz content well before 17 July 2013

The Buzz-download Google Drive files will only contain comments from users who had enabled Google Buzz.  They won't include any comments that you deleted before Google moved your data to your Google Drive.

AdSense now allow changes to their advertisement code

This QuickTip is about a change to AdSense's policies about modifying their ad code: in short, you are now allowed to change the code in certain way, to achieve certain things.


quick-tips logo
AdSense have announced changes to their "Modifying ad code" policy.

In the past, publishers weren't allowed to change AdSense ads in any way other than what could be done through the AdSense ad-code generator or Blogger's Add-a-gadget / Adsense tools.

Now, however, some changes are allowed, so you can do things like:
  • Responsive design: creating a single webpage that adapts to the device on it’s being viewed on (eg laptop, smartphone or tablet).
  • A/B testing: creating multiple versions of a page and comparing how they are used to see which page is the most effective.
  • Setting custom channels dynamically:
  • Ad tag minification: Enabling your site pages to load faster by reducing the amount of data to be transferred.


In several places, AdSense say that the goals of these changes should be to "maximize ad and user experience" - and most of their Terms and Conditions about what you're not allowed to do still hold, so it's clearly not carte blanche to make any changes you want.

Provided you have enabled a mobile template then responsive / adaptive website design isn't and issue which Blogger users have to worry much about - although there are some things you can and should do.

A/B testing is certainly relevant- and I'll be looking to see how much support their code offers for this.

Right now, I'm not sure how relevant dynamic custom channels and minification are for Bloggers - will be investigating this over the coming weeks.

See AdSense's help-centre article for details and the specific code snippets related to the these types of changes.

Newer AdSense ad-unit sizes are now available inside Blogger

This QuickTip shares a feature that I just noticed inside Blogger's Add-a-gadget > Adsense option.


quick-tips logo

Previously I've mentioned that rather than using the AdSense gadget offered by Blogger's Add-a-Gadget wizard, I usually get ad-code from AdSense and put this code into my blog as an HTML widget.

This gives:
  • Access to a wider range of ad-unit sizes, 
  • Better control over the gadget alignment
  • Ability to re-use  AdSense's colour palettes that I've saved before
  • Access to an "image ads only" option that Blogger doesn't have.


The downside that if I have enabled a mobile template for the blog, then visitors who look at it using a mobile device don't see any ads.   I did find work-around for this, but it had a nasty side effect if I wanted to add another gadget to the template - and that's a story for a different post.

Tonight I happened to look at the options in the Add-a-gadget > AdSense  option again, and was delighted to notice that the newer ad-sizes (eg 300x600 wide skyscraper) are now available there.    I have no idea how long they've been there - but I haven't seen it mentioned on any of the other blogs I read, so thought it was worth a mention here.


Adsense ad-unit size options now available in Blogger's AdSense gadget - include the wide skyscraper and the 300x15 mobile banner


This doesn't solve all my issues, but did mean that I could use a standard AdSense gadget on a blog where I was particularly keen to have one that filled the whole width of the sidebar.

Like they say in Tesco - every little helps!


Update:   shortly after I wrote this post, AdSense announced a new ad-size (970 x 90 pixels) - and unfortunately it's not included in Blogger's AdSense widget.  

How to tick the "expand widgets" checkbox in Blogger's new template editor

This QuickTip is about finding the "expand widgets" option in Blogger's template editor.


Today, Blogger Buzz announced a new version of the template editor.

This is exciting in all sorts of ways, including that it implies that Blogger will continue to support template editing:   some people suspected that Dynamic Templates, which don't allow template editing, might be the way of the future.

But there's one immediate issue: many of the existing "How to do XXXX in Blogger" tutorials include statements like
Open your template for editing, and tick the "Expand widgets" checkbox

or

Open your template for editing, and make sure that "Expand widgets" isn't ticked


However today's changes have deleted the Expand Widgets checkbox.

So - what do you do if you need to expand the widgets?   Luckily, this is one of the things that has been made easier, once you find out where the option has moved to.


How to see expanded code for a gadget / widget


The equivalent of ticking the "expand" check-box is to:


1)    Find the gadgetID in the usual way.


2)   Open the template for editing, and find the reference to the widget / gadgetID in the code
(Either using the browser's find feature - or  the "Jump to Widget" feature that is now in the post editor.)


3)    Click on the fold marker for that gadget.
This is the horizontal arrow ( ? ) which is in the very left side of the editing window on the same line as the gadget name.

Clicking it turns the sideways arrow into a down-arrow, and shows you the code that's included in that gadget - or at least as much of it as Blogger is going to let you see.


To un-tick the expand check-widgets checkbox, just make sure that all the fold-arrows are horizontal. (they work as toggles - clicking them changes them from one expanded to contracted, or vice versa).


What else has changed?

I'll be updating Blogger-HAT's main "How to edit your Blogger template" article soon - this is just a quick heads-up to start with.

If you've found any more features of the new template editor that you like (or don't) or which need more explanation then drop a comment below and I'll see what I can do.

Introducing Google's tools for measuring how fast your blog loads

This quick-tip describes some tools that I've recently discovered that measure page-load speed and make suggestions about how to improve it.


quick-tips logo
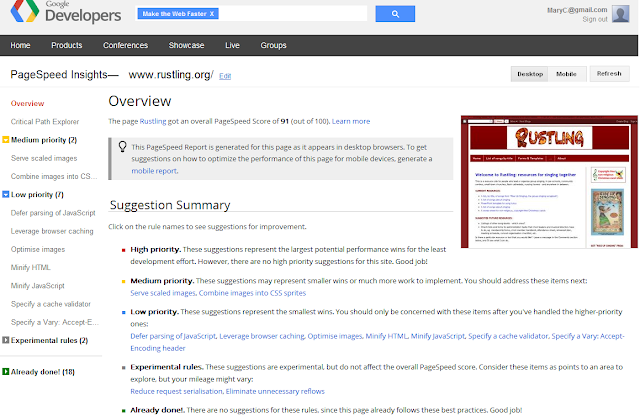
Google have said a number of times that page-load-speed (ie how quickly a visitor to your blog sees it load onto the screen) is one of the factors in SEO.

And even if SEO isn't important to your blog in terms of getting visitors, page-load speed is important for making your visitors happy: even your mother isn't going to be happy if your blog takes five minutes to show her the pictures of your new baby.

So Google's tools for measuring and improving page-load speed are valuable tools for most bloggers.


Where to find them:

The tools are available at https://developers.google.com/speed/pagespeed/

The most important one for Bloggers is in the Analyze section, called Insights, found under the "Analyze your site online" link.

There are other tools there, too (eg an API, the Page-speed service, extensions for certain browsers), but they are well outside what Bloggers need to know.


How to use the Pagespeed tool

To find out what Google thinks of your blog's page-load speed, simply type your web-address into the box in the middle of the Pagespeed  Insights screen, and click the Analyse button.


In a few moments, the screen refreshes with the results.

At the top of the results, there is your site's score out of 100.

Then there is a list of suggestions, broken down by priority (high, medlium, low) based on their "potential performance wins" (how much difference they make) and amount of "development effort" ie how hard they are to do).


Not all of these suggestions are relevant for Blogger users, because we don't have total control over how our posts are converted into website pages. However ones that are relevant include:
  • Optimize images
  • Serve scaled images,
  • Putting CSS into the document head  (in our case, putting it into the template rather than into individual posts)


If you go into the details of the particular suggestions (using the entries in the left hand sidebar), you can see how much impact they will have, and get information about what  you need to change to implement the suggestion.


Why bother

Given that so many of the suggestions aren't relevant for Blogger why use the tool at all?

One reason is that it gives you a way of looking at the effect of gadgets that you add to your blog:  looking at the page load score before and after adding the gadget shows if it makes much difference to your load time.   Based on this, you may decide to only show certain gadgets on a particular page.

Accessing Pinterest Analytics, and verifying your website with Pinterest

This Quick-tip is about how you can verify the website (or blog) associated with your Pinterest account - and solving a small problem with the meta-tag that Pinterest give you.


quick-tips logo
Pinterest have recently announced Pinterest Web Analytics, which will show you "how many people have pinned content from your site, what content is most popular with pinners, and more."   (From their announcement email.

To register to Pinterest Web Analytics, you need to
  1. Get early access to Pinterest’s new look.
  2. Verify your website, using the tools listed here.

After your website is verified, there will be an Analytics option on the top-right menu whenever you are using Pinterest.


Verifying your blog with Pinterest:

There is one slight twitch to the verification process:  As I've explained previously, Bloggers don't have access to load files to their site's root directory.   Instead we need to use the meta-tag option, currently on the bottom left of the box which opens when you choose "Verify your website" from Pinterest's settings.

The meta-tag that Pinterest gives you looks like this
<meta name="p:domain_verify" content="a-weird-collection-of-letters-and-numbers" >
Add it to your blog's template the same way you would add any other meta-tag.

If you see a message like this when you try to Preview or Save the change:
Your template could not be parsed as it is not well-formed. Please make sure that all XML elements are closed properly. <br/> XML error message: The element type "meta" must be terminated by the matching end-tag "</meta>".
Error 500
then it means is that the meta tag that Pinterest gave you has not been closed properly.   To fix it, you just need to add a "close tag" command  ( </meta> ), so that the code looks like:
<meta name="p:domain_verify" content="a-weird-collection-of-letters-and-numbers" >
</meta>

After the tag is added and you have saved your template, click the Complete Verification button in the Pinterest window, to tell Pinterest to look at your website and make the connection.

New resources and help-options for Google AdSense publishers

This Quick-tip is about some new help resources and options that Google has recently introduced for AdSense publishers - including ones who use AdSense through Blogger.


quick-tips logo
If you put AdSense ads into your blog or website, you are known as a "publisher", because you "publish" materials where advertisements, placed by people known as advertisers, can be placed.

Recently Google announced a simplified, personalized contact options page for AdSense publishers, backed by an an email-based "help" service.

This is a single source for many commonly used AdSense troubleshooting tools and articles, which often help you to resolve problems very quickly.

Some troubleshooters lead to "issue-specific contact forms that generate emails to our team". These are backed by automated tools, that help to fix problems very quickly.

Google say that "The new contact options page, troubleshooters, and specialized contact forms are available to all publishers with an approved AdSense account".

Also, publishers who usually earn $US25 or more a week are now eligible for consultations via email, to help with

  • Managing your AdSense account
  • Discussing strategies to grow more business.


Account-holders who qualify see an alert about this on the contact options page. Google target a 2-day response time, although they note it may be slower during peak times.

It's not clear whether publishers who were signed up quickly via a publishing partner (like Blogger) will qualify or not.  I cannot test this, because I signed up using the older full-sign-up process - but I'd suspect that they won't.

Easy professional translations for YouTube video captioning

This quick-tip is about an extension to YouTube's captioning service. It's relevant to bloggers who focus strongly on videos as a complement to their blog content.


quick-tips logo
In Septemeber 2012, YouTube introduced a feature that let you or your friend translate the captions of videos (that you own) into additional languages.

Now they've partnered with some professional translation firms so you can get a quote, order, receive and pay for professional translation - all within YouTube / Google.    So you don't have to worry about whether your friend's high-school Spanish is really good enough for your international audience!

The first step to doing this is uploading a transcript file for your video. Something to bear in mind if you do this:  If SEO matters for your blog, then you probably don't want to put the transcript into both YouTube and the blog, because that would create duplicate content.

A simple time-management tool for bloggers

This QuickTip shares a template that I used to help me be productive when I was working as a free-lance blogger (and a other things besides).


quick-tips logo

Blogging can seem overwhelming: there just is so much to learn, to do, to read

And if you don't have a boss, official work-hours or school-pickup-times to structure the day, it can be easy to get to the end of the week and discover that you've done lots of research, but nothing has actually been finished and published..

I had a few months between jobs, and found that it really helped to plan my week, by:

  • setting very small, achievable goals for each of my blogs, 
  • allocating my time in two hour blocks.
  • writing this all down on old-fashioned pen-and-paper on a one-page-at-a-glance sheet that I could hang on the wall, tick of my achievements and keep track of the progress.


A week-planner template


Here's the template that I used to do my planning every Sunday night.  

 It's licensed under Creative Commons, so you are free to copy, adapt and share it.


My tips for being productive:

  • Choose a set time to review your plan each week.   Mine was Sunday night - but any time is fine, so long as it's consistent.
  • If your blog is not your Number One priority, then allocate time, before you set goals. There's no point getting six goals for your blog if you can only spend two hours working on it this week!
  • Make sure that there are some small, totally-achievable-in-one-hour goals, and some that are simply steps toward doing a bigger project.
  • If you need to be flexible, fill it in using a pencil and adapt as the week goes on:  this is a tool to make life better, not a way to overburden yourself.
  • Make sure you allow time for meals, housework, exercise, socialising and relaxation - and even sleeping in sometimes (but not every day).
  • Give yourself some weekends and "annual leave" days: ones when you choose not to schedule all your time, or any of it.


What has worked for you?

Custom-search-engine adds an "overlay" results layout

This quick-tip is about a new overlay results format which Google Custom Search Engines have just introduced - and which looks like it will be their new standard. 


quick-tips logo
Custom Search Engines have announced a new layout - which appears to have become their new standard option.

Search-engine creation is much the same as it was, but at the end you only get one piece of code to install, and it can just go in the place where you want it (no more messing with editing the <header> in your template).

The search results page is shown as an overlay on top of your regular page.  As always with custom-search-engines, there are ads-by-Google at the top of the page, and if you have already become an AdSense publisher you can use your custom-search-engine to share the revenue.

The big question is - will this new layout approach work in Blogger?    If I was writing an article, I'd test it out somewhere else first, and have some advice about the options, likely problems etc.   But since this is only a quick-tip, this post is my research!   Below, you should see a search-engine, which is set up to search inside Blogger-HAT.   Search for something in it, and you will hopefully see how the overlay search results work.    (If not, I'll come back and change this post as soon as I know more about the problem and how to solve it.)

See an example of custom-search-engine overlay results format

Try it out here:


Is this layout better?


If the layout works, my next decision is whether I should switch the overall Blogger-Helper-Search tool over to use it.

 What do you think?   Like the overlay search results approach, or hate it?

A quick way to keep an eye on what is posted to interesting YouTube channels

This quick-tip is about subscribing to a YouTube channel using an RSS feed-reader, like Google Reader


quick-tips logo
Most bloggers know about other blogs and websites in their niche that they want to keep an eye on, to either know what's going on, or as inspiration for their own posts.

Previously I've explained that RSS was invented to make this simpler: you can get a summary of changes on all interesting websites in the one place (called a feed-reader), rather than having to regularly visit each site individually.

Video is increasingly popular: many bloggers are putting videos in their posts or their posts into videos, and some have even abandoned their blogs and are only publishing new content to a YouTube channel.

I've just found that it's very easy to subscribe to a YouTube user or channel in RSS / Google reader, meaning you can see a list of new videos from you reader, without having to go to the channel in YouTube.

Follow these steps:
  • Find the channel or person you want to subscribe to in YouTube
  • Right-click on their name or icon, and copy the URL / web-address / link location (the precise name depends on the browser you are using - you want the place that clicking the link takes you to, not the location of the image-file used to make the link)
  • Go into your feed-reader, and subscribe to that link (in Google Reader, this is done using a red button near top left corner of the screen labelled "subscribe" - just click it, paste in the link and click the Add button).

The link will be something like  
http://www.youtube.com/user/MariahIsTheQueen  or http://www.youtube.com/channel/UCX9_dIohJBxlizx14AozTng
If it has something else after the name (eg   ?feature=watch), then delete that part before you subscribe  you just need a link saying whether it points to a user or channel, and the name of that user channel.


Example of subscribing to a channel about rocket-science in YouTube

Remove sidebar background in the Travel template

This quick-tip is about removing the coloured section that is in the background in Blogger's Travel template.


quick-tips logo
Recently, I've been using the Travel template a lot:  it just seems to line things up more sharply on the page.

Today I noticed that there is an option for setting the Sidebar background colour under the Template Designer > Customize > Advanced tool.  However it doesn't seem to work.

Investigating the template shows that as well as this sidebar background colour (which is correctly set by the option above), the template also specifies a background image (ie not a colour) to use in the sidebars.    This isn't removed when the overall background image for the template is removed, and cannot be controlled from the template designer.

But it's simple enough to get rid of it, by following these steps:

1   Edit the template in the usual way.

2   Tick the expand widgets checkbox.

3   Find this code:

background: $(widget.outer.background.color) $(widget.outer.background.gradient) repeat scroll top left;


4   And either replace it with this code, or delete the line entirely.

/*  background: $(widget.outer.background.color) $(widget.outer.background.gradient) repeat scroll top left;  */


The first option just comment its out, meaning you could re-instate it again by removing the /* and  */. But if you are certain that you never want it back, just delete the whole line instead.

Depending on the sidebar layout chosen, there may be one or more places where the background image is.   Make sure that you do all of them that you want the background removed from.

Also, if you later choose a different layout, you make need to remove the background image again even though you haven't actually changed templates.

Teach Google-search about your blog with the Data Validator

This quick-tip is about the Webmaster Tools Tool Data Validator tool - which is an easier way to "teach" Google about the way things are described on your blog or website.


quick-tips logo
Recently, Google announced a new feature in Webmaster Tools called the Data Validator.

This is like a simpler way for website-owners (which is what bloggers really are) to tell Blogger about structured information that they put onto their sites - by point-and-clicking at the information on screen, rather than by learning the intricacies of Rich Snippets and the snippet testing tool.

What they've released so far is just an English-language tool for events - "such as concerts, sporting events, exhibitions, shows, and festivals".

To use it you need to
visit Webmaster Tools, select your site, click the "Optimization" link in the left sidebar, and click "Data Highlighter".

And obviously you need to have verified the blog in Webmaster Tools before you start, and to do the "learning" with the same account.   NB   Some blogs will be automatically verified, but some won't:  if yours isn't, then the best way to do this is to choose Alternate Methods and choose HTML Tag - then add the meta-tag to your blog.

The bottom line is that for this to work, you need to put the information into your blog the same way every time (aka in a "consistent format"). What will be interesting to see is exactly how "consistent" it needs to be - I suspect that the tool will probably get smarter over time.

I haven't had a chance to try it yest,  /But I am using a Blogger to manage the website for a small choir which has a concert in January.   So I think I'll start by structuring the announcement of the last concert in June 2012, and then see how well it applies the learning to the next one.